Партнерка на США и Канаду по недвижимости, выплаты в крипто
- 30% recurring commission
- Выплаты в USDT
- Вывод каждую неделю
- Комиссия до 5 лет за каждого referral
Приветствую всех участников. Давно читаю конференцию, почерпнул много полезного. Вот теперь решил поделиться опытом. Как же лечить гидрики? Во-первых, определяем, когда они стучат.
1. Стук только при пуске на холодную (несколько секунд)- гидрики имеют износ, но за несколько десятков циклов компенсируют зазоры в клапанах. Здесь ничего предпринимать не надо (пока).
2. Если стук почти не слышен при пуске, но появляется в движении после небольшого прогрева (4-5мин), а также на полностью прогретом двигателе ( этакий дятел, постучит, затихнет) вот тогда нужно промыть гидрики физически.
Не стоит заливать Винс в масло (сам извёл 2 банки), он не поможет, в этом я убедился, когда сам извлёк и разобрал первый гидрокомпенсатор. Снаружи он был как новенький. Внутренняя же полость представляла собой отстойник для мазута - вся внутренняя поверхность была покрыта густым черным маслом с твёрдыми отложениями. Вот они то и не давали плунжеру свободно перемещаться для компенсации зазора! Теперь пригодился Винс - жидкость для промывки карбюраторов.
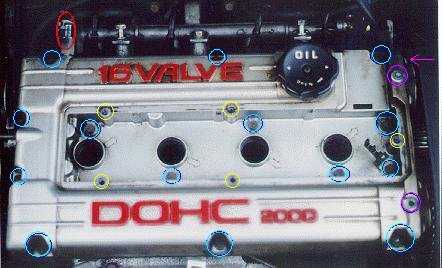
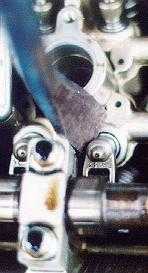
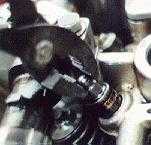
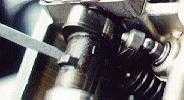
Как извлечь гидрокомпенсаторы из 4G63? Оказалось очень просто! Распределительные валы снимать не надо! . Снимаем крышку клапанов (элементарно), намечаем первую жертву, вращаем двигатель за коленвал (головка на 19 в районе лев. переднего колеса пока кулачёк распр. вала над намеченным клапаном не установится в верхнее положение. Клапан полностью закроется, рокер (деталька в виде коромысла) будет готов к демонтажу. Далее, используя ближний распредвал как опору, отжать подходящим инструментом (я использовал нижн. часть п-образной ручки газового ключа) клапан вниз до освобождения рокера. Рокер вынуть, клапан отпустить. В головке увидите хвостик гидкика, за который извлекаем его для препарирования. Для разборки гидрика нужно снять стопор, который чем-то напоминает пробку на бутылке пива. Если бутылку открыть очень аккуратно, та же пробка уже не сядет как новая. Это к счастью и не требуется. Далее вынимаем шток из корпуса ( просто) и плунжер в сборе с обратным клапаном. Если грязи внутри очень много, плунжер может заклинить в корпусе. Замачиваем Винсом, вращаем, зацепив болтом подходящего размера. Вынимаем плунжер ( не теряем пружинку), видим кучу грязи. С удовольствием вычищаем. Собираем в обратном порядке, заполнив гидрик наполовину чистым маслом. Рокер поставить на место не просто, но с 3-4 раза встанет. Не заполняйте гидрики маслом под завязку, иначе после сборки все клапана окажутся открытыми и нужно будет ждать сутки и более( у кого какой износ), пока масло, залитое в гидрики с избытком, стравится под давлением клапанной пружины.
Да, и так 16 раз! У меня эта процедура заняла часов 6 в холодном гараже при недостатке инструментов. Одновременно с ремонтом обязательно меняйте масло! Результат превзошёл мытарства. 12000р экономия, двигатель шелестит, расход заметно упал. 3000 км после ремонта, полёт нормальный. Извините за излишне строгий стиль изложения ( местами), но так проще объяснить. Всем Удачи.
Газовый ключ-известный инструмент сантехника. Выбор такого инструмента случаен-оказался под рукой. Можно использовать
монтажку, гвоздодёр итд. Когда откроешь клапанную крышку сам поймёшь, что надо.
Стопор с ГК можно снять небольшой плоской отвёрткой, равномерно, по окружности отгибая завальцованные края стопорной крышки. Опять же как только возмёшь в руки ГК станет все понятно. Обратно одевается равномерным нажатием по всей плоскости крышки (например накидной ключ на 12) до слабого щелчка. Главное не перелить масло в ГК, иначе шток не уйдёт корпус ГК и будет мешать крышке защёлкнуться. К сожалению, фотографий не делал, с холодном гараже не до этого, да и результат был не очевиден.
Прокладку крышки я не менял, только почистил обе поверхности и поставил на место. Затягивал равномерно все болты, не до упора. Динамометрического ключа не было, моменты затяжки не знаю, но по ощущениям поймёшь, как вначале легко поддаётся затяжке резина прокладки, затем уже при среднем усилии (отвёртка с головкой для гайки) сопротивление быстро начинает возростать. Тогда харе. По стыку клапанной крышки нужно протереть насухо, а затем понаблюдать ( км) нет ли потёков. Если есть, то можно ещё подтянуть крышку, но без лишних усилий. Не поможет - меняй прокладку. У меня служит старая. Успехов!
От себя добавлю в алгоритм:
1. Надо проверить местоположение поршня перед демонтажем рокера, иначе может клапан постардать...
2. Газовый ключ мне пригодился только для сжатия промытого гидрика;
3. Не пейте пиво при такой промывке, я один гидрик не правильно собрал, вытащить его назад (поршень с обратным лапаном) оказалось не просто, пришлось прямо в цилиндрике разобрать этот клапан с шариком...
4. Коленвал прокручивал воротком от совдеповского набора, четырёхгранник идеально подходит (внутри болта на 19 дырка есть)...
5. Я незнаю почему масла под завязку лить в цилиндрик гидрика нельзя, ведь когда его собираешь излишки стравляются через дырку в цилиндрике...
6. Прокладку клапанной крышки обезжирил ацетоном и посадил на селиконовый герметик (черный чтоб без палива), поэтому заводить сразу не стал...
Однозначно согласен, что никакие двойные промывки (без разбора гидрика) не помогут избавиться от стука! ![]()
О результате доложу, раньше стучал какой-то из них каждое утро примерно с минуту, потом стук пропадал...
разборке 16 гидриков только 1 не "отпружинил" после снятия стопора (наверное это и был заклиневший дятел), но грязь была почти во всех!
Lifter Cleaning/Replacement VFAQ
Tools needed:
- 10mm socket Crowbar 17mm wrench Large flat-bladed screwdriver Optional, but highly recommended: new valve cover gaskets
(all 6 - valve cover, 4 spark plug hole, and cam bore half-moon plug)
| |
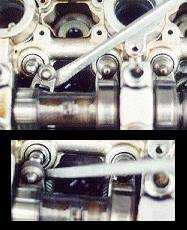
Remove the valve cover
| |
| Remove the rocker arm
|
| Remove the lifter
|
| Reinstall the rocker arm
|
| Seat the lifter
|
Repeat for all lifters
| |
Another cleaning technique...
This is the technique Jeff Brinkerhoff posted to the Talon Digest:
Remove lifters as per the VFAQ.
- NOTE - I had no trouble with the lifters near the cam sprockets as Tom warns about, so I would not worry too much about it. I used a Craftsman 12" flat-blade screwdriver as a pry bar. It has a square cross section shaft, much easier since it did not slip when prying as a round one would. Wipe each lifter off, and clean off with CARB/Brake Parts cleaner. Rotate the inner cylinder until you see the inner hole through the outer hole. (They do not line up perfectly, but close.) Yes, they rotate easily by hand. Put the red straw into the side hole and spray a good amount of cleaner in. Really hose it out. ***warning - carb cleaner will shoot out of the tip of the lifter 5-10 feet!*** Repeat for each, and soak lifters completely submerged in cleaner for at least 30 minutes. Remove from cleaner and turn upside down. Shake hard to remove most of the cleaner. Re-spray to get any gunk out that soaking loosened (this is when I saw actual crud chunks). Shake again and dry off. Rotate inner cylinder so that the inner hole is opposite the outer hole (180 degrees). Reinstall as per the VFAQ. NOTE - I had to 'pop' each rocker back onto it's lifter as Tom shows at the end of the VFAQ. I used another, bigger screwdriver to give each one a push.
Pull the MPI fuse and crank the car for 30 seconds to prime the lifters with oil.
- Replace the MPI fuse and start the car... Ahh sweet silence...
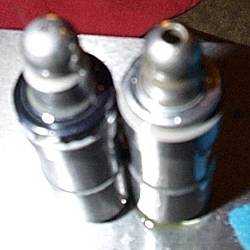
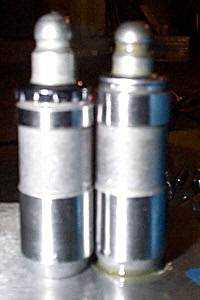
NOTE: | |
| The first version of lifters used on early 1Gs (possibly up to early 2Gs) had extremely small top holes. The second version had a top hole about 3-4 times larger, and a larger groove on the side. First version is on the left, second on the right. Note that the second version was also slightly shorter in total height than the first. The third and latest version (as of 2004) is the same total height as the first version, has a top hole the size of the second version, and a side oil feed hole larger than the first or second version for even more oil flow to the followers. If you want to pick up lifters a lot cheaper than factory costs, the lifters I recently bought are not Mitsu packaged, they're made by TopLine. Apparently Mitsu buys the TopLine lifters and repackages them. I compared them to photos of Mitsu OEM "new" style lifters, and they appear identical. The shop selling them is down in Texas, and they sell a lot of items at wholesale prices. Here's the info: Prime Automotive Wholesale Last time I bought them in late 2003, the price had increased a bit, to about $8-9 each, but still far less than factory cost. |