Партнерка на США и Канаду по недвижимости, выплаты в крипто
- 30% recurring commission
- Выплаты в USDT
- Вывод каждую неделю
- Комиссия до 5 лет за каждого referral
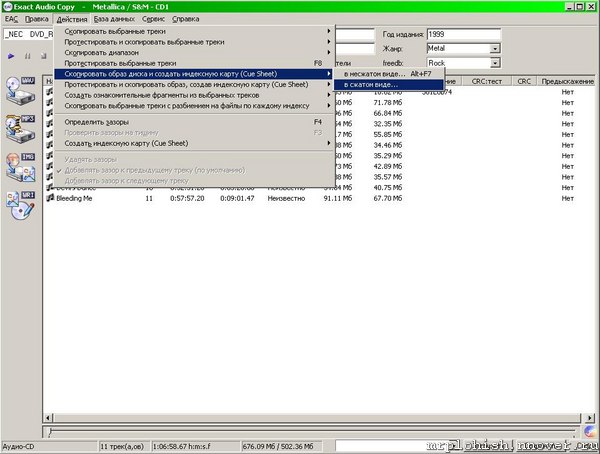
Как сделать точную копию AudioCD
Жмем F9 и начинаем: 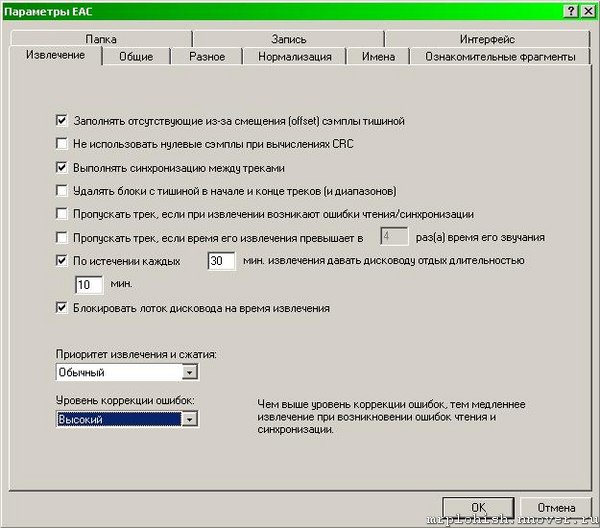
Если вы копируете диски с многочисленными царапинами - охлаждайте драйв каждые 30 минут, если не хотите поплавить диск - лазер же его греет. Хотя они говорят, что каждые 60 минут это надо делать - я думаю 30 минут не повредит тоже. Уровень коррекции ощибок (Error Recovery) - это как раз сколько раз он будет перечитывать ошибки, ставьте (Высокий) High иначе можете Clone CD делать. Обязательно надо делать "Выполнять синхронизацию между треками" (Synchronize between tracks), особенно если вы хотите делать сборник и надрать треков с разных дисков. "Заполнять отсутствующие из-за смещения (offset) сэмплы тишиной" (Fill up missing offset samples with silence) должен быть включен - это не особо влияет, но лучше включить. Про оффсеты я потом напишу. 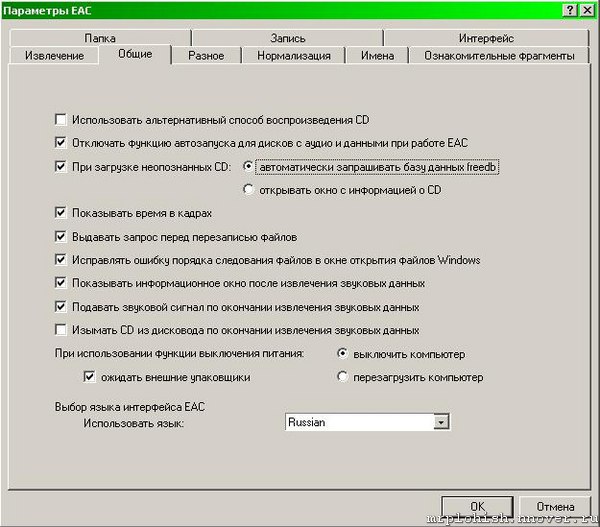
Ничего существенного - это так сказать косметика... 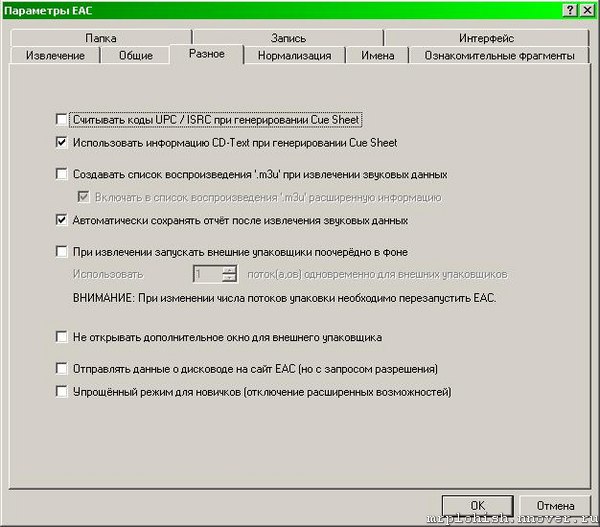
"Считывать коды UPC / ISRC при генерировании Cue Sheet" (Retrieve UPC/ISRC codes in CUE sheet generation) - не надо, не многие СD-RW это поддерживают и на самом деле всего 1% CD имеют этот код - это типа штрихкода на CD.
"Использовать информацию CD-Text при генерировании Cue Sheet" (Use CD-Text information in CUE sheet generation) - надо включать, тогда потом можно будет порубить WAV файл на треки нормально - с именами. Остальное - неважно.
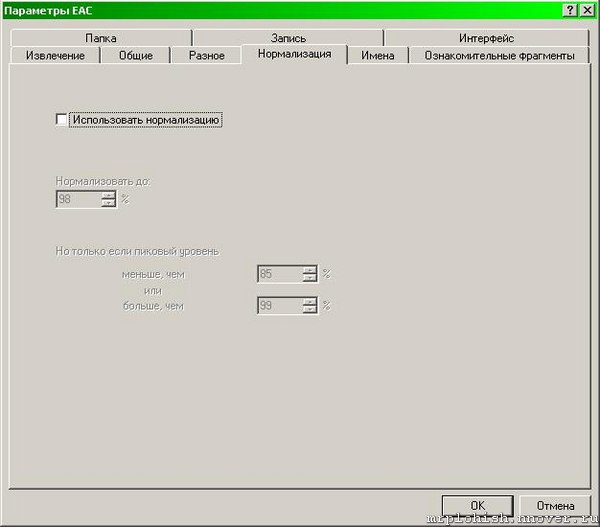
НИКОГДА не трогайте это, это должен делать звукоинженер, он уже это сделал в студии и не надо ему мешать 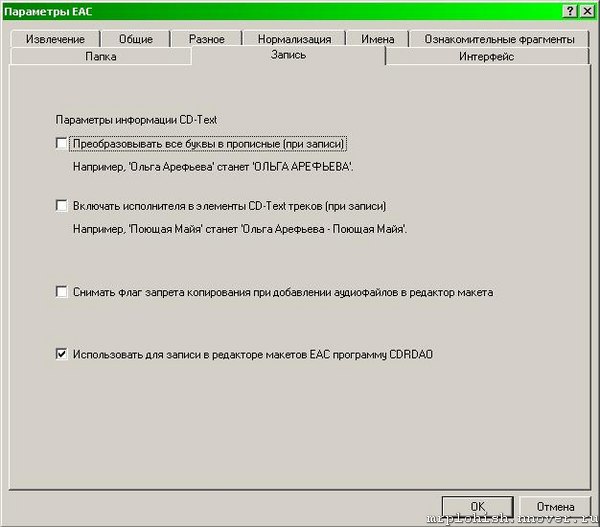
Т. к. мы делаем имиджи - мы ничего не трогаем в табах Имена и Папка, вы можете поставить директрию по умолчанию для ваших имиджей в табе Папка. Можно ничего не трогать в табе Запись - это косметика. 
Рекомендуется использовать ASPI. Если что-то не так, можете попробовать пихнуть (распаковав, разумеется) в корень папки с EAC-ом (или в System32) вот эту вот DLL (в кольце aspi): - на NEC-овских приводах работает - проверено! Прежде чем вы начнете конфигурить дальше - надо выйти из EAC, он сохраняет конфиг в момент выхода. Еще можно сделать Shift-F2 и сохранить результаты труда
ftp://ftp. pinnaclesys. de/driver/pc/InstantCDDVD/ASAPI. exe
F10 - Самая тонкая часть настройки - приготовьтесь пару раз подвесить EAC
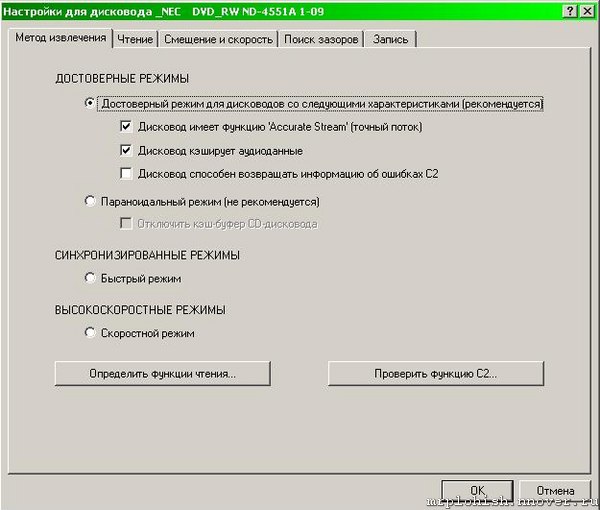
Можно кликнуть на "Определить функции чтения..." (Detect Read Feature) и посмотреть, что из этого выйдет (может и зависнуть). Но в целом, вы должны использовать Достоверный режим (Secure Mode) (!!), никаких Быстрый/Скоростной (Fast/Brust) (это то, что делают всякие Nero). "Дисковод способен возвращать информацию об ошибках C2" (CD-ROM опознает ошибки чтения) вы должны всегда отключить, что бы вам ни говорил "Определить...." (Detect), это фишка хорошая, но в основном бесполезная - если диск без сбоев - он его считает и так достаточно быстро, а если диск проблемный - основное время уйдет не на обнаружение ошибки, а на ее устранение. Кроме этого С2 сделан очень часто криво - я сам на это налетал, не работает он. Если в диске сделана дырка гвоздем типа сотка - тогда работает, а мелкие ошибки все равно (лично у меня) не замечает. Если автодетект говорит, что "Дисковод имеет функцию 'Accurate Stream' (точный поток)" (Drive has 'Accurate Stream' feature) - это радостно, это надо использовать, а если нет - то и фиг с ней На счет "Дисковод кэширует аудиоданные" (Drive caches audio data) - они утверждают, что ЕАС это определяет правильно и если автодетект говорит NO - значит NO. Но я не верю. Я ставлю там галку и это приводит к тому, что ЕАС сбрасывает буфер дисковода принудительно - т. е. всегда читает 2 раза с самого диска, а не из буфера CD-ROM. Медленнее, но зато я спокоен 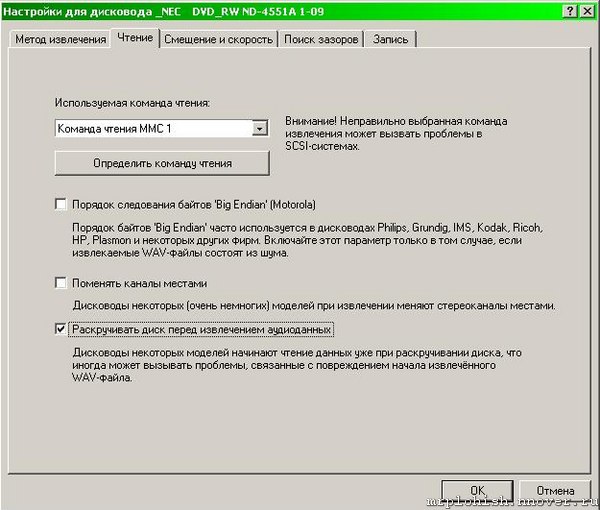
Сделайте "Определить команду чтения" (Autodetect read command) (может подвиснуть опять), включите "Раскручивать диск перед извлечением аудиоданных" Spin Drive и я думаю, что все остальное у вас будет нормально - немногие драйвы меняют каналы и если у вас в результате рипа получается дикий шум - тогда можете попробовать этот "Поменять каналы местами" (Big Endian) - кроме того, что там написано рядом я ничего не знаю. 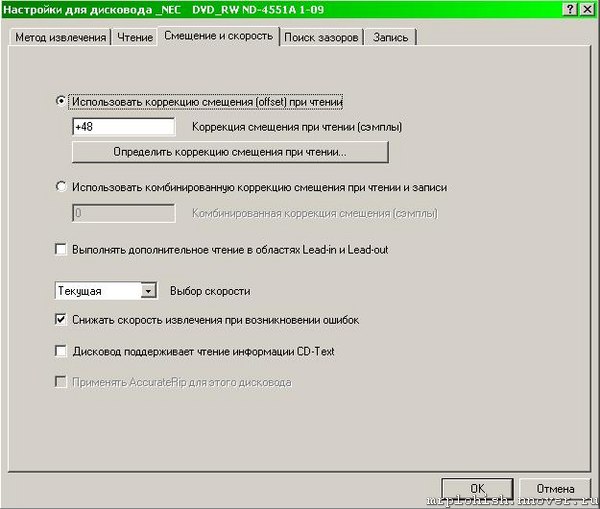
Смещение.... гадость Видимо придется написать немного о том, что такое Audio CD. Так вот это - почти виниловый диск - как и на виниле у него есть некоторое место в начале и в конце, на которую ставят иголку и по которой иголка съезжает - это Lead-In & Lead-Out. Т. к. на диске нет маркеров секторов (+\- 1 сек), то лучик ставить точно не получается и посему есть такая гадость, как оффсет - т. е. когда вы говорите лучу - ставь вот туда на второй трек - он промахивается, причем величина промаха у него постоянная - он ставит на Х самплов до этого места или на Х самплов после. Величина Х называется оффсетом, она либо известна из базы данных EAC, либо ее можно померить самому - есть список дисков, на которых это можно пробовать. http://www. /driveoffsets. htm
Теперь о том, что будет, если она будет установлена в нуль. Если вы выдергиваете треки - то это значит что у каждого трека пропадает Х самплов либо в начале трека, либо в конце, причем некоторые драйвы имеют страшное значение оффсета - 300 самплов. Страшно? Теперь если подумать, то перевод этих самплов в секунды звучит так 300 самплов / 44.1 кГц = что-то калькулятор не показывает, а, во = 0.0068 секунды, т. е. 6.8 млск. В применении к имиджам (да и к просто трекам) это значит - тишина, звук начинается и заканчивается задолго до потерянных самлов. Так вот, по базе данных EAC можно найти величину оффсета чтения (для ДАННОГО CD-ПРИВОДА!) и выставить её в соотв. окне EAC: Параметры дисковвода->Смещение и скорость->Использовать коррекцию смещения (offset) при чтении->указать число из таблицы (например, для многих приводов семейства NEC это число равно +48).
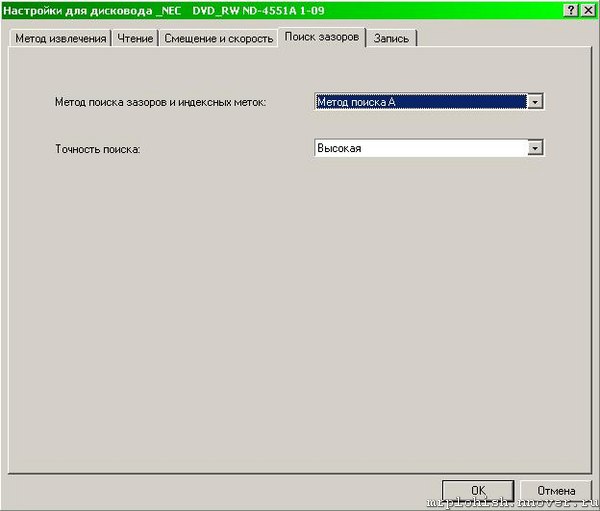
Все, все - уже почти все готово. Теперь надо решить вопрос на счет "Метод поиска зазоров и индексных меток" (Gaps) - опять можно повиснуть. Проблема в том, что паузы между треками могут быть, а могут и не быть и это инфа не доступна в простом виде - когда Clone CD делает свое дело - он копирует все и потому для него это не проблема - мы же выдираем только звук и нам это не подходит, нам надо в CUE получить точные значения позиции, чтобы при нажатии кнопки Next Track оно шло куда надо (кроме этого потом можно будет используя эту инфу порубить WAV на треки). Что тут надо знать - Методы A, B, C влияют только на скорость этой операции - А самый быстрый и С самый меделнный. Какой именно вы выберете - не важно, просто может оказаться что С не работает на вашем железе и тут надо пробовать (или поискать ваш драйв в базе EAC). Самое главное - использовать "Высокая" (Secure) и (после сохранения профайла) сунуть аудио диск и начать тестировать Gaps. Меню Actions\Detect gaps (F4) - появляется экран и если все треки опознались нормально (т. е. у вас Method А, Secure) и ничего не повисло - вам повезло и все, процесс настройки почти закончен. Если же повис (на каком-то треке все висит и ничего не происходит - нажмите Cancel - через пару минут он отвиснет) - пробуйте другие методы с режимом Secure и если все они висят - придется понизить точность и пробовать Accurate. Если же и это не помогло - то тогда все плохо, Inaccurate часто криво определяет Gaps. Но я думаю, что почти все смогут делать Secure одним из методов и уж 99% смогут делать Accurate.
Далее все становится совсем просто - осталось приладить CDDB для определения названий треков - жмите F12, вводите свой (или не свой) е-mail, выбирайте сервер CDDB и все, приехали - осталось дело за малым, начать сам процес. Для этого либо из меню "Действия\Копирование образа и создание Cue Sheet" (Actions\Copy Image & Create CUE Sheet) - либо иконкой Image Cue... После этого начнётся процесс грабления, и после того, как он завершится, EAC выведет окно с отчётом. Вот тут самое время сохранить этот отчёт (там будет кнопочка Save Log) и потом приложить его к релизу. Этот log-файл выглядит примерно так:
Цитата:
Отчёт EAC об извлечении, выполненном 26. февраля 2007, 21:53 для диска:
Unknown Artist / Unknown Title
Дисковод: _NEC DVD_RW ND-1300A Adapter: 1 ID: 0
Режим чтения: Достоверный (C2: нет, Точный поток: да, Отключение кэша: да)
Коррекция смещения при чтении: 48
Способность читать области Lead-in и Lead-out : Нет
Выходной формат: Внутренние WAV-операции
44.100 Гц; 16 бит; стерео
Другие параметры:
Заполнение пропущенных сэмплов тишиной : Да
Удаление блоков с тишиной в начале и конце : Нет
Установленный внешний ASPI-интерфейс
Характеристики диапазона извлечения и сообщения об ошибках
Выбранный диапазон
Имя файла C:\antology\cd1\Unknown Artist - Unknown Title. wav
Пиковый уровень 96.8 %
Качество диапазона 99.9 %
CRC 3667A466
Копирование... OK
Ошибок не произошло
Конец отчёта
Зелёным выделены те места, которые важны. Если Вы используете английскую версию EAC, то будет примерно вот что:
Цитата:
EAC extraction logfile from 5. May 2006, 16:08 for CD
Кино / 45
Used drive : HL-DT-STDVD-ROM GDR8163B Adapter: 3 ID: 0
Read mode : Secure with NO C2, accurate stream, disable cache
Read offset correction : 102
Overread into Lead-In and Lead-Out : No
Used output format : Internal WAV Routines
44.100 Hz; 16 Bit; Stereo
Other options :
Fill up missing offset samples with silence : Yes
Delete leading and trailing silent blocks : No
Installed external ASPI interface
Range status and errors
Selected range
Filename E:\Music\Kino\Кино - 45.wav
Peak level 100.0 %
Range quality 99.9 %
CRC 6E9DA541
Copy OK
No errors occured
End of status report
Пока идет процесс - осталось решить последний вопрос - на выходе появится два файла - WAV & CUE, чего с ними делать? Их потом можно жечь Nero, выбрав из меню File\Burn Image этот самый CUE файл. Или можно использовать CDRWin, BlindWrite и много еще чего. А можно для записи использовать и этот самый EAC.
Максимально подробное руководство по EAC на русском языке
Как сделать качественный рип в wav при помощи EAC мы прошли. Теперь сделаем дополнительную настройку чтобы на выходе у нас были не wav файлы, а сразу сжатые в lossless
Настройка EAC для сжатия в. Wv
Для начала необходимо скачать плагин-упаковщик WavPack DLL
Распаковать скачанный архив в папку EAC 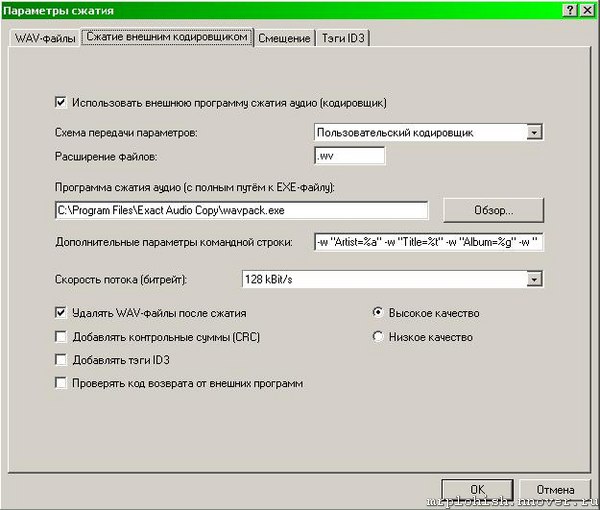
Далее заходим в Параметры сжатия\Сжатие внешним кодировщиком
Настраиваем, "Схема передачи параметров" - Пользовательский кодировщик
"Расширение файлов" - .wv
указываем путь к файлу "wavpack. exe"
В "Дополнительные параметры командной строки" вписываем:
Для варианта без тегов:
Код:
copyText_writeLink('this. parentNode. parentNode. nextSibling. nextSibling'); скопировать в буфер обмена
-h %s %d
Для варианта с APEv2:
Код:
copyText_writeLink('this. parentNode. parentNode. nextSibling. nextSibling'); скопировать в буфер обмена
-w "Artist=%a" - w "Title=%t" -w "Album=%g" - w "Year=%y" - w "Track=%n" - w "Genre=%m" - h %s %d
где "-h" = Высокое качество
Дополнительные ключи командной строки (англ.)
-a = Adobe Audition (CoolEdit) mode for 32-bit floats
The WAVEFORMATEXTENSIBLE structure is used (if present) to determine the format details. However, there are some programs that use their own non-standard format extensions. The most popular of these is Adobe's Audition (previously Syntrillium's CoolEdit) which created two new 32-bit floating point formats. An option has been added to WavPack (-a) to force the "adobe" interpretation of these floating point formats. If you are compressing integer files do NOT use this option.
-bn = enable hybrid compression, n = 2.0 to 23.9 bits/sample, or
n = 24-9600 kbits/second (kbps)
The default operation of WavPack is pure lossless, which means that the. wv file contains all the information that was in the original. wav file. The hybrid mode allows the user to specify a target bitrate for the output file, either in kilobits per second (kbps) or bits per sample. If the track can be losslessly compressed without exceeding the specified bitrate, then it will be and WavPack will report the compression as lossless. If lossless compression would exceed the specified bitrate, then WavPack will begin carefully discarding the least significant portion of the audio information to stay within the limit. Every effort is made to keep this inaudible, including the use of joint stereo, dynamic bit allocation and noise shaping. WavPack will report this as "lossy" compression. Although the option accepts bitrates as low as 24 kbps, the actual value that WavPack can achieve is usually much higher than that. For example, with CD-audio sampled at 44.1k the lower limit is about 196 kbps.
--blocksize=n = specify block size in samples (n =
WavPack normally determines the optimum number of samples to place into each WavPack block, however this option allows it to be directly specified. Probably only for advanced users.
-c = create correction file (.wvc) for hybrid mode (=lossless)
If the - c option is specified (in addition to the - b option), then WavPack will generate an additional file that will contain the information that was discarded to generate the lossy. wv file. This file will have the same name as the. wv file but will have the extension. wvc (the 'c' is for "correction"). When WvUnpack is used to restore the. wav file, it will attempt to find the. wvc file in the same directory as the. wv file. If it is found then the decompression will be lossless and will be reported as such, otherwise lossy decompression will be reported (assuming that any information was actually discarded during the original compression). If - c is specified but no actual information is discarded, the correction file will be deleted. The extra overhead involved with having these two files instead of a single pure lossless file is usually less than 1% of the original. WAV file and can be as low as 0.25% at high bitrates. Note that CRCs are stored for both the lossy and lossless versions, so error detection works correctly whether the. wvc file is used or not.
-cc = maximum hybrid compression (hurts lossy quality & decode speed)
Normally, when the - c option is used to create a correction file in the hybrid mode, WavPack attempts to optimize for the quality of the lossy file and let the combined lossless compression of the two files fall where it may. This option tells WavPack to optimize for the overall compression ratio instead, even if this means some possible degradation of lossy quality (and this can also have a small effect on lossless decompression speed). Keep in mind the effect of this option is not too significant either way.
-d = delete source file if successful (use with caution!)
Self explanatory.
-e = create self-extracting executable (needs wvselfx. exe)
WavPack can be used to create self-extracting archives (Windows only) with a .exe extension. In this way it is possible to distribute compressed audio without having the recipient install any other programs (or have any dlls) to unpack the archives. When the. exe file is run (directly or by double-clicking) it extracts the original. wav file into the same directory. If it can't (because the file exists or it is run on a read-only device) then it displays a standard Windows "Extract to" dialog box and allows the user to specify the destination. The self-extracting feature can be used with WavPack's hybrid modes as well as pure lossless. If a. wvc file (with the correct name) is present in the same directory as the executable, then a lossless extraction is automatically performed. It is possible to turn the. exe file back into a valid WavPack by simply changing the extension back to. wv (although the extra 33k unpacking header will still be there).
As of version 4.40, the self-extraction module will also check for a CUESHEET field in the APEv2 tag and if it is present then the text in the CUESHEET field will be extracted into an appropriately named. cue file. Note that the cuesheet is not automatically modified to point to the correct. wav file; this must be handled either when the cuesheet is embedded or (if the. exe file is renamed) by the user after extraction.
To convert an existing WavPack 4.x file into a self-extracting executable use the DOS copy command to prepend the self-extracting stub (wvselfx. exe) to the .wv file:
C:\music_files>copy /b wvselfx. exe+music. wv music. exe
-f = fast mode (fast, but some compromise in compression ratio)
The "fast" mode should be used when compression (or decompression) speed is more important than compression ratio (or, in lossy mode, audio quality).
-h = high quality (better compression in all modes, but slower)
The "high" mode should be used when compression ratio (or, in lossy mode, audio quality) is more important than compression (or decompression) speed. This option slows both by about a factor of about 1.5.
-hh = very high quality (best compression in all modes, but slowest)
The "very high" mode should be used when compression ratio (or, in lossy mode, audio quality) is much more important than compression (or decompression) speed. This option slows both by about a factor of about 2, and is not recommended for use on portable devices because of the high CPU load required for decoding.
--help = extended help display
Self explanatory.
-i = ignore length in wav header (no pipe output allowed)
Some programs that pipe data to encoders do not always give the correct length in the wav headers that they provide (foobar's clienc and CDex are examples). In these cases use this option to force WavPack to ignore the header and accept the actual length. Because WavPack must seek to the beginning of the file to write the correct length, this option cannot be used with piped output.
-jn = joint-stereo override (0 = left/right, 1 = mid/side)
WavPack normally defaults to joint stereo (sometimes called mid/side) in which the left and right channels are combined to form an alternate representation (essentially L+R and L-R) that compresses better in lossless mode and improves quality in lossy mode. This option allows this feature to be forced either on or off.
-l = run at low priority (for smoother multitasking)
This option can be used (in Windows only) to force WavPack to run at a low priority and is handy for doing large WavPack batch conversions in the background.
-m = compute & store MD5 signature of raw audio data
Calculate and display the MD5 checksum of the uncompressed audio data and store it in the compressed file. These sums are commonly used in file trading communities to compare versions of tracks, and as such the sums generated by WavPack match those of FLAC, OptimFROG, Shntool, and get_id3(). They can also be used by WvUnpack during decompression to verify the data integrity of lossless files.
-n = calculate average and peak quantization noise (hybrid only)
This causes WavPack to calculate the average and peak quantization noise generated in the lossy version of the hybrid mode, both referenced in decibels below full scale. While it is impossible to use this as a guide to determine the audibility of the noise, it is useful for comparing the various compression options and for comparing WavPack's lossy performance to other programs. Note that this option does not currently produce meaningfull results for floating point or multichannel files.
--optimize-mono = optimization for stereo files that are really mono
Use this option on stereo files that may actually be mono (i. e. old recordings) to increase the compression ratio by up to 6%. Note that on stereo recordings that are almost mono (as many supposedly mono recordings are) this will not improve compression. This option does not significantly slow encoding, however the resulting files are not compatible with older WavPack decoders (before version 4.3).
-p = practical float storage (also 32-bit ints, not lossless)
This option reduces the storage of some floating-point data files by up to about 10% by eliminating some information that has virtually no effect on the audio data. While this does technically make the compression lossy, it retains all the advantages of floating point data (>600 dB of dynamic range, no clipping, and 25 bits of resolution). This also affects large integer compression by limiting the resolution to 24 bits.
-q = quiet (keep console output to a minimum)
Self explanatory.
-r = generate new RIFF wav header (removing extra chunk info)
WavPack normally saves all the RIFF header information contained in the wav file (including any chunks after the audio data). This is done so that WvUnpack. exe can restore the original wav files exactly. The - r option causes WavPack to discard the header contained in the source file (and any extra chunks) and generate a fresh wav header. Obviously the source wav header is still used to determine the format and size of the file (i. e. this is not a "raw" mode). Note that for multichannel files a WAVEFORMATEXTENSIBLE header is generated whether the source file had one or not. Also note that this option cannot be used with certain floating-point wav files generated by CoolEdit or Audition because they are not properly normalized.
-sn = noise shaping override (hybrid only, n = -1.0 to 1.0, 0 = off)
WavPack uses first-order noise shaping to improve the perceived quality of lossy files and to improve the hybrid lossless compression ratio. Normally WavPack will choose the noise shaping most appropriate for the application, but this option allows the user to override the default. The parameter range is +/- 1.0, where positive values shift the noise higher in frequency and negative values shift the noise lower in frequency. Values very close to -1.0 are clipped to prevent problems associated with very high gain near DC.
-t = copy input file's time stamp to output file(s)
Self explanatory.
-w "Field=Value" = write specified metadata to APEv2 tag
Write specified information to APEv2 tag appended to WavPack file(s). May be used multiple times for multiple fields. APEv2 tags are the preferred tag format for WavPack files and are read by all the standard WavPack playback plugins. If the specified value begins with a '@', then the value is assumed to be a filename which is used to obtain the item's actual value. This is handy for including the CUESHEET field for use with images files + cuesheets and foobar2000. The filename may contain wildcards if it matches exactly one file. Also, if the file cannot be found in the current directory then the source and destination directories (if specifed) are also checked.
-x[n] = extra encode processing (optional n = 1-6, 1 = default)
Like previous versions of WavPack (and many other compressors), WavPack 4.40 normally works "symmetrically" in that encoding and decoding operate at about the same rate (regardless of the mode used). However, WavPack has an option to work "asymmetrically", so that extra processing can be done during encoding to provide better compression, but with NO corresponding cost to decoding performance!
This is enabled with the - x option and provides an average improvement in CD music compression of about 1% in "fast" mode, about 0.5% in the normal mode, and still less in the higher modes. Because the standard compression parameters are optimized for "normal" CD music audio, this option works best with "non-standard" audio (synthesized sounds, non-standard sampling rates, etc.) where it can often achieve enormous gains. The default level (n=1) provides a decent improvement with little cost in encoding speed and is recommended for all but the most time critical encoding. Higher levels provide some marginal improvement with an increasing cost of encoding speed. The highest levels (n = 4-6) are extremely slow but can provide significant improvement in special situations (i. e. synthesized sounds).
-y = yes to all warnings (use with caution!)
Self explanatory.
Жмем "Действия\Копирование образа и создание Cue Sheet" (Actions\Copy Image & Create CUE Sheet)\в сжатом виде... и процесс пошел.
Не волнуйтесь насчет битрейта 128кб/с на скрине, это настройка для встроенного кодировщика и на внешние модули она не влияет.
Настройка EAC для сжатия в. flac 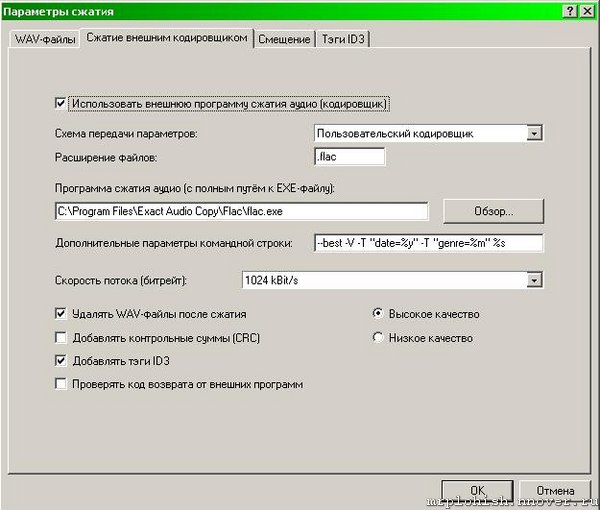
Далее заходим в Параметры сжатия\Сжатие внешним кодировщиком
Настраиваем, "Схема передачи параметров" - Пользовательский кодировщик
"Расширение файлов" - .flac
указываем путь к файлу "flac. exe" - C:\Program Files\Exact Audio Copy\Flac\flac. exe
В "Дополнительные параметры командной строки" вписываем:
Код:
copyText_writeLink('this. parentNode. parentNode. nextSibling. nextSibling'); скопировать в буфер обмена
--best - V - T "date=%y" - T "genre=%m" %s
где --best наибольший возможный битрейд
Жмем "Действия\Копирование образа и создание Cue Sheet" (Actions\Copy Image & Create CUE Sheet)\в сжатом виде... и процесс пошел.
Настройка EAC для сжатия в. ape
Для начала необходимо скачать плагин-упаковщик Monkey's Audio
Установить скачанный дистрибутив 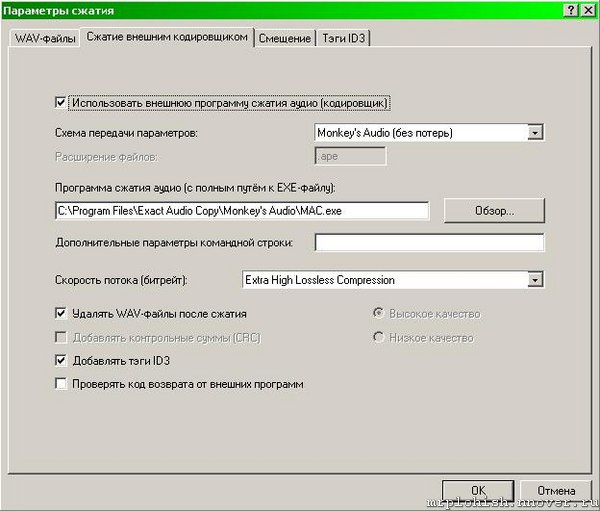
Далее заходим в Параметры сжатия\Сжатие внешним кодировщиком
Настраиваем, "Схема передачи параметров" - Monkey's Audio (без потерь)
"Расширение файлов" - .ape (будет затемнено)
указываем путь к файлу "mac. exe" - C:\путь по которому устанавливали плагин\mac. exe
"Дополнительные параметры командной строки" не трогаем
Выставляем скорость потока
Жмем "Действия\Копирование образа и создание Cue Sheet" (Actions\Copy Image & Create CUE Sheet)\в сжатом виде... и процесс пошел.