
Партнерка на США и Канаду по недвижимости, выплаты в крипто
- 30% recurring commission
- Выплаты в USDT
- Вывод каждую неделю
- Комиссия до 5 лет за каждого referral
3 – radiation rate indicator – blinking symbol «*»;
4 – discharge indicator for energizing elements;
5 - current value of magnitude measured;
6 – analogue scale;
7 – measurement units (Russian version) :
- mcSv/h – microsievert/hour;
- mSv/ч – millisievert/hour;
- min-1sm-2 – minute-1 per centimeter-2;
- min-1 - minute-1;
- mcSv - microsievert;
- mSv - millisievert;
- Sv - Sievert;
Information is shown on the display at a language selected by the user (Russian or English).
1.4.2.2 Alarm on excess of dose rate preset threshold, beta-particles flux density or ionizing particles flux – an intermittent audible alarm with an interval 1.
1.4.2.3 Alarm on excess of preset dose threshold – periodic (with preset interval) voice message «EXCESS OF DOSE THRESHOLD».
1.4.2.4 Alarm on overload – in the case of excess of dose rate upper measurement range – voice message «RESULT IS HIGHER THAN MEASUREMENT RANGE».
1.4.2.5 Indication of energizing element category – if the category of energizing elements is below 1,6 V the symbol «![]() » will be shown on display.
» will be shown on display.
1.4.2.6 The display light is on automatically by pressing any button of the instrument. Duration of light is 30 sec.
If the light is off the mode change is set by one-time short pressing on «MODE» button.
1.4.3 Operating mode of the instrument
1.4.3.1 Activation of the instrument is done by short pressing (not more than 0,5 sec) of «POWER» button.
1.4.3.2 Switching off the instrument is done by long pressing (more than 2 sec) of «POWER» button.
1.4.3.3 Mode change is done by short pressing (less than 1 sec) of «MODE» button. The modes are changed repeatedly in a circle, according to the scheme given on Fig. 3 (Russian version).


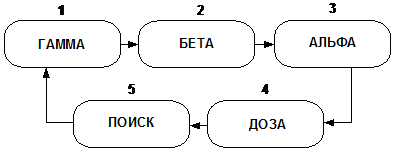
Fig. 3 – Mode change scheme of the instrument
1 - «GAMMA» - dose rate measurement;
2 - «BETA» - beta-particles flux density measurement;
3 - «ALPHA» - alpha-particles flux density measurement;
4 - «DOSE» - integral dose measurement;
5 - «SURVEY» - Survey and localization of radioactive sources (based on intensity of ionizing particles count).
1.4.4 Changing of alarm settings
1.4.4.1 The input in alarm mode is done in the following way.
Activate the instrument.
After activation the instrument is initially activated in the mode of dose rate measurement (the word «GAMMA» is shown on display).
The input in settings mode is done by long press (more than 2 sec) of «MODE» button in the case of operating the instrument in any measurement mode. The text «VOICE …..» will be shown on the display.
Select the required parameter from the list given in the Fig. 4 by short pressings of «MODE» button.


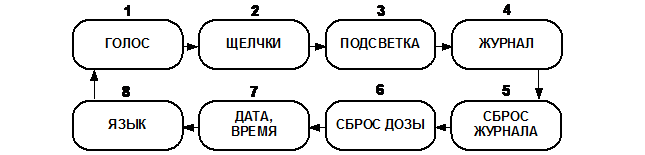 Fig.4. The scheme for changing of alarm settings (Russian version)
Escape from settings mode is done by long (more than 2 sec) pressing of «MODE» button, at that the instrument returns to preliminary selected measurement mode.
1.4.4.2 Selection of the mode of voice interval for scoring of dose rate measuring result is done by short, sequential pressing of «POWER» button from the row: «VOICE 30 sec»; «VOICE 60 sec»; «VOICE 120 sec», where the intervals of periodic activation of voice accompaniment are marked with numbers. «VOICE OFF» - voice accompaniment is off.
Transfer to the next parameter is done by short press of «MODE» button.
1.4.4.3 Activation of radiation intensity audible alarm – “clicks”.
Enter the setting mode (item 1.4.4.1). Select the mode of radiation intensity audible alarm «CLICKS …» on/off by sequential pressing of «MODE» button. Select the “on” or “off” audible alarm mode «CLICKS» by sequential pressing of «POWER» button.
Transfer to the next parameter is done by short press of «MODE» button.
1.4.4.4 Setting of display light mode is done in the following way.
Enter the setting mode (item 1.4.4.1). Enter the «LIGHT …» mode setting by sequential pressing of «MODE» button. Setting of light mode is done by sequential pressing of «POWER» button from the row: «LIGHT ON» or «LIGHT OFF».
Transfer to the next parameter is done by short press of «MODE» button.
1.4.4.5 Setting of intervals for recording in the log (inherent memory of the instrument for further reading of PC changing history) is done in the following way.
Enter the setting mode (item 1.4.4.1). Enter the mode for setting of recording intervals «LOG …» by sequential pressing of «MODE» button. Setting of time slots for recording in the log is done by subsequent pressing of «POWER» button from the row: «LOG OFF»; «LOG 1 min»; «LOG 5 min»; «LOG 30 min», where time slots for periodic recording of current measurements history with fixation of actual date, time and statistic measurement error are indicated with numbers. The log capacity is 2 000 reports.
1.4.4.6 Reset of records from the log is done in the following way.
Enter the setting mode (item 1.4.4.1). Enter the mode «LOG RESET» by sequential pressing of «MODE» button. Reset of records from the log is done by one-time pressing of «POWER» button. Saving of records in the log and transfer to the next mode is done by short pressing of «MODE» button.
1.4.4.7 Reset of measured integral dose is done in the following way.
Enter the setting mode (item 1.4.4.1). Select the mode «DOSE RESET» by sequential pressing of «MODE» button. Dose reset is done by one-time pressing of «POWER» button. Saving of changed dose and transfer to the next mode is done by short press of «MODE» button.
1.4.4.8 Setting (corrections) of the current date and time is done in the following way.
Enter the setting mode (item 1.4.4.1). Select the mode «DATE & TIME» by sequential pressing of «MODE» button. Setting of current date and time is done by «MODE» and «POWER» button. The first short press of «POWER» button corresponds to the order “select”. Second pressure of «POWER» button changes the selected parameter for one unit (one step) upwards. Short press of «MODE» button corresponds to one step cursor movement and means “select”, “move the cursor to the right”. Selected parameters are saved in the instrument independently of instrument’s operating modes and subject to corrections only in the case of supply elements replacement.
ATTENTION! IF THE INSTRUMENT IS OPERATING WITHOUT SUPPLY ELEMENTS, BUT ONLY FROM THE NETWORK ADAPTER, THE PRESET PARAMETERS “DATE & TIME” AFTER DISCONNECTING OF INSTRUMENT FROM THE NETWORK AND FUTURE ACTIVATION WILL NOT BE SAVED.
1.4.4.9 Changing of conversational language on display (Russian/English) is done in the following way.
Enter the setting mode (item 1.4.4.1). Select the mode of changing the language on the display «LANGUAGE» by sequential pressing of «MODE» button. Select the language mode on a display (Russian or English) by sequential pressing of «POWER» button.
Escape from setting mode is done in accordance with (item 1.4.4.1).
1.4.4.10 Setting of alarm thresholds is done in the following way.
Setting of alarm thresholds in any measurement mode is done identically. Switch on the instrument. Select the required measurement mode by short pressing of «MODE» button for setting of required threshold measurement values – «GAMMA», «BETA», «ALPHA», «SURVEY» or «DOSE».
Enter the mode of threshold measurements setting by one-time pressing of «POWER» button (if the light of display is on) or double pressing of «POWER» button (if the light of display is off), at that the name of selected measurement mode and symbol «…PRG ХХХХ» the number and unit of measurement of measurable value, set by the manufacturer will be shown on a display.
The first short pressing of «MODE» button corresponds to command “select” and will select the more significant figure. Changing of selected figure for one unit (one step) upwards is done by short pressing of «POWER» button. The further cursor movement is done by short pressing of «MODE» button. Changing of measurement unit of measurable value is done in a same way – by «POWER» button. After changing of the last element, the return to indication mode of preset threshold occurs. Escape from threshold indication mode is done by short press of «POWER» button. The preset Установленные threshold values parameters are saved in energy independent memory of the instrument.
2 MEASURING
2.1 Operating limitations and safety measures
2.1.1 To prevent the detector power supply occurrence under the high voltage and malfunction of the chart elements it is forbidden to open the sealed section of the instrument.
2.1.2 Keep clean the power supply section and contacts for power supply connection.
2.1.3 Change on-time the power sources which have been discharged.
2.1.4 In case of radioactive substances occur on the instrument case its background readings can be increased. Check it by measuring the instrument background readings in another place or room.
2.1.5 As for the human protection class from radiation the instrument is related to the class III according to All Union Standard 12.2.007.0-75.
2.2 Preparation for operation
2.2.1 Preparation for operation with removable power elements:
- remove the cover of power section (see Fig.1);
- install power elements, keeping in mind the polarity;
- install the cover of power section in place;
- close operating surface of detector by moving the absorbing screen (see Fig.1) into upper position.
2.2.2 Preparation for operation from AC network:
- connect output connector of network adapter to mini USB connector, located in the upper end of the instrument (see Fig.1);
- switch on adapter mains plug in receptacle with the power of ~ 220 V.
2.2.3 Preparation for operation with PC:
- connect with the cable the connector in the upper end of the instrument and USB port of PC.
2.3 Dose rate measuring
2.3.1 To measure radiation background of dose rate in the building or in the open air:
- close the entrance gate of detector, by moving the screen (see Fig.1) in the top position;
- Activate the power supply of instrument (one-time press and release «POWER» button). After activation the instrument will initially be set in dose rate measuring mode («GAMMA» will be shown on a display);
- locate the instrument on a distance of not less than 1 m from the surface and any surrounding subjects;
- in (2-3) seconds the first averaged value of radiation background dose rate, and also first value of statistic error, approximately ± 90 % will be shown on a display;
- to measure the dose rate it is required to fix the readings of display if the statistic error of less than 20 % occurs;
- it is important to remember that each sudden change of the instrument position and/or sudden change of radiation intensity is accompanied by reset of collected information (zero setting) and dose rate measuring process starts again.
Recalculation of measured value of ambient dose rate to effective or expositional dose rate should be done using typical multipliers given in the Table 1.
2.4 Dose measuring
2.4.1 Close the input window of the detector, by moving the screen (см. Рис.1) in the top position. Switch the instrument power supply on (press the button «POWER» once and release). The instrument measures the integral radiation dose as soon as the instruments is switched on only in modes «GAMMA» or «DOSE». In the «DOSE» mode the instrument display indicates the accumulated dose value in the form of hours and minutes «DOSE ХХ ХХ» and the meaning of collected dose in digital format of four significant figures with floating coma with indication of measurement unit: «Х,ХХХ mSv». The instrument keeps the accumulated dose value after it is switched off (or when the power elements are replaced) in the nonvolatile memory for more than 5 years period.
Recalculation of measured ambient dose value to effective or expositional doses should be done using conversion factors given in the Table 1.
2.5 Beta-particles flux density measuring from surfaces
2.5.1 Measurement of beta-particles flux density from the surface being surveyed, is done in the following way:
- open the input window of detector, by moving the screen (see fig.1) in the lower position;
- switch the instrument power supply on and set the mode «BETA» by the button «MODE»;
- place the detector input window at (3-5) mm distance directly under the surface to be surveyed. As soon as the statistic error has achieved less than 20%, register the average value of the display Φβ+ф (min-1·cm-2);
- close operating surface of detector by moving the absorbing screen (see Fig. 1) in the top position. Place detector of instrument directly above surface to be surveyed at (3-5) mm distance;
- as soon as the statistic error has achieved less than 20%, register the average value of the display Φф, (min-1·cm-2);
- calculate beta particles flux density Фβ, (min-1·cm-2), by the formula
Фβ = Φβ+ф - Φф (1)
2.6 Alpha-particles flux density evaluation from surfaces
2.6.1 Measurement of alpha-particles flux density from the surface being surveyed, is done in the following way:
- open the input window of detector, by moving the screen in the lower position;
- switch the instrument power supply on and set the mode «ALPHA» by button «MODE»;
- place the instrument by the back side directly above the surface to be surveyed, in a way that the distance between detector and surveyed surface was not more than (1-2) mm;
- as soon as the statistic error has achieved less than 20%, register the average value of the display Φα+ф, (min-1·cm-2);
- cover the surveyed surface with a thin paper sheet used for printing on laser or ink printers;
- repeat measuring operation by placing the detector of instrument directly above the surface to be surveyed in the same geometry as for measuring Φα+ф. As soon as the statistic error has achieved less than 20%, register the average value of the display Φф, (min-1·cm-2);
- calculate alpha particles flux density from contaminated surface Фα, (min-1·cm-2)
Фα = Φα+ф - Φф (2)
2.7 Operation of instrument with PC
2.7.1 Connecting to PC
2.7.1.1 Connect the instrument to PC in the following way:
- connect the instrument to PC using USB cable;
- activate the instrument according to item 1.4.3.1;
- in a few seconds after activation of the instrument the PC system (ОС Windows XP and higher) will identify its connection. In the section «My computer» the new removable disk will appear. The window will be displayed on the screen of PC (see Fig. 5)
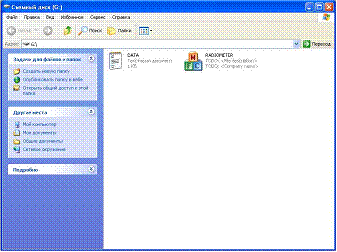
Fig.5 – Monitor window showing hard disc content.
2.7.2 Operation with Control program
2.7.2.1 Activate Control. exe program (file extension may not be displayed and depends on PC settings). This could take several seconds.
The user’s program menu will be displayed on the screen (see Fig. 6).
 |  |  |
|

|

|
|

|
|
|
|
|
|
|
|
|
|
|
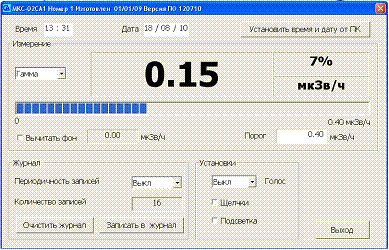
Fig.6. User’s program menu
1 – Time setting window; 2 – Date setting window; 3 – Button for automatic set of time & date through PC; 4 – Button for selecting the operating mode of the instrument; 5 – Measuring result; 6 – Measured value statistical error, %;
7 – Unit of measurement; 8 – Analogue scale (progress bar scale); 9 – Alarm threshold set; 10 – Automatic background deducting showing the figure of deductible value; 11 – Button for selecting time slots for voice accompaniment of measuring results; 12 – Button for “Clicks” on/off; 13 – Button for display light ob/off; 14 – Button of one-time second recording of measuring results in the «Log» of the instrument; 15 – Button for reset of all records from the «Log»; 16 – Amount of records in the «Log»; 17 – Button for selecting of time slots for automatic record of results in «Log»; 18 – Button for finishing of operation with Control. exe.
2.7.2.2 Set date and time on the instrument. This could be done in both manual and automatic mode by pressing the button 3 (Fig. 6) «Set date & time through PC ». At that time & date set for PC will be set for the instrument.
2.7.2.3 Select the required measurement mode («GAMMA», «DOSE», «ALPHA», «BETA» or «SURVEY»), by pressing the button 4 (Fig.6).
2.7.2.4 For automatic deducting of the background put a mark in the window 10 (Fig. 6). At that the deductible value will be shown in the window close to mark, and measured value – in the window 5 (Fig. 6) will be equal to zero.
NOTE! For correct measurement f background, place the instrument at a distance of 1 m from the surface and walls. Expose the instrument as soon as statistical error will reach not more than 10%.
2.7.2.5 Set the required alarm threshold for selected measuring mode in the window 9 (Fig. 6) and press Enter. At that the same value as for the window 9 will appear below the analogue scale to the right.
ATTENTION! ALARM THRESHOLD WILL NOT BE CHANGED DURING AUTOMATIC BACKGROUND DEDUCTION.
2.7.2.6 Set the required time slot for voice accompaniment of measuring results by the button 11 (Fig.; 60 or 120 sec).
NOTE! Voice accompaniment of measuring results is done only in «GAMMA» measuring mode.
2.7.2.7 To activate audible signals - «clicks», and also the light of display put the mark in windows 12 and 13 correspondingly (Fig. 6).
2.7.2.8 Set the required time slot interval for recording of measuring results in the log of the instrument (1; 5 or 30 min) by the button 17 (Fig. 6).
2.7.2.9 Additional, single shot record of measuring result in the log is done by the button 14 (Fig. 6).
2.7.2.10 If maximum allowed number of records has achieved in the measuring log (2000 records), delete files from the log with 15 button (Fig. 6). By pressing button the control question «Delete files from log?» will appear. In the case of approval all records will be removed.
ATTENTION! Removed records are impossible to be restored. Copy the data to PC memory if required.
2.7.2.11 Window 15 (Fig. 6) shows current quantity of records in instrument log.
2.7.2.12 To finish work with Control. exe please press the button 18 (Fig. 6).
In the case of «Escape» pressing the program will finish its PC performance, and parameters set in the user's menu are saved in the instrument.
ATTENTION! BEFORE PRESSING THE BUTTON «ESCAPE» ALL PARAMETERS ARE SAVED IN PC CORE MEMORY. IF POWER SUPPLY OF THE INSTRUMENT WILL BE DISCONNECTED BEFORE PRESSING «ESCAPE» BUTTON, ALL PARAMETERS SET IN USER’S MENU, WILL NOT BE SAVED.
2.7.3 Browsing of records in the log
2.7.3.1 Open the file DIARY. HTM with the help of EXCEL or other Internet-browser (this file is open only for reading). The table will be shown on PC display where each line corresponds to one record of the log (see Fig.7).
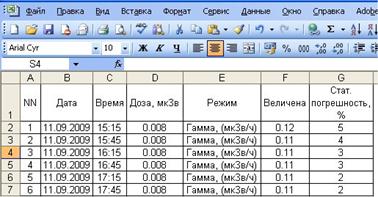
Fig.7. Fragment of log
2.7.3.2 Processing of results recorder in the log is done in accordance with enterprise procedure.
2.7.4 Finishing of operation with PC.
2.7.4.1 Disconnect power supply of the instrument (see item 1.4.3.1)
2.7.4.2 Disconnect USB cable from the instrument.
2.8 Survey of radioactive sources, subjects and objects contaminated with radioactive nuclides
2.8.1 Survey of radioactive anomalies is required after preparation of instrument for operation according to item 2.2 in the mode of indication of ionizing particles total flux intensity, «SURVEY».
- switch on the instrument and select the mode «SURVEY» by «MODE» button;
- open the working surface of detector by moving the screen (see Fig.1) in the lower position.
Smoothly moving the instrument along the surfaces of object controlled, it is required to place it at a minimum distance from the surface surveyed.
In the case of sensible increase of instrument readings (1,5 – 2) times and more – stop moving of instrument and within (30 – 40) sec, ensure increasing of instrument readings.
Then, smoothly moving the instrument hither and yonder, determine the borders of radioactive contamination and identify subjects contaminated with radioactive nuclides.
Evaluate the photon radiation dose rate level at the distance as requested by an operator from the radiation source in accordance with the item 2.3.
2.9 Survey and monitoring of objects or samples contaminated with radioactive nuclide
2.9.1 Survey and monitoring of objects or samples for contamination with radioactive nuclides is performed in order to detect separate objects (for example, building materials, banknotes etc.) and samples (of soil, agricultural production etc.), contaminated with radionuclide. The result of this activity shall be separation of objects subjected to monitoring or types of production in accordance with established reference levels of radioactive contamination for different radionuclide..
Related to the mentioned activity measurements shall consider specificity and physical characteristics of objected subjected to monitoring, as well as tasks, arisen when organizing such a monitoring. In view of this for each object and type of monitoring the procedure and/or recommendations shall be developed additionally on how to organize the detection and monitoring of objects, contaminated with radioactive nuclides and how to remove them from application followed by disposal at special areas. These documents are subjected to obligatory agreement with Federal authorities on technical regulation and metrology, Federal agency of health protection and social development, Federal agency on atomic energy and other organizations – if required (for example, Federal agency on agriculture etc.).
3 MAINTENANCE
3.1 Safety measures
3.1.1 Prior to start working with the instrument the personnel shall study carefully the present operation manual.
3.1.2 It is forbidden to open the instrument or to perform repairs since the high voltage power supply (about 400 V) counter is inserted inside it. Thus for repairs the instrument shall be sent to the manufacturer.
3.1.3 Beta-radiation control source, included in delivery set, is located in the polyethylene packet. Control source is safe in operation as its total radionuclide activity 90Sr + 90Y is much (approximate 100 times) less than lower limit of regulation mentioned in the table of AddendumП-4 Radiation Standards (НРБ)-99/2009. In accordance with НРБ-99/2009 such sources are free from regulation.
ATTENTION! DO NOT DETACH THE LABEL ON THE CONTROL SOURCE. DO NOT DISTURB HERMETICITY OF CONTROL SOURCE. IN THE CASE OF CONTROL SOURCE HERMETICITY DISTURBANCE PLEASE APPLY LOCAL BODIES OF STATE SANITARY & EPIDEMIOLOGICAL SUPERVISION.
3.2 Maintenance procedure
3.2.1 The instrument maintenance is performed to assure its serviceability during operation and executed by the personnel, working with the instrument, observing safety measures as per item 3.1.
3.2.2 Preventive works, performed during maintenance include the check of completeness, examination of the instrument appearance and check of its operability.
3.2.3 Check of the instrument completeness assumes its compliance with item 6.1.
3.2.4 When examining the instrument appearance make sure that there are no chips and cracks on the instrument case, that inscriptions on controls are clear, and also that the shielding grid and the detector thin input window are integral.
4 VERIFICATION METHODOLOGY
ATTENTION! STATE INSPECTION COULD BE DONE ONLY PERSONS, HAVING QUALIFICATION OF STATE VERIFICATION OFFICER. NO PERSONS INVOLVED IN ASSEMBLYM REPAIR, ERECTION OR ADJUSTMENT OF MEASUREMENT UNITS AFTER THEIR MANUFACTURING OF REPAIR SHOULD BE ALLOWED TO PERFORM INSPECTION.
4.1 Verification operations
4.1.1 The methodology regulates methods and ways of initial and periodic verification.
4.1.2 The following operations mentioned in the table 3 should be done within verification.
Table 3
Name of operation | Operation manual item No | Performing of operation within | |
Initial verification | Periodic verification | ||
1 Exterior inspection | 4.5.1 | yes | yes |
2 Testing | 4.5.2 | yes | yes |
3 Determination of basic relative error of the instrument: - for gamma-radiation - for beta-radiation | 4.6.3 4.6.4 | yes | yes |
4 Determination of the own background | 4.6.2 | yes | no |
5 Determination of instrument reading from the control source | 4.6.5 | yes | yes |
4.2 Verification instruments

|
Из за большого объема этот материал размещен на нескольких страницах:
1 2 3 |
