


Партнерка на США и Канаду по недвижимости, выплаты в крипто
- 30% recurring commission
- Выплаты в USDT
- Вывод каждую неделю
- Комиссия до 5 лет за каждого referral
Министерство образования и науки Российской Федерации
Федеральное агентство по образованию
Саратовский государственный технический университет
АНГЛИЙСКИЙ ЯЗЫК
Методические указания
по обучению чтению
для студентов 2 курса
специальностей 260901.65, 260902.65
(4 семестр)

Одобрено
редакционно-издательским советом
Саратовского государственного
технического университета
Саратов 2010
Данные методические указания предназначены для студентов 2 курса специальностей «Технология швейных изделий» и «Конструирование швейных изделий». Изложенный в указаниях материал изучается в 4 семестре.
Цель указаний – научить студентов основным приемам технического перевода и способствовать выработке навыков профессионально-ориентированного общения.
Указания состоят из 2 частей. В 1-ой части содержится информационный материал, специальные тексты и система учебных заданий к этим текстам, во 2-ой части подобраны дополнительные тексты, которые могут изучаться как в аудитории, так и самостоятельно. Указания также содержат словарь основных терминов по специальности.
Методические указания могут использоваться на практических занятиях студентов заочного обучения.
Часть 1
Основы перевода
Перевод – это передача содержания определенного речевого произведения средствами другого языка. Все виды перевода можно класси-фицировать:
а) по содержанию: свободный, дословный, учебный,
б) по форме: устный, письменный,
в) по стилю: художественный, публицистический, технический и пр.
До настоящего времени использовался учебный перевод, который является частью общей работы над текстом, связанный с пониманием его содержания.
На данном этапе обучения мы переходим к основам технического перевода, которым необходимо владеть специалисту с целью получения научно-технической информации и обмена этой информацией.
Для правильного перевода технического текста надо уметь.-
а) правильно выполнять изученную ранее последовательность действий, относящихся к анализу языковых средств текста и его смысловых связей;
б) определять значение слов по контексту. При многозначности слова уметь найти нужное для данного контекста значение:
в) раскрывать значение слова по словообразовательным элементам;
г) правильно переводить термины и устойчивые словосочетания;
д) узнавать и находить соответствия в русском языке грамматическим формам и конструкциям английского языка;
е) быстро и правильно пользоваться нужным словарем;
ж) передавать смысл переводимого текста в соответствии с нормами русского языка.
Некоторые проблемы перевода
К лексическим проблемам прежде всего относятся различия в круге значений слов в английском и русском языках, тесно связанные с этим проблемы сочетаемости слов, синонимии и т. д.
Многозначность
Английский словарный запас отличается весьма развитой многозначностью, что обуславливает значительные трудности при переводе. Например, в «The American College Dictionary» слово «turn» имеет 111 значений, «run» – 104 значения, «round» – 63 значения и т. д. Поэтому надо иметь хорошие знания английского языка, чтобы по словосочетаниям и контексту определить нужное значение слова
For correct cutting the ma - Для правильного раскроя ткани
chine should have leaders. машина должна иметь направляющие.
All foremen must be capable Бригадиры должны быть способными
leaders of their men. руководителями своих рабочих.
Неологизмы
Неологизм – это слово или термин, возникающий для обозначения нового понятия. При их переводе необходимо, в первую очередь, учитывать значение входящих в него лексических элементов. Например, употребление слова «times» в значении «сколько-то раз» привело к появлению глагола to times – «умножать». С помощью суффикса - ability созданы слова durability, wearability, washability etc.
«Ложные друзья переводчика»
Это слова, которые, в силу своего сходства с хорошо знакомыми переводчику словами, направляют его по ложному пути. Их можно разделить на 2 группы:
а) слова, похожие на русские, но отличающиеся от них своим значением.
accurate – точный, а не аккуратный compositor – наборщик, а не композитор data – данные, а не дата и т. п.
b)слова, имеющие внешнее сходство с более употребительными словами.
complement – дополнение, комплект, compliment – похвала,
insolation – инсоляция, insulation – изоляция,
currant смородина, current – ток, поток,
courier – курьер, currier – кожевник и т. п.
Слова-заместители
В английском языке имеется большое количество разнообразных слов-заместителей. Ими бывают, в основном, местоимения и глаголы. Местоимения: one, ones, this, that, these, those и глаголы: to be, to do, to have, shall, should, will, would, can, could, may etc. Употребление слов-заместителей объясняется строгим порядком слов в английском языке. Опущение значимого слова невозможно без подстановки его заместителя. Это опущение чаще всего диктуется стилистическими соображениями, а именно стремлением избежать повторения одного и того же слова. Все слова-заместители не имеют предметно-логического значения, а только контекстуальное. Их необходимо соотносить с соответствующими глагольными формами или существительными, которые они замещают, и только тогда они получают лексическое значение.
В качестве слова-заместителя существительного чаще всего употребляется местоимение One. Как слово-заместитель оно или совсем не переводится на русский язык, или переводится соответствующим личным местоимением.
Если оно употребляется с определенным артиклем или указательным местоимением, то переводится местоимением тот, та, то.
I have no a hat, I must buy У меня нет шляпы, мне нужно ее
one. купить.
I don’t like this brown hat, Мне не нравится эта коричневая
give me, please, the red one. шляпа, дайте мне красную.
This hat is more attractive, Эта шляпа более привлекательна,
than that one. чем та.
This pattern is more complex Эта выкройка более сложная, чем
than the one we made the last та, которую мы делали на прошлой
week. неделе.
This coat is old, I must Это пальто старое, я должен купить себе новое.
buy a new one.
Для того чтобы избежать повторения глагола, чаще всего употребляется глагол to do в соответствующей форме.
Metals conduct electricity Металлы проводят электричество better than semiconductors do. лучше, чем полупроводники.
New cutting machine works with Новая раскроечная машина работает
greater precision than the с большей точностью, чем
old one did. (работала) старая.
Безличные предложения
Наряду с безличными предложениями, сообщающими о явлениях природы, обозначения времени или расстояния ( It is cold. It is two o'clock. It was getting dark. It is late.). В английском языке употребляются безличные обороты, состоящие из местоимения it и глагола в страдательном залоге. Такие обороты соответствуют русским неопределенно-личным оборотам типа «Говорят, сообщают» и т. п.
It is reported that new model represents a certain interest. It was expected that he would visit the exhibition. |
Сообщают, что новая модель представляет определенный интерес.
Ожидали, что он посетит выставку.
В обороте there be /быть, находиться, существовать/ вместо глагола be могут употребляться глаголы to stand, to exist, to live.
There exist many types of fabrics. |
Существует много типов тканей.
Exercises to Text 1
1. Exercises in getting acquainted with the text content:
a) Look through the text and say what the text is about,
b) Say In Russian, what fabrics are mentioned in the text,
c) What properties of fabric are discussed in the text.
2. Exercises in understanding the text content;
a) Check if you understand or remember the following words:
to utilize, designer, garment, pattern, fibre, elasticity, warm, cotton, wool, linen, blend, range, due to.
b) Find in a dictionary the suitable meaning of the following words:
durable, crease, washability, bulk, fullness, change-over to execute, price, design, to apply.
c) Give the Russian equivalents of the following word combinations.
pattern maker, to execute the design, look to new materials, light weight fabric, heavy bulk fabric, colours washability, to take into consideration.
d) Analyze and translate the sentences:
1. Having taken into consideration the various properties of the materials, the designer has to work with the pattern maker who has to apply ideas by executing the designs.
2. The designer can look to new materials to solve problems of warmth, durability, crease resistance and others.
3. Bulky garments are still being made, the public being yet not accustomed to these new materials.
e) Read the text again and make sure you understand its content,
f) Translate in writing the parts indicated by a teacher.
 g) Read your translation and edit it according to the norms of the Russian language.
5. Exercises in rendering the text content:
a) Divide the text into several logical parts.
b) Think out a title-for each part.
e) Find in the text the main information for each part.
d) Render the content of the text in a form of summary (review).
6. Exercises in discussing the text content;
a) Say, what fabrics are in fashion now, what are their proper
ties?
b) Describe the process of manufacturing new garments,
c) Compare the properties of natural and synthetic fibres.
Text 1
Properties of Fibres
While utilizing different materials a designer tries to make garments that are decorative, useful and durable. Having taken into consideration the various properties of the materials he has to work with the pattern maker who has to apply these ideas executing the designs. Having these things in mind the designer had to work in the past with certain animal fibres, such as silk, wool and fur, and vegetable fibres, such as cotton and linen. These fibres had certain physical properties, both the designer and pattern maker were being limited by them.
Nowadays new fibres such as Rayon, Nylon, Capron, Orion, Lavsan, Nitron and blends of the new fibres with the natural ones are known to give the designer and pattern maker a greater range than they had before.
Today the old problems of warmth, durability, colours washability, crease resistance, elasticity and price of fabrics are very important and the designer can look to new materials to solve these problems. Now the designers can operate many new silhouettes,' while formerly when thinking of warmth they were drawn only into materials of wool or furs. These fabrics due to their bulk, both in fullness and weight, have the best warmth of the materials then known. The designs being created from these materials depended upon the properties of the fabrics. The products had to be heavy, bulky and costly. New synthetic fibres having been developed, the situation has changed. These new fibres being formed into lighter weight fabrics with equal or greater warmth. It is no longer necessary to have heavy, bulky fabrics for this purpose.
However, the change-over has been very gradual. Bulky garments are still being made, the public being not yet accustomed to these new materials. The public sometimes resist the new materials having not yet realized that they are getting the same or better qualities than before. The designers themselves have not yet fully realized the potentials of fabrics in order to put these fabrics into good use, this being another reason for the slow change-over.
Exercises to Text 2
1.Exercises in getting acquainted with the text content:
a) Look through the text and say what the text is about.
2.Exercises in understanding the text content.
a) Check if you understand or remember the following words:
quality, fashion, to deal with, object, suitable, shape, to vary, order, layer, circular, to damage, quantity, technique.
b) Find in a dictionary the suitable meaning of the following words:
cutting, tailor, to govern, pattern, lay-out, waste, savings, interlocking, khife, portable, designing, cutting.
c) Give the Russian equivalents of the following word combinations:
high-quality fashionable clothes, technique of cloth cutting, the most suitable parts of a material, different pattern shapes, the material to be cut, subject to modifications, pattern lay-out.
d) Analyze and translate the sentences:
1. The last of the three factors although subject to modifications does not vary to any great extent.
2. The variations in a shape can be defined and standardized for training purposes so that «ideal» pattern lay-out can be devised.
3.  It is possible to expect savings in the order of anything up to 15-20%.
4. The most common cloth cutting machines are the portable reciprocating vertical straight knife machine and the electric portable rotary circular knife machine.
e) Read the text again and make sure you understand its content.
f) Translate in writing the parts indicated by a teacher.
g) Read your translation and edit it according to the norms of the Russian language.
3. Exercises in rendering the text content:
a) Divide the text into several logical parts.
b) Think out a title for each part.
с) Find in the text the main information for each part.
d) Render the content of the text in a form of summary (review).
4. Exercises in discussing the text content:
a) Speak about the main problems of cloth cutting.
b) Explain, how cutting is performed.
c) Discuss, in which, cases one can use portable reciprocating vertical straight knife machine and electric portable rotary circular knife machine.
Text 2
Cutting Technique
People always need high-quality fashionable clothes. To ensure its quantity and quality it is necessary to use the achievements of modern science and designing in tailoring industry, to strengthen its technical basis. It is also important to improve the quality of materials and the technique of cloth cutting.
Cutting is a very important branch of clothes manufacture which deals with the cutting of the sections for clothes from fabrics, synthetics. If it is the first stage in actual manufacture of clothes, economical cutting is the most difficult part to acquire. Economical cutting has for its object the cutting of the sections from the best suitable parts of a material in best direction and in great number.
The cutting technique is entirely governed by the quality requirements of clothes and the characteristics of the material to be cut. The variations in the fabrics, the different pattern shapes arid the quality requirements form problems which vary with each change in one of the conditions. The last of the three factors although subject to modifications does not vary to any great extent.
The shape of the pattern presents a problem that must be solved at the first stage of clothes manufacture. The variations in a shape can be defined and standardized for training purposes so that "ideal" pattern lay-outs can be devised that avoid waste and make full use of the material to be cut. Material savings will vary, depending on interlocking the patterns. In general, it is possible to expect savings in the order of anything up to 15-20%.
Materials can be cut in different number of layers, depending on the cloth type. The number of layers should be such as to provide less risk of damaging the cloth to be cut. The most common cloth cutting machines are: the portable reciprocating vertical straight knife machine and the electric portable rotary circular knife machine.
Exercises to Text 3
I. Exercised in getting acquainted with the text content:
a) Look through the text and say what the text is about,
b) Look through the text again arid say what machines are mentioned in the text.
2. Exercises in understanding the text content:
a) Check if you understand or remember the following words:
fabrics, sections, manufacture, decorative, serpantine, needle, thread, wear, length, to place, article, top, to machine.
b) Find in a dictionary the suitable meaning of the following words:
stitch, edge, ridge, seam, embroidery, to fit, strength, to flattern, to alternate, row, plain, fancy, to omit, to face, temporary, to secure.
c) Give the Russian equivalents of the following word combinations:
plain seams, after opening outwards, a resulting ridge, lapped seam, to stitch through, zigzagged or butted seam, top stitching, twin-needle machine, lock-stitch machine.
d) Analyze and translate the sentences:
1. After opening outwards a resulting ridge is left on the inside and it must be flattened.
2. Lapped seam is produced by placing one section above the other and stitching through.
3. Needles are designed especially for each make of machine and only those made for a given type must be used.
4. By this is meant the rows are not machined through two materials, securing one to the other.
5. It is possible to use more stitches to the inch than in any other type of seams.
e) Read the text again and make sure you understand its content.
f) Translate in writing the parts indicated by a teacher.
g) Read your translation and edit it according to the norms of the Russian language.
3. Exercises in rendering the text content:
a) Divide the text into several logical parts.
b) Think out a title for each part.
c) Find in the text the main information for each part.
d) Render the content of the text in a form of summary (review).
4. Exercises in discussing the text content:
a) Say, what kinds of seams are used in clothes manufacture.
b) Say, how these seams are produced.
с) Explain the difference between these seams.
d) Speak about machines used for stitching.
Text 3
Stitching
Several methods are employed in stitching sections of fabrics together, many factors are involved including type of sewing articles, strength required in manufacture and wear. Plain seams are produced by facing together the. two sections and stitching approximately 1/16 in. from the edge. After opening outwards a resulting ridge is left on the inside and it must be flattened. The length of stitch should be constant. Lapped seam is produced by placing one section above the other and stitching through. It is the strong seam and it is possible to use more stitches to the inch than in any other type. Zigzagged or butted seam is usually of a temporary nature in which the cut edges of two sections are butted together and a special machine stitches by a needle which alternates from one section to the other, forming a zigzag stitch. Top stitching applies to all rows of machining, whether if the plain or fancy kind, which do not make this is meant the rows are not machined through two materials securing one to the other, but purely for decorative purposes. Top stitching is performed by special machines. The plain single-needle lock-stitch machine can produce attractive embroidery effects. It is fitted with a vibrating finger which carries one or two embroidery threads and can do serpantine fashion on the surface of the contrasting colours pleasing effects are produced. The twin-needle machines produce both top stitching and plain rows. Parallel plain rows are produced by machine of several needles with one transverse hook. When desired, one or more of the needles can be omitted so as to vary the spacing between the lines of stitching aid reducing the number of rows.
Needles are designed especially for each make of machine and only those made for a given type must be used.
 |
Exercises to Text 4
1. Exercises in getting acquainted with the text content:
a) Look through the text and say what the text is about.
b) Say in Russian, what types of pockets do you know?
2. Exercises in understanding the text content.
a) Check if you understand or remember the following words:
novice, to branch out, seam, utilitarian, outside, bag, job, gently, corner, convenient, size, shape, top stitching, to create.
b) Find in a dictionary the suitable meaning of the following words:
self-fabric, slash, flap, welt, slot, opening, interfacing, true, to anchor, to insert, to fit, alteration, to reinforce, a stay, to thread, markings.
c) Give the Russian equivalents of the following word combinations:
patch pocket, set-in pocket, poor construction job, right side (RS), wrong side (WS), to adjust the pattern in size, loosely woven fabrics, reinforcement of a stay.
d) Analyze and translate the sentences:
I. Thread trace all pocket markings to the right side of all pocket and garment parts.
2. Thread mark the pocket position from the pattern to the garment and study the position carefully when fitting.
3. Patch pockets usually need no interfacing, but are often lined for a custom finish.
4. There appeares to be a wide variety of pocket styles.
5. Strive for even, balanced welts or flaps.
e) Read the text again and make sure you understand its content.
f) Translate in writing the parts indicated by a teacher.
g) Read your translation and edit it according to the norms of the Russian language.
3. Exercises in rendering the text content:
a) Divide the text, into several logical parts.
b) Think out a title for each part.
c) Find in the text the main information for each part.
d) Render the content of the text in a form of summary (review).
4. Exercises in discussing the text content:
a) What types of pockets do you know? Describe them.
b) Describe a process of making a pocket.
c) What pockets can be recommended for different garments?
Text 4
Pockets
If you are a novice at the art of sewing, or even if you've acquired a great amount of skill, you probably will be confused at the seemingly endless variations in pocket types and names. To help clear your mind, just remember that pockets branch out from two basic constructions-pockets of self-fabric applied to the garment, and pockets of lining pushed to the inside through a seam or slash, aid sometimes covered by a flap or a welt.
Pockets usually have a utilitarian purpose, although they are used sometimes purely decoratively. In many cases both purposes are combined. There appears to be a wide variety of pocket styles but, when analyzed they will be found to belong to one of the following types: a) a patch pocket, which is applied to the outside of a garment, b) a set-in pocket, sometimes it is called cut pocket or bound slot pocket which is really a bag, set behind a prepared slot, and c) a pocket set into a seam.
 Pockets can beautifully accent a professional seam or they can expose a poor construction job. A few simple but vital rules will bring about successful results: thread trace all pocket markings to the right side of all pocket and garment parts; pull pockets through openings very gently; keep all corners true; use interfacing for body; strive for even, balanced welts or flaps; and anchor the side edges of flaps and welts invisibly to the garment. The position of a pocket is important. A pocket should be set in a convenient place for inserting the hand. However to achieve a balanced line or to create a desired decorative effect, the purely convenient position may have to be altered slightly. Thread mark the pocket position from the pattern to the garment, and study the position carefully when fitting. Adjust the position to suit your own needs if necessary. This is especially important if you have had to adjust the pattern in size or make alterations to the garment in fitting. If a pocket is being added to a garment, the position should be decided during a fitting.
All types of pocket made in lightweight or loosely woven fabrics need to be interfaced. Interfacing provides added strength, reinforces the opening, and preserves the pocket line. Welts and flaps should be interfaced if their shape and resiliency are to be preserved. Patch pockets usually need no interfacing, but are often lined for a custom finish. In-seam pockets will not require interfacing, but may need the reinforcement of a stay to keep the pocket edge from stretching.
As a decoration or means of emphasizing a design line, top stitching is superb. As a method of applying your pocket, however, topstitching is not generally recommended.
Exercises to Text 5
1. Exercises in getting acquainted with the text content:
a) Look through the text and say what the text is about.
b) Say, what types of sleeves do you know?
2. Exercises in understanding the text content:
a) Check if remember or understand the following words:
to cut, to fit, arm,, appearance, circular, wrist, to pair, point.
b) Find in a dictionary the suitable meaning of the following words:
armhole, crown, sideseam, bodice, underarm, puff, gathered, notch, to ease, to pin, to tack, grain, warp, to baste.
c) Give the Russian equivalents of the following word combinations:
raglan sleeve, kimono sleeve, set-in sleeve, finished appearance, one-piece sleeve, puff sleeve, short gathered sleeve, fit-ting line, crown setting point.
d) Analise and translate the following sentences:
1. The sleeve crown should measure 25-40mm more that the armhole, so that it may be eased into the armhole.
2. When working on the fabric with no apparent right side, as certain that the sleeves are correctly paired.
3. These balance notches pair with those on the bodice armhole.
4. Gather top of sleeve between notches and pin or baste in armhole, distributing fullness evenly.
e) Read the text again arid make sure you understand its content.
f) Translate in writing the parts indicated by a teacher.
g) Read your translation and edit it according to the norms of the Russian language.
3. Exercises in rendering the text content:
a) Divide the text into several logical parts.
b) Think out a title for each part.
c) Find in the text the main information for each part.
d) Render the content of the text in a form of summary (review).
4. Exercises in discussing the text content:
a) Explain the difference between the set-in sleeve and kimono sleeve.
b) What types of sleeves can you recommend for different garments.
c) Describe the procedure of setting the sleeve in
 Text 5
Sleeves
Sleeves must be accurately cut, fitted arid set if they are to be attractive in appearance and comfortable in wear. Due attention must be paid to the position or the fabric grain, and care must be taken to fit the sleeves so that the arms can move easily. If these precautions are followed by smooth, even setting, the results will be satisfactory and pleasing in all respects.
Sleeves can be divided into three basic types: a) the raglan sleeve, b) the kimono sleeve, c) the set - in (or inset) sleeve. Set-in sleeve is the most commonly used and most generally become. It can be short, long, or in-between length. A set-in sleeve that is cut in two pieces is often used in coats arid suits.
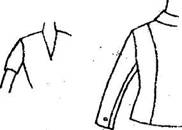
Fig. 1 set-in sleeve
See figure 1 for the finished appearance of a set-in sleeve. This fits into a circular armhole with the crown of the sleeve fitting to the armhole end of the shoulder seam, and the sleeve seam joining-the sideseam of the bodice at the underarm. In dressmaking one-piece sleeves and puff sleeves fall into this category. Puffed sleeve or short gathered sleeve can also be cut in a long full version with a tight-band cuff at the wrist for a peasant sleeve. Gather top of sleeve between notches and pin or baste in armnole, distributing fullness evenly. Stitch and press seam toward sleeve. (Fig. 2) 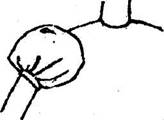 Puffed sleeve
Both inset sleeps should be made arid fitted into the armholes before the wrist line, or lower edge is finished, so that this fitting line may be finally tested for position on the arm before the opening is made or the cuff Is set.
The sleeve crown should measure 25mm - 40mm more that the arm-hole, so that it may be eased into the armhole and fit smoothly over the rounded shape of the top of the arm.
When working on the fabric with no apparent right side, ascertain that the sleeves are correctly paired before pinning and tacking. If they are correctly paired, identical balance notches should appear - on the two upper layers, and also on the two under layers. These balance notches pair with those on the bodice armhole. The crown setting point should be transferred to the sleeve with a tailor tack, so that it can be fitted accurately to the shoulder line. The position of the crown setting point in sleeves is very important in fitting. A warp line of fabric should fall from the crown setting point down the length of the sleeve. If for reasons of style, the sleeve is cut cross, the crossway line should fall from the crown setting point.
Exercises to Text 6
1. Exercises in getting acquainted with the text content:
a) Look through the text and say what the text is about,
b) Find in the text dates and say, how they are connected with the collar development.
c) Say the main idea of the text orally in Russian.
2. Exercises in understanding the text content:
a) Check if you understand or remember the following words;
strip, tunic, to finish, collarless, to face, shawl, trend, flat, polo, origin, comfortable, neckline, chin,
b) Find in a dictionary the suitable meaning of the following words:
band, lace, revers, lapel, notch, to detach, starch, stiffly, gap, shallow, bone, choker, frill, knitwear.
c) Give the Russian equivalents of the following word combinations:
 stand-up collar, upstanding collar, lace collar, lace-edged embroidered collar, turned-down collar-, roll-type collar, detached collar, choker collar, flat collar, stiffened collar.
d) Analyze arid translate the sentences:
1. On the latter garment this evolved into a stand-up collar,
the height varying to the date.
2. In the late 16-th century the starched, wired and supported
lace or lace-edged embroidered collars became fashionable.
3. In the late 18-th century the small coat collar which had
begun to develop by 1770 grew larger and in the last decade became a turned-down style worn high round the back of the neck.
e) Read the text again and make sure you understand its content,
f) Translate in writing the parts indicated by a teacher,
g) Read your translation and edit it according to the norms of the Russian language.
3. .Exercises in rendering the text content:
a) Divide the text into several logical parts,
b) Think out a title for each part.
с) Find in the text the main information for each part.
d) Render the content of the text in a form of summary (review).
4. Exercises in discussing the text content:
a) Talk about different types of collars.
b) What collar would you select for a new blouse? Why?
c) How do you think, what collars will be in fashion in a coup le of years?
Collar
Until the early Middle Ages clothes were made without collars. From the thirteenth century a narrow strip of material began to be attached to the neckline or the chemise tunic. On the latter garment this evolved into a stand-up collar, the height varying according to the date. In the late fourteenth century, for example, high collar, was known to be fashionable for tunic.
In the sixteenth century the collar became a separate article which finished the neckline of the shirt; it was usually known as a band arid evolved in the early seventeenth century into the large lace collars known as falling-bands. In the late sixteenth century the starched, wired and supported lace or lace-edged embroidered collars became fashionable. It began as a Spanish fashion, ' where it was a simple collar, open in front or encircling the neck, it was of white gauze, starched and generally plain.
During the second half of the seventeenth and much of the eighteenth century, the coat and waistcoat were collarless.
In later eighteenth century the small coat collar which had begun to develop by 1770 grew larger and, in the last decade became a turned-down style worn high round the back of the neck. The collar was generally faced with velvet or satin or was embroidered. An especially high collar - of this type was popularized by Robespierre and bore his name while, at the end of the century, the Napoleon style, with high collar and large decorative revers, retained the fashion until about 1810.
During- the nineteenth century coats had varying styles of collars and lapels.
In the first 30 years the coat collar was high at the back, standing a little away from the neck and was often of the shawl or roll-type. In the 1820s the M-cut was introduced, where a M-shaped notch was made between collar and rever. In the mid-century collars and revers were small and the coat buttoned high, but after 1825 collars and revers became larger and were buttoned lower - on the chest.
The detached shirt collar was white all the century and, for much of the time, starched stiffly. In the early years it was standing, with points rising high on to each cheek, but with a wide gap in the centre front to accommodate the chin. From the 1840s the collar was upstanding and very stiff; at first it was shallow but became deeper as time passed.
The day dress fashions for ladies between 1890 arid 1903 had very high necklines, England blouses and tea gowns had lace collars, boned at the sides to keep them up under the ears; these were choker collars, other designs, having deep velvet neckbands with a frill above.
The trend in men's collar styles in the twentieth century has been towards more informal, flat collars about two to three inches deep.
The trend towards informality and freedom of personal choice progressed at an increased pace after 1950. Informal knitted wear replaced for men shirt collar and tie for many occasions. The-polo collar being at the end of the nineteenth century a stiff, white stand-fall collar, now became a high, turned-down finish to knitwear, in use for both sexes. The mandarin collar was favoured for ladies dresses and blouses. This design, of Asiatic origin, was a standing collar of about one-and-a half inches high with a small gap in front where the garment was buttoned across. For men's shirts of all kinds, formal or sportwear the man-made fibres made possible the manufacture of stiffened, yet comfortable, collars which could be drip-dried and also appear attractively finished.
ЧАСТЬ 2
Дополнительные тексты
для аудиторной и самостоятельной работы студентов
Виды работы и задания определяются преподавателем
Text 1
Shaping
Pattern pieces are shaped so that, when they are joined, the garment fits the curves of the figure. Additional shaping is often needed with the pattern pieces to arrange or to take up fullness as a style feature or in order to accommodate parts of the body. Fullness is controlled by various methods, the amount of fullness allowed depending on the figure, the style of garment and the fabric.
Suitable for any fabric, darts or tapering folds of fabric, are often used to arrange fullness. With correct adjustment they give a smooth and comfortable fit.
Tucks, or parallel folds of fabric, can, if short, provide fullness. They can also be stitched over an entire area, as on a skirt or on the bodies of a dress, to give a purely decorative effect.
Fullness can also be controlled or created by gathers. The excess fabric is wrinkled or gathered up along the edge before the seam is made and the gathered part of the garment hangs loosely over the body. Several rows of gathering can be worked to produce different effects such as shirring, gauging or waffling, which may be decorative rather than functional. Use synthetic thread for all processes where threads are to be pulled or where will be strain as in shirring.
Frills and ruffles can also provide fullness, but usually only as an attractive style feature.
The style of garment and the type and amount of fabric available govern the width of tucks. The spacing between each tuck depends on the effect desired in the finished garment.
Short, or released, tucks are a useful method of providing fullness on children's clothes and adults wear. The amount of fullness required determines the size and number. Pin tucks are very narrow tucks, they are purely decorative and do not provide fullness. If a complete section, such as a yoke or cuffs, is to be tucked and tucks are not allowed for in the pattern, make the tucks on a large piece of fabric and then cut out the appropriate pattern piece.
Areas such as the shoulder, cuff, yoke or waist can have gat hers set into them to introduce fullness, gathers also allow for growth. The amount of gathering and of extra fabric needed depends - of the fabric.
Two forms of functional and decorative gatherings, shirring arid gauging are used on areas such as bodices or cuffs. Shirring - is worked in parallel rows with shirring elastic, which gathers the fabric as it is sewn. The gathering stretches in wear. Gauging gives the same outward effect, but as it is worked with normal thread it does not stretch. It is rather weak so the back must be covered.
A decorative finish on necklines and cuffs, a ruffle is a piece of fabric cut in such a way that the outer edge is longer than the inner. This causes the ruffle to flute decoratively when attached. Make ruffles in fine fabrics so that they are not too bulky.
Text2
Setting sleeves for fitting
1. Place the right sleeve inside the bodice, bringing the crown to the corresponding right armhole. This will bring together the right sides of sleeve and bodice with the front and back balance notches pairing. The worker should hold the garment 50 that she is looking down into the inside of the sleeve, and handle the setting throughout with the sleeve uppermost. Pin the sleeve crown to the bodice armhole at the front and back balance notches, and at the crown setting point.
2. Across the underarm line, pin the sleeve and bodice together along their fitting lines between the back and front, balance points. They should lie flat here without easing. The bodice and sleeve seams usually meet and should be arranged to do so if possible. At this lower area of the crown, set the pins in line with the fitting line.
3. Between the back and front balance points and the crown balance point it is necessary to ease the sleeve into the armhole so that it will fit comfortably, without straining, over the top of the *****n a gathering thread on the fitting line between the front balance notch and the crown fitting point and a second gathering thread in the corresponding position at the back. Make the running stitches as fine as possible. Ease the fabric along the two sets of gathering threads. Tack the sleeve into the armhole stitching along the fitting line and using small tacking stitches.
4. The crown setting should be checked. If the crown setting is even, the lower part of the sleeve is bound to hang correctly: One or more of the following alterations may be required: a) the shoulder line may need either shortening or lengthening; b) the sleeve crown may need either dropping or lifting; c) the crown setting point may need moving either backwards or forwards; d) more ease may be required at the back, especially if the figure tends to be round-shouldered; more ease may be required at the front if the figure is erect with a prominent bust line; e) the underarm section may need either raising or lowering to adjust the hang of the sleeve
5. Try on the garment, check all these points carefully and make any alterations which seem to be necessary. Machine very slowly beside the tacking stitches. If any part of the sleeve crown begins to form a wrinkle, stop, use a pin to flatten it and proceed.
6. Remove tackings, trim the turnings and press from the right side with the turnings facing towards the sleeve to support the sleeve crown.
Text 3
Raglan Sleeve
Any design with seams running from underarm to neckline is raglan sleeve. The shoulder line is shaped by means of a dart. This shape of sleeve often provides an easy, comfortable setting for people who have difficult shoulders for fitting with an inset sleeve. It is used frequently in sports clothes. It is not a good style for the figure with a heavy bust line, since it adds width to the figure.
Fig. 1) Raglan sleeve
The raglan of both sleeve and bodice are on the bias and will stretch very easily. It is partly this tendency which makes the raglan comfortable to wear, so if you want to retain this property, never lift by the top of the sleeves or bodice.
Join bodice and sleeve underarm seams before setting sleeve to armhole. If the style shows gathers along the top bodice or sleeve, a dart in the top of the sleeve, or even a seam running from neck to wrist on the outside of the arm (as often found in coats) is necessary.
Place right-side to right-side bodice, matching underarm seams. Bring neck edges of seam together so that they meet at the fitting line, not necessarily at the edge of the fabric. Pin at that point. Set the pins in line with the sleeve fitting line and pin in the following order: 1. at the underarm; 2. at the front balance notch and front neck point; 3. at the back balance notches and back neck point; 4. pin in between.
Tack from neck edge to underarm. There is often some ease to distribute on one edge of the seam. If the edge is very full or badly stretched, then steam it gently after pinning, but before stitching. Remove all pins and test the fit of the sleeve. Move your arms freely to check for comfortable movement. Examine the sleeves and note the following points:
1.The length and set of the shoulder line;
2. The looseness or tightness at the front and back shoulder lines;
3. The straight hanging of the sleeves.
Text 4
Kimono Sleeve
An old-fashioned term used to describe any style where the sleeve and bodice are cut in one piece. A kimono sleeve requires no setting, but is given its final shape by two seams. One of these runs from the neck line, along the shoulder, and continues to the lower edge of the sleeve. The lower part of the seam is very much on the bias, so take care not to stretch the fabric. The other seam is a continuation of the side seam of the bodice, curving to fit, the underarm line, and also finishing at the lower edge of the sleeve, (Fig. 1)
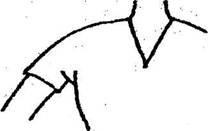
Fig. 1) Kimono sleeve
Join the underarm seam by placing back and front rightsides together. Match the underarm curve and pin. Place sleeve hems together and pin.
Tack from hem to underarm, turn work and tack from sleeve hem to underarm. Remove pins and machine the seam. Stitch a second time round the curve of the underarm, placing the second raw of stitching beside the first. If the fabric is loosely woven reinforce it by placing a piece of folded bias binding or a piece of folded bias fabric on the seam before working the second row of stitching.
Occasionally kimono sleeves are cut high under the aim for a closer fit, but as this restricts movement additional room has to be provided by inserting a gusset. It may be triangular - or diamond-shaped. |
Press the seam open, using only the toe of the iron to press the underarm curve.
Kimono sleeves are liable to strain at the weak point under the arm. Do not anchor the garment at the waist with belt loops, etc. Make the garment fit loosely.
Text 5
Rules for all Pockets
Pockets are one of the most difficult processes to work successfully, because they must look neat and yet be strong enough to withstand constant use. Also, most types of pockets are conspicuous, often forming part of the style of the garment.
Always reinforce the wrong side of the garment where the pocket is to be made. The strip of reinforcement should be 4cm longer than the pocket and 4 cm wide. It can be of linen, or soft canvas. If two matching pockets are to be placed on each side of the body, place the two garment sections together and tailor tack position, marking across the ends with tailor's tacks.
Open out pieces, but mark the pocket line with chalk on top of the tailor's tacks before starting the pocket.
When machining pockets, make a chalk line on which to stitch to ensure accuracy of position as well as length.
Support cut pockets further, when finished, by back stitching a narrow piece of linen or a length of stay tape to the top corner of the pocket nearest the side seam, and back stitch the other end to the seam turnings or armhole turnings.
Work strong bar tacks at each end of the pocket when finished. On welts and Settings these are normal bar tacks; on welt pockets the prick stitching across the end is sufficient; on patch pockets work a tiny french tack under the corner to take the strain.
The grain of the welt, patch, flap or jetting must be on the same grain as the jacket, or it can be directly on the cross for effect. If it is on the straight, any pattern must match exactly. Do this by marking the pocket position with chalk, lay a spare piece of cloth on top matching the pattern, and the exact size and shape of the piece needed and cut out, adding turnings. All jacket pockets should have an additions support of linen strip Z 1/2 cm wide, the outer corner of the pocket running up to the armhole seam, arid similarly from the breast pocket edge to the armhole seam.
On trouser pocket always work a double row of stitching round the bag for strength.
Pocket bags should be slightly wider at the bottom front edge, and should have rounded corners.
After making a pocket, always close it up with basting and press, with the stitches in until the garment is finished.
Sizes of Pockets
The size of a pocket depends upon whether it is for use or for decoration. It must be tied up with the style of the garment and should be positioned to give balance.
The width of the pocket can be calculated by measuring the hand across and adding a little ease, if hand is to go into the pocket. It should be big enough to take the hand. When the hand is in the pocket the top must, not be wrinkled up.
A breast pocket placed on the bodice front measures 7cm wide. Hip pockets must be so placed that they are comfortable to use. Hip pockets must be the breadth of the hand plus allowance for movement. The average size is 12-15cm wide. On a jacket the size of the pocket bag may be governed by the length of the jacket. Patch pocket can be larger purely for effect.
Text 6
Types of Pockets
Patch pockets are used on sporting jackets for men's and ladies' coats and jackets; they involve attaching a piece of the same or contrasting material to the outside of the garment. The basic shape of a patch pocket is square, but it may be pointed or rounded at the base, according to the taste. There is a great variety of patch pockets: a) a single patch pocket; b) a double patch pocket; c) a lined patch pocket; d) a patch pocket with a flap.
While making a single patch pocket, it is usual to out a patch pocket with the weft grain straight along she top edge. This brings the warp grain downwards and balances the garment grains. A pocket of patterned fabric should be cut to fit exactly over the design in the pocket area of the garment, so that the pocket does not disturb the effect of the pattern as a whole.
After finishing the top hem with the help of stitching, trimming and tacking the turnings all round the pocket, tack the pocket in place on the right side of the garment, setting it fairly easily, otherwise it will cause the garment to pucker. The warp grain of the pocket is usually set parallel to the centre front of the garment. Begin machining the pocket at the top edge, arid stitch round the pocket, keeping close to the edge.
The machine thread ends must be securely fastened off at the two top edges. If you feel that an extra reinforcement is required at the pocket top to take strain in wear, e. g. on children's play clothes, a triangle can be machined when beginning and finishing the stitching. Top stitching is often used on a patch pocket. On medium and heavier weight fabric it is better to work top stitching before attaching the pocket. On thin fabric machine the pocket at the required distance from the edge, so that the top stitching and the setting of the pocket are done together.
A double patch pocket has a-firm appearance arid gives a neat, easy top finish.
A lined pocket is used on medium and heavy-weight fabrics, and is lined with lining fabric to prevent it from being too bulky. An interfacing is usually set along the top edge.
A patch pocket with a flap is generally used on sports or casual wear. Therefore a machined finish is suitable. A double patch pocket is the best choice, as it balances the flap in weight. For added strength, the pocket can be set with a double line of machine stitching.
Text 7
Cut or Bound Slot Pockets
With cut pockets, a cut is made in the garment fabric and the pocket material is sewn inside the garment. There are two types of bound slot pockets: straight bound slot pocket and a diagonal bound slot pocket. Jetted pockets are those with a narrow piping on each side; they can also have flaps. They are used in a jacket, as an inside breast pocket, as back trouser pockets (sometimes buttoned) and as a ticket pocket (which is a small pocket within one of the main pockets on a coat). A straight bound slot pocket on the right side appears like a long bound buttonhole. The width of the pocket binding should be as narrow as possible, e. g. 3mm on thin fabrics and 5mm on heavier ones. While setting the pocket it is necessary to place the right side of the strip to the right side of the garment, with the tacked-lines matching, and with the longer length of the strip above the pocket line. Then tack the strip and the garment together along the pocket line. Make the opening following the directions given for a bound buttonhole. Press the bound slot on the wrong side. Close the folded edges of the binding together with fishbone stitch. On the right side, machine round the outer rectangle of the binding to hold the pocket strip in place on the wrong side. The pocket is now finished on the right side, and the strip is now ready for folding over and forming the pocket on the wrong side. The pocket bag is made by folding the upper flaps of the strip downwards over the lower flap along the top of the machining or stab stitching. Pin the pocket bag together and tack along the 10mm turning allowance line, rounding off the two lower corners. Machine on the tacked line, trim the edges and neaten with machine zigzagging or by overcasting. If the. garment fabric is thick and would make a bulky pocket, lining fabric can be used at each end of the strip.
A diagonal bound slot pocket is a more difficult pocket to make, as a diagonal line requires more careful handling than a straight line. A strip of thin lining fabric or lawn should be used to support the line of a diagonal slot pocket.
A welt pocket has a rectangular slot on the right side which is covered by the welt. The welt is an inserted band of fabric with a fold along the top edge. It is used in a man's breast pocket or the main pockets on a lady's coat.
Text 8
Seam Pockets
Seam pockets are used in ladies' coats, skirts, dresses and trousers, and often made by simply folding back the seam turning and adding a pocket bag. Seam pockets in men's trousers have to withstand a lot of wear, so they are made by adding extra fabric to the seam edges.
A side seam pocket can be set into an opening in the side seam of any garment. If the garment has a waist band or seam, the pocket is set into the top of the skirt side seam, arid the top of the pocket is joined in with the waist band or seam.
The pocket position is marked on the side seam of the pattern from the waist fitting line downwards. The top line of the pocket is drawn along the waist fitting line, and made 70mm in length. This makes the outer edge of the pocket less curved. The extended size is required to make the pocket easier to use in this position.
Machine the side seam on the fitting line either side of the pocket the opening. Fasten off the machine thread ends securely. Check that the seam fitting line is tack marked on both sides of the pocket opening. Press the seam open flat. Then cut two pocket shapes, leaving a turning of 13mm all round, but sloping out to meet the seam line, where the turning is already provided.
Mark the fitting lines with tacking or chalk. Work on the wrong side of the skirt. Take one pocket section and, with the wrong side uppermost, place the side seam edge to the pocket opening, aligning it exactly across, but setting the pocket seam fitting line 3 mm inside the skirt side seam fitting line. Tack and machine along the pocket fitting line.
Set the second pocket section to the opposite side of the росket opening in a similar way. Place the two pocket sections together and fold back the skirt away from them. Tack and machine the pocket sections together, beginning and finishing 3mm away from the machining on the seam turning.
Trim the turnings round the pocket bag to 10 mm, but leave the turning intact along the seam edge. Machine zigzag or hand overcast the curved edge of the bag as far round as possible. Trim the pocket turnings level with the skirt seam turnings. Neaten the skirt seams, including the pocket turnings, with machine zigzagging or whatever suitable method is desired.
Fold the pocket onto the front of the skirt and press, ensuring that the pocket opening is pressed along the skirt seam fitting-line on either side, with the pocket seams lying 3 mm inside. A short length of ribbon seam binding can be sewn diagonally across from the seam to the outer top corner of the pocket to hold it permanently in position. A tailor's bar tack should be worked across each end of the pocket opening on the right side.
Lining fabric can be used for part of each side of the pocket if it is desirable to reduce bulk. Make the seam straight with the warp grain and place in the position of the grain line. The right sides of the seams should face each mother on the inside of the pocket. Press the seam turnings into the lining fabric.
Vocabulary
A
accent – подчёркивать
alternate – совершать возвратно-поступательное движение
alteration – изменение, переделка
anchor – скреплять, закреплять
appearance – внешний вид
armhole – пройма (рукава)
ascertain – выяснить, удостовериться
В
band – тесьма, ремень
baste – сметывать
binding – обтачка
blend – смесь
bodice – лиф (платья)
bone – вставлять косточки в корсет
bulky – объёмистый, громоздкий
С
canvas – холст, парусина, брезент
change-over – изменение, замена
chemise – женская сорочка
clip – зажимать, подрезать
collar – воротник
detached ~ – отстегивающийся воротник
choker ~ – высокий крахмальный воротник
flat ~ – плоский воротник
lace ~ – кружевной воротник
stand-up ~ – стоячий воротник
roll-type ~ – воротник хомутиком
stiffened ~ – жесткий воротник
turned-down ~ – отворачивающийся воротник
collet – хомутик
crease – складка
crown – скат (рукава)
cut – резать, кроить
cuff – манжета
D
dart – вытачка
detach – отделять, разъединять
drape – драпироваться
durable – прочный, ноский
Е
ease – легкость, осторожно вставлять
edge – край, кромка
embroidery – украшение
evolve – развиваться
F
face – повернуть лицевой стороной
fancy – фасонный, нарядный
felt – фетр, войлок
fit – подходить по форме и размеру
fitting – примерка, пригонка (одежды)
flap – клапан (кармана)
flatten – разглаживать
flute – заутюживать складки
fold – складка, складывать сгибать
frill – оборочка, рюш
fulness – посадка, полнота
G
gather – сборка, сборить, собирать
gauging – буфы
gauze – марля, кисея
grain – зерно, структура, узелок
gusset – ластовица, клин, вставка
I
insert – вставлять
interlock – соединять, переплетать
L
lace – кружево, шнурок, тесьма
lapel – лацкан, отворот
lay-out – план, разбивка
M
machine – машина
lock-stitch m. – машина с челночным переплетением marking –
разметка
match – подходить (подбирать по цвету, качеству, размеру)
movability– свобода в движении
N
needle – игла
notch – надсечка, У-образный вырез, обрабатывать край зубчиками
О
omit – пропускать, не включать
opening – отверстие
overcasting – сшивание через край
P
pair – подбирать пару, комплектовать
patch – заплата, лоскут
pattern – выкройка, рисунок
patternmaker – модельер
pocket – карман
patch ~ – накладной карман
set-in ~ – врезной карман
R
reinforce – укреплять, усиливать
revers – отвороты, лацканы
ridge – рубчик
row – ряд, строчка
ruffle – сборка, волан
S
saving – вкономия
seam - шов
lapped ~ – накладной шов
butted ~ – шов встык
secure – закреплять
set – втачать, устанавливать
shallow – неглубокий
shaping – фасонирование, придание формы
sideseam – боковой шов
slash – разрез
sleeve – рукав
 set in ~ – вшивной рукав
 short-gathered ~ – короткий сборенный рукав
one - piece ~ – цельный Рукав
puff ~ – рукав с буфом
slot – прорезь
snip – отрезать, надрез
starch – крахмал, крахмалить
stay – стойка
stiff – жесткий, крепкий
stitch – стежок, шов, шить
strain – натяжение, напряжение
stuff – материал
subject – подвергаться
T
tack – наметка, наметывать, стежок
tailor – портной
take up – образование складок (сборок), подтянуть
temporary – временный
top stitching – прошивка
trace – намечать
trim – подрезать края, отделывать (платье)
tuck – защип, застрочная складка
turning – отворот
U
underarm – нижняя часть оката рукава
uppermost – верхний
V
vary – изменять (ся)
W
waffle – буфы
warp – основа (ткани)
waste – отходы
welt – листочка (кармана)
whisk – шарф, нашейная косынка
wrinkle – морщина, морщиться
АНГЛИЙСКИЙ ЯЗЫК
Методические указания
к контрольным работам 3, 4
Составили: ИВАНОВ Эдуард Яковлевич
ТАЛАЛОВА Инна Ивановна
Рецензент
Корректор
Подписано в печать Формат 60х84 1/16
Бум. офсет. Усл. печ. л. 1,62 (1,75) Уч.-изд. л. 1,6
Тираж 100 экз. Заказ Бесплатно
Саратовский государственный технический университет
Саратов, Политехническая ул., 77
Отпечатано РИЦ СГТУ. Саратов, Политехническая ул., 77
