Партнерка на США и Канаду по недвижимости, выплаты в крипто
- 30% recurring commission
- Выплаты в USDT
- Вывод каждую неделю
- Комиссия до 5 лет за каждого referral

gp254 Metal sportcomplex for kids,
height 2,35 – 3,20
Manual
Purpose: for games and sport exercises for children 3-14 years of age
Design features:
· safety (possibility of loss of stability is structurally excluded);
· simplicity and ease of installation (installation is made by one person with little effort);
· 2 types of installation:
· 1.Symmetric - for big loads
· 2.Asymmetrical - allows to install a complex close to a wall;
· adjusting details are hidden in the construction giving stylish slick look
· compact gift package
Sports equipment:
· Wall Bars,
· Gymnastics Rings of 15cm in diameter,
· Rope ladder,
· Trapeze
· Swing Disc
Construction features
· width of the Wall Bars, cm – 45
· diameter of main bar of wall bars, mm – 22
· maximal load, symmetrical installation, kg – 100
· maximal load, asymmetrical installation, kg – 70
· weight, kg – 12.5
the components SET
Item number | Name | Quantity |
1 | Beam | 2 |
2 | Lower prop | 2 |
3 | Middle prop | 2 |
4 | Prop raise | 2 |
5 | Short spacer | 2 |
6 | Long spacer | 2 |
7 | Long crossbar | 10 |
8 | Short crossbar | 2 |
9 | Upper stop | 4 |
10 | Short cord with slip block | 2 |
11 | Long cord with slip block | 2 |
12 | Cord for Swing Disc | 1 |
13 | Cord for Rope Ladder | 2 |
14 | Gymnastiсs ring | 2 |
15 | Disc | 1 |
16 | Large bearing heel of the regulation screw | 2 |
17 | Wooden crossbar for the Trapeze | 1 |
18 | Wooden crossbar for the Rope Ladder | 8 |
19 | Decorative case 35 mm | 2 |
20 | Tap-wrench | 1 |
21 | Bushing of 37.5 mm in diameter | 2 |
22 | Bushing of attachable equipment | 3 |
23 | Screw 6х50 | 30 |
Attention! In some of LECO goods small ironware and wiffets are packed up within the large parts.
assembling and Installation
ATTENTION! The figures given below are taken from the technical assembling drawings of the specified product. The numbers and colors of the components correspond to those in section “LIST OF COMPONENTS”. Before starting assembling, perform the COMPLETE IDENTIFICATION OF THE COMPONENTS and separate them according to the table. For this, use the photographs of the product on the package together with the drawings and the table with the specified names and quantities of the components. Identification of the components before assembling helps significantly to comprehend the figures and shortens assembling time.
 A particular feature of assembling is in the need to mount firstly the thrust prop ready-mounted with the beam. Next, tighten the crossbars to the fixed prop with the beam. The second prop with the beam must be tightened then. After that straighten upright both of the props and thrust the sport set with the screws. Adjust the spacers #4 and #5 if it is necessary depending on ceiling height.
Rope Ladder Assembling
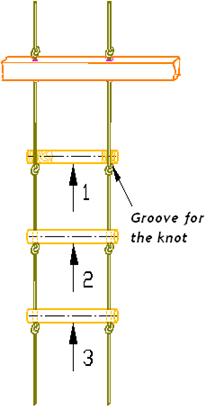
While you are busy with assembling the Wall Sport Complex for Kids, your child may start assembling the rope ladder with your help and under your supervision (excellent developing exercise). Depending on the child’s height, the steps of the ladder can be assembled at different distance from one another. As follows from experience, it is most comfortable for children to climb a rope with a distance between the steps of not more than the shank’s length. The knots should be tightened the same way as two existing knots (so-called “simple knots”) at the rope ends. The ladder assembling is performed from the top down. Place the cords with the knots upward. Thread the cords into the first bar, see Fig.1. The grooves for the knots on the bar must be at the bottom. Tie the knots without tightening to make them movable. Thread the cords into the second bar and bind the knots for it at a chosen distance from the first bar, and so on. The ladder can be rebound for a fully-grown child.
Fig.1. Rope Ladder assembling
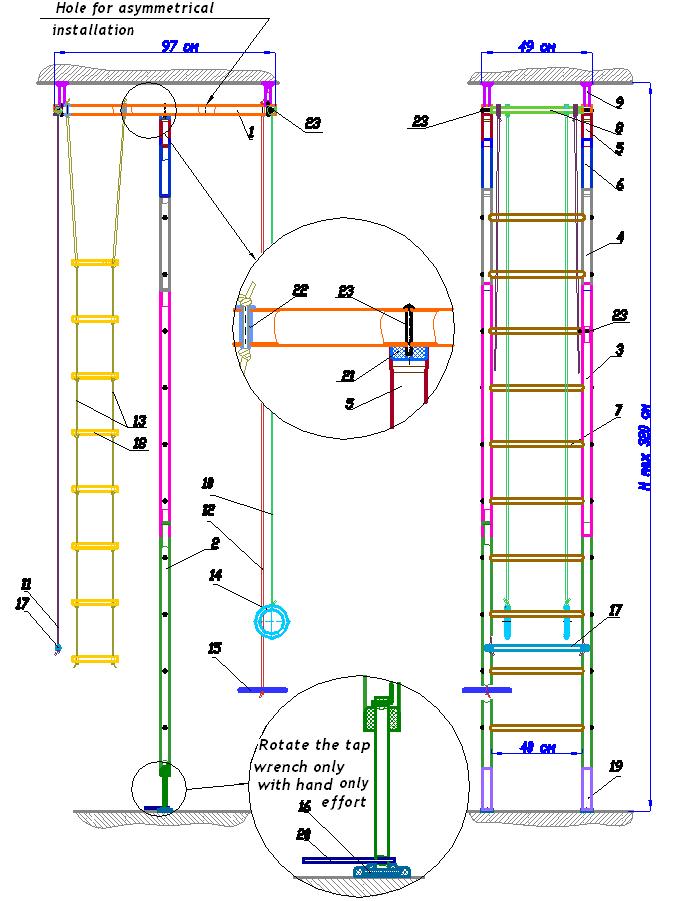
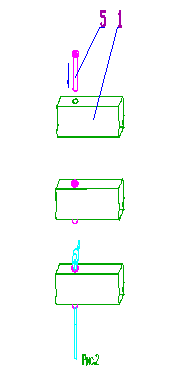
Pic.2. General view(symmetrical installation, maximal height)
Assembling and setting-up attached equipment
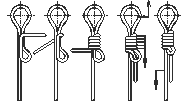
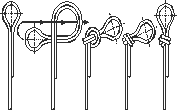
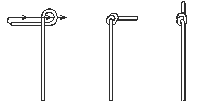
It is recommended to hang up the attached equipment after the Sport Complex is completely set up. One of the possibilities of setting it up is shown in Pic.2. One may choose one’s own way. Choose places on the beams for setting up the rope ladder and gymnastic rings. Insert the plastic hubs into the inlets on the beams. Thread the cord ends into the hubs. Tie “simple knots” on the top ends of the cords, see Table 1. Fix the gymnastic rings with the “figure-eight” knot or “slip-knot”. This system of cord fixation ensures full absence of abrasive wearing and provides reliability of suspension.
Table 1
Name of the not | Appearance of the knot and ways of tying | Recommendations for its use | ||
Slip-knot | | Nice knot with the function of the running knot. Used for fixing slip blocks and gymnastic rings. | ||
Figure-eight | | Main fixing knot for suspension. Used for fastening slip blocks and gymnastic rings. | ||
Simple | | Knot for local widening of the rope in order to limit its movement. Used for fastening the rope ladder bars and trapeze one. |
warranty
Warranty period: 2 years from the day of sale. Operation period: unlimited.