

Партнерка на США и Канаду по недвижимости, выплаты в крипто
- 30% recurring commission
- Выплаты в USDT
- Вывод каждую неделю
- Комиссия до 5 лет за каждого referral
Cooker hood
Instruction manual
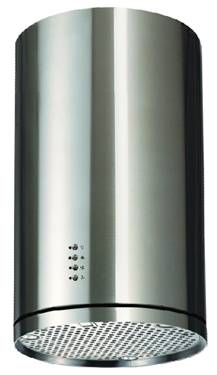
AWS-CY28E1
CONTENT
1……………………………………….Notice
2……………………………………….Feature
3………………………………………..Installation
4………………………………………..Safety Warning
5………………………………………..Operation
6……………………………………….. Maintenance
7…………………………………..……Abnormity and Solution
1. Notice
1. Thank you for choosing our cooker hood. Please read the instruction manual carefully before use.
2. The installation work must be undertaken by a qualified and competent fitter.
3. The manufacturer disclaims all liability for any damage or injury caused as a result of not following instructions for installation contained in the following text.
2. Feature
1. The cooker hood uses high quality materials, and is made with a streamlined design.
2. Equipped with a large power low noise electric motor and centrifugal leaf, it produces strong suction, low noise, non stick grease filter and easy to clean.
3. With the isolated low voltage circuit board control, 4vAC input, the lights are therefore safer.
4. Special wind tunnel construction and oil collector design, free dirt will be absorbed in a second.
3. Installation
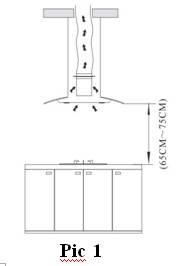
The cooker hoods should be placed at a distance of 65-75cm from the cooking surface for best effect. See Pic 1.
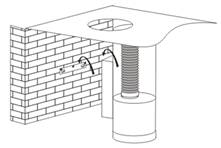
1. To install onto the wall every 100mm drill 3 holes of Ø8mm on a suitable place in line with the hook on the hood. Drill a holes on the ceiling which is with the same size of the decorative tube.
2. Insert expended screws into the holes. Fix the hook on the wall, See Pic 2.
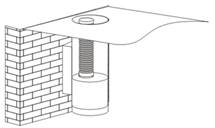
3. Add the soot tube to the one way valve, and extend it to a perfect height as you need. See Pic 3.
4. Hang the hood onto the hook. See Pic 4 and Pic 5.
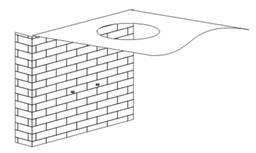
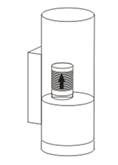
Pic. 2 Pic. 3
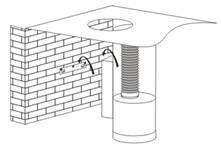
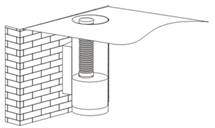
Pic. 4 Pic. 5
4. Safety Warning
In certain circumstances electrical appliances may be a danger hazard.
· Keep electrical appliances out of reach from Children or infirm persons. Do not let them use the appliances without supervision.
· This appliance is not intended for use by persons (including children) with reduced physical. Sensory or mental capabilities, or lack of experience and knowledge, unless they have been given supervision or instruction concerning use of the appliance by a person responsible for their safety.
· Do not touch the light bulbs when/after appliance use.
· Do not check the status of the filters while the cooker hood is operating
· Flame cooking is prohibited underneath the cooker hood
· Your cooker hood is for domestic use only, not suitable for barbecue, roast shop and other commercial use.
· Any installation work must be carried out by a qualified electrician or competent person.
· Before cleaning, always ensure that you have switched your cooker hood off.
· Clean the cooker hood according to the instruction manual and keep the cooker hood from the danger of burning.
· No fire for drying your cooker hood.
· If there is any fault with your cooker hood, please call the service department appointed by agent for servicing.
· If the power cord is damaged, it must be replaced by the manufacturer or a qualified service engineer in order to avoid a hazard.
· Do not exhaust the gas from cooker hood through the same heated flue which is for the gas from gas hob and other kitchen appliances.
· Before installation and usage, read all the instructions and make sure that the voltage (V) and the frequency (Hz) indicated on your cooker hood are exactly the same as the voltage (V) and the frequency (Hz) in your home.
· Regulations concerning the discharge of air have to be fulfilled.
· CAUTION: Accessible parts may become hot when used with cooking appliances.
· Attention! Observe the warning in the instruction sheet concerning the operation of the appliance when air is discharged from the room.
5. Operation
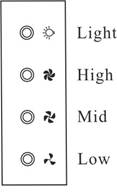
1. Press the button “Low”, the inner indicator light of switch starts shining, the motor is running at low speed. Press the button again, the motor stop.
2. Press the button “Mid”, the inner indicator light of switch starts shining, the motor is running at medium speed. Press the button again, the motor stop.
3. Press the button “High” ,the inner indicator light of switch starts shining, the motor is running at high speed. Press the button again, the motor stop.
4. Press the button “Light”, both lights start shining. Press the button again, the lights are switched off then
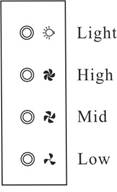
6. MAINTENANCE
1. It is recommended to operate the appliance prior to cooking.
2. It is recommended to leave the appliance in operation for 15 minutes after cooking is terminated in order to completely eliminate cooking vapors and odors.
3. The proper function of the cooker hood is conditioned by the regularity of the maintenance operations, in particular, the active carbon filter.
4. The anti-grease filters capture the grease particles suspended in the air, and are therefore subject to clogging according to the frequency of the use of the appliance.
5. The cooker hood must regularly cleaned on both the inside and outside with hot water plus non corrosive detergent (AT LEAST ONCE A MONTH) to protect the main body from corrosion over a long period of time.
Attention! Please do not use abrasive detergent or alcohol as it will damage the body.
Attention! Keep the motor and other spare parts free from water, as this will cause damage to the appliance.
Attention! Before cleaning the appliance please remember to cut off the power.
6. Changing and cleaning the anti-grease filters
-Removing the filters as the instruction of picture.
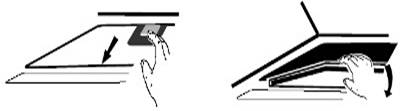 -
-
You can clean the filter as below measure:
1).Soak them for about 3 minute in hot water (40-50 degrees) with a grease-loosening detergent then brush it gently with a soft brush. Please do not apply too much pressure, avoid damaging it.
2).It can be put into a dishwasher with detergent, set the temperature at around 60 degrees.
Note: Please do not use abrasive detergent for it will damage the hood; Make sure that the hood is shut off before cleaning.
7. Installing the carbon filter, see Pic. 11;
Activated carbon filter can be used to trap odors. Normally the activated carbon filter should be changed at three or six months according to your cooking habit. Activated carbon filter cannot be washed or recycled. The installation procedure of activated carbon filter is as below.
1) 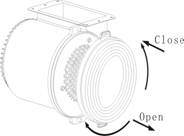 .Remove the filters like the picture.
2) The carbon filters are located at either end of the motor. Turn the charcoal filters anti-clockwise until they are unscrewed.
3) Apply reverse procedure to install the charcoal filter
7. Abnormity and Solution
Fault | Cause | Solution |
Light on, but motor does not work | The leaf blocked | Get rid of the blocking |
The capacitor damaged | Replace capacitor | |
The motor jammed bearing damaged | Replace motor | |
The internal with of motor off or a bad smell from the motor | Replace motor | |
Light does not work, motor does not work | Beside the above mentioned, check the following: | |
Light damaged | Replace lights | |
Power cord looses | Connect the wires as per the electric diagram | |
Oil leakage | One way valve and the air ventilation entrance are not tightly sealed | Take down the one way valve and seal with glue |
Leakage from the connection of U-shaped section and cover | Take U-shaped section down and seal with soap or paint | |
Shake of the body | The leaf damaged and causes shaking | Replace the leaf |
The motor is not tightly hanged | Lock the motor tightly | |
The body is not tightly hanged | Fixed the body tightly | |
Insufficient suction | The distance between the body and the gas top too long | Readjust the distance |
Too much ventilation from open doors or windows | Choose a new place and resemble the machine | |
The machine inclines | The fixing screw not tight enough | Tighten the hanging screw and make it horizontal |
The hanging screw not tight enough | Tighten the hanging screw and make it horizontal | |
ВИТЯЖКА КУХОННА

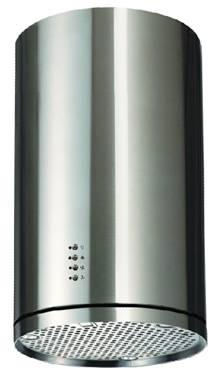
Candle
КЕРІВНИЦТВО З ЕКСПЛУАТАЦІЇ
зміст
1. Загальні відомості
2. Особливості
3. Установка
4. Вимоги безпеки
5. Використання
6. Обслуговування та догляд
1. Дякуємо, що придбали нашу продукцію. Будь ласка, перед використанням, уважно прочитайте інструкцію з експлуатації.
2. Установка та підключення здійснюється фахівцем.
3. Виробник не несе відповідальності за будь-які пошкодження, що виникли внаслідок недотримання даного керівництва.
4. Кухонний очисник повітря працює від мережі змінного струму частотою 50Гц і напругою 220/240В.
2. Особливості
1. Кухонний очисник повітря виготовлений з високоякісних матеріалів в сучасному дизайні.
2. Обладнаний нізкошумним електричним двигуном високої потужності, який створює сильне всмоктування, невеликий шум.
3. Жировий фільтр легкий в очищенні.
4. Зроблен з ізольованою контрольною платою низької напруги 12vAC, лампи найбільш безпечні.
5. Спеціальна аеродинамічна труба і масляний мотор моментально поглинають брудні пароутворення і випаровування
3. Установка
3.1 Для кращого ефекту кухонний очисник повітря потрібно встановити
на відстані 65-75см від варильної поверхні. див. рис. 1
3.2 Просвердлити в стіні 3 отвори діаметром 8мм через кожні 100мм відповідно до гачка на корпусі.
3.3 Вставити шурупи в отвори.
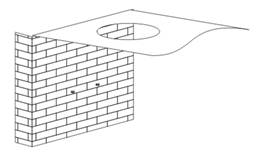
3.4 Закріпіть гачок на стіні, помістіть шаблон для свердління на гачок. см. рис. 2
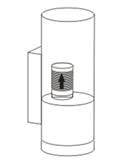
3.5 Додайте камінну трубу до клапана і виведіть її назовні. см. рис. 3
3.6 Визначити остаточну висоту U-подібної секції, вигніть внутрішню частину секції до підходящої висоти. (Див. ріс4).
Просвердлите 2 отвори діаметром 8мм на місці згідно з 2-ою пластиною.
Повторіть п.3.3. Помістіть внутрішню частину U-подібної секції у 2-у пластину і закріпіть двома
Pic. 2 Pic. 3
4. Вимоги безпеки
• Не дозволяйте дітям запускати прилад.
• Прилад призначений тільки для домашнього використання. Не застосовувати для барбекю, у м'ясних магазинах і інших комерційних цілях.
• По установці звертайтеся до фахівця.
• Прилад і фільтра до нього повинні бути чистими.
• Перед очищенням слід відключити від електричної мережі.
• Чистити очисник повітря слід відповідно до інструкції.
Необхідно уникати можливості спалаху.
• Не допускається виникнення відкритого факельного полум'я безпосередньо під очисником повітря.
• Не залишайте без нагляду сковорідки, займання жиру на яких може створити небезпеку пожежі.
• При виникненні несправності зверніться за допомогою фахівця в сервісний центр.
• Прилад, що має відмову, пошкодження шнура живлення, повинен бути відремонтований в спеціалізованій майстерні або утилізований відповідно до інструкцій з утилізації металів і пластмас.
5 Використання
1. Увімкніть прилад; прозвучить п'ять коротких сигналів про те, що він включений.
2. При натисканні кнопки "low" загориться лапочка № 1 і прозвучить один сигнал. Прилад запрацює на низькій швидкості. При повторному натисненні прилад повинен зупинитися.
3. При натисканні кнопки "mid" загориться лапочка № 2 і прозвучить один сигнал. Прилад запрацює на середній швидкості. При повторному натисненні прилад повинен зупинитися.
4. При натисканні кнопки "high" загориться лапочка № 3 та прозвучить один сигнал. Прилад запрацює на високій швидкості. При повторному натисненні прилад повинен зупинитися.
5. При натисканні кнопки "high" загориться лапочка № 3 та прозвучить один сигнал. Прилад запрацює на високій швидкості. При повторному натисненні прилад повинен зупинитися.
6. При натисканні кнопки "light" загориться лапочка № 4. Включати дві освітлювальні лампи. При повторному натисненні лампи вимикатися. З кожним натисненням прозвучить один сигнал.
6. ОБСЛУГОВУВАННЯ ТА ДОГЛЯД
1. Рекомендується включити прилад перед початком приготування їжі.
2. Рекомендується не вимикати витяжку 15 хвилин після закінчення приготування страв для того, для повного поглинання парів і запахів.
3. Правильна робота витяжки залежить від регулярного догляду за приладом,
4 Жировловлюючий фільтр служить для зберігання двигуна від забруднення, і тому вони схильні до засмічення залежно від частоти використання приладу.
5. Витяжку треба регулярно мити спеціальними засобами для логляду за нежавіючою сталлю, а також неагресивних миючих засобів (принаймні раз на місяць) для захисту від корозії протягом тривалого часу.
Увага! Будь ласка, не використовуйте абразивні миючі засоби оскільки це може призвести до пошкодження тіла.
Увага! Тримайте двигун та запасні частини подалі від води, так як це може призвести до пошкодження приладу.
Увага! Перед чищенням приладу будь ласка, не забудьте вимкнути.
6. Заміна та очищення фільтра
Щоб зняти фільтр, треба відкрутити декоративну гайку,
Та вже потім зняти фільтр обережно потянувши його на себе
Щоб встановити його на місце , треба повторити всі дії в зворотньому напрямку
Очистка фільтра
1). Замочіти фільтр на 3 хвилини в гарячу воду (40-50 градусів) з протижировим миючим засобом, потім чистити його м'якою губкою. Будь ласка, не тисніть надто сильно, щоб уникнути його пошкодження.
2). Його можна покласти в посудомийну машину з миючим засобом, встановити температуру в межах 60 градусів.
Примітка: будь ласка, не використовуйте абразивні миючі засоби для це може пошкодити фільтр
7. Установка вугільного фільтру, див. рис. 11;
Фільтр з активованим вугіллям може бути використаний для прибирання запахів. Зазвичай фільтр з активованим вугіллям повинен бути мінятися раз в три або шість місяців у відповідності з частотою використання витяжки. Вугільний фільтр не можна мити
Процедура установки фільтра, описана нижче.
1). Зніміть фільтри, як на картинці.
2) В комплекті йде 2 фільтра. Поверніть вугільним фільтром проти годинникової стрілки, поки не відкрутиться.
3) Використовуйте зворотну процедуру для установки фільтра
