
Партнерка на США и Канаду по недвижимости, выплаты в крипто
- 30% recurring commission
- Выплаты в USDT
- Вывод каждую неделю
- Комиссия до 5 лет за каждого referral
Academic Summary notes, only to be used in conjunction with the Full Capita Guidance Notes
Academic Year End
It is essential that the new academic year is created with the correct pastoral
structure and that the promotion routines have been run before the old year ends.
Permissions Required in System Manager
Members of System Manager Group can perform tasks such as backups
Members of the Personnel Officer Group can perform the tasks relating to staff
Members of the School Administrator Group can perform the tasks relating to
the academic year, pastoral structure, promotion and housekeeping
Members of the Admission Officer Group can perform the tasks relating to pupil
admissions, leavers etc.
Backups
As several of the actions in the Preparing for a New Year process have a significant
impact on the data held in the system, it is advisable to make backups through
System Manager at appropriate stages of the process.
You must have System Manager access rights to perform the following task
1. Focus/System Manager/System Manager 6
2. Close the Welcome Screen
3. Click on Tools and choose the option create Backup
4. In the Description, enter the date of the backup
5. Click Create and say Yes to continue
Task 1
Adding New Teachers
Select Focus | Person | Staff and click the New button on the toolbar. Enter relevant information, such as Name/Gender/DOB followed by Continue. Enter a Title e. g. Mr Then Under the Employment Details Tab, ensure that the Teaching Staff check box is selected and chose an appropriate Teacher Category and Qualified Teacher Status. E. g. Qualified Teacher. Still under the Employment Details Tab, click on New and enter an Employment Start date. (This still applies even if you have already entered a start date under the Teachers Contract)
4. Other details such as the address, contract etc can be entered now or at a later stage
5. Click the Save button on the toolbar.
Adding Teachers’ Leaving Dates
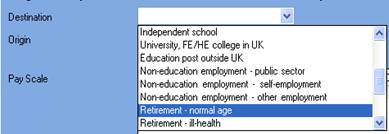
Select Focus | Person | Staff Search and Open the relevant member of staff Enter Date of Leaving in Employment Details and then Open the Contract![]() and select an appropriate Destination after Leaving for example Retirement
and select an appropriate Destination after Leaving for example Retirement
Task 2
Creating an Academic Year
Whilst not essential, it is strongly recommended that all other users log out of SIMS before commencing this process. Continuing to work whilst an academic year is being created is likely to result in error messages.
Please be aware that the process may take a long time because the system creates attendance records for the new academic year.
When creating an academic year, the start date of the first term is deemed to be the first day of the academic year. This may not necessarily be the day that pupils arrive in school; it could be an INSET day
Select Routines | School | Academic Year to display the Create Academic Year wizard. Click the Next button to display the Define the school working week Click the Next button to display the Define the terms and term holidays for the academic year page. Please do not include the Half Term Holidays on this page
For example Primary School
Autumn Term 01.09.2015 – 18.12.2015
Spring Term 04.01.2016 – 01.04.2016
Summer Term 18.04.2016 – 26.07.2016
Click the Next button to display the Define the half term holidays page.(Only add the Half term holidays here. Holidays are automatically created for the dates in between the term dates entered)
From the Define the half term holidays page, click the Add Holiday button todisplay the Half Term Holiday Details dialog.
Select Half-Term from the Category drop-down list. Enter the Start Date and End Date for the half-term holiday by clicking the Calendar button and selecting the required dates. (Please note that the Start and End dates are the dates the children are not physically in school, and not the date that they finished. For example If the children finished on Friday the 23rd of October, you would enter the date of following Monday 26th October, as this is the first date that the children are not required to attend. The end date would be Friday the 30th October and not Monday 2nd November as they are required back in school on that date) Next enter a description of the holiday and press OKFor example
Start date 26th October 15 End date 30th October 15 Description October Half
Term
Start date 15th February 16 End Date 19th February 16 Description Feb Half Term
Start date 30th May 16 End Date 10th June 16 Description Whit Half Term
NOTE – only show the days you are actually off, NOT the day you return
Click the Next button to display the Define teacher training day’s page.(This can be done at a later date via the School Diary, if dates are not known at this stage) Focus/School/School Diary. Select the required Academic Year, then right click on the appropriate day. Select New Staff Training Day, enter required description and Staff Training day from the Category.
From the Define teacher training days page, click the Add button to display theNew Teacher Training Day dialog.
Select Staff Training Day from the Category drop-down list. Enter the Date of the training day by clicking the Calendar button and select the date. Enter a relevant Description if required, e. g. INSET Day, to ensure that the type oftraining can be identified. The description appears in the School Diary.
Click the OK button to add the teacher training day. Repeat for any other requiredteacher training days.
15.Click the Next button to display the Define public holidays page.
(This can be done at a later date via the School Diary, if dates are not known at this stage)
(Only add the Bank Holidays that fall outside your existing school holidays. For
example no need to add the Christmas Bank Holidays or the late May Bank holiday
here, as they are already included in the Xmas/Whit Holidays, which are
automatically created for the dates in between the term dates you entered earlier.
You will need to add the Early May Day Holiday which falls on the 2nd May plus
Good Friday and Easter Monday, which falls on the 25th March and 28th March, as
these are additional dates to your school holidays. To add this, click the Add Holiday
button. Select Bank Holiday from the Category drop-down list. Enter the Date of
the Bank Holiday by clicking the Calendar button and select the date. Enter a
relevant Description and press OK.
16.Click the Next button to display the Ready to create new academic year page.
17.Once you are sure that the information is correct, click the Create button to create the
new academic year. If there are any anomalies in your settings, you are asked to
confirm whether you wish to proceed or review your settings. If you are certain the
data is correct, you can proceed and would say Yes to continue.
18.It is recommended that once you have created an academic year, you validate group
memberships by selecting Tools | Validate Memberships.
Task 3
Setting up the New Academic Year's Pastoral Structure
IMPORTANT NOTE - MAKE SURE YOU ARE IN NEXT ACADEMIC YEAR’S STRUCTURE
There are several possible structure scenarios for schools. So I will just run through a few.
The vast majority will not need to add additional year groups, however if this is required, such as adding a New Nursery, please log a call and a member of the Sims team will go through this. (This does not apply for those who have an existing Nursery, only those who have just introduced a Nursery to their school)
Example 1
In the following scenario, Mrs J Boswell, Class Teacher of 2JB is leaving at
the end of the year to be replaced by Mr Gerald Holyoake who will not start until
next year. This means the class name cannot stay as 2JB but we are
unable to just rename this class as it will effect the existing pupils history. It is
therefore necessary to create a new registration group
Select Focus | School | Pastoral Structure | Next Academic Year Structure to display the Next academic Year Pastoral Structure page. Click on the Plus button next to Pastoral Structure, then click on the + next to Year 2 followed by the Plus button next to Registration Group. Right-click on Registration Group and select New Registration Group.Enter for example Class 2 as both the Short name and Full name. Followed by clicking on the binoculars to select the registration tutor. E. g. Gerald Holyoake. Click the OK button to complete. If you get the message – (Group with the same name already exists. Do you want to check details and reuse it) you are advised to re-used the class rather than create a new class with the same name. (It is best not to name the reg group after the teacher’s initials as you would have to create a new reg group every time they leave)
Do not remove the old registration group at this stage, this can be removed after the start of the academic year. For now just click on the + button next to 2JB, then right click on the old reg tutor and click remove Click the Save button to complete the process.Example 2
In the following example, we are going to be adding a new registration tutor to an existing reg group named Class 3. We don’t need to add a new reg group as the reg group is not named after the reg tutor initials.
Expand relevant Year /Registration Group/Class. For example Right click on the reg tutor Caroline Connelly and select remove. Important note –do not remove the reg group as It effects the pupils history Next right click on Reg Tutor and select New Click on the Spy glass and select the new reg tutor –e. g.Suzanna Harrison(If the class has 2 joint teachers, follow the instruction above, then add the second teacher by right clicking on Supervisor, select New Supervisor, choose Joint Main Supervisor as the role and then search for the required teacher)
OK twice and Save the structureExample 3
In the following scenario, we are going to be changing the structure from vertical to horizontal. For example reception and year 1 are currently taught together (vertical), however next year they will be taught separately (horizontal)
1. Right-click on vertically year groups e. g.Year R/Year 1 (already structured vertically)
and choose Organise Year Group Horizontally.
2. It is then necessary to assign each Registration Group to one of the years
which were previously arranged vertically. This is achieved by highlighting
the Reg group and appropriate year group, then clicking on the right
pointing arrow.
3. Click OK to complete and Save the new structure
Example 4
In the following scenario, we are going to be changing the structure from horizontal to vertical. For example year 5 and 6 are currently taught separately (Horizontal) however next year they are going to be taught together (Vertical)
1. Right-click on the words Pastoral Structure and choose Organise Year Group
Vertically.
2. Select the Year Groups to be organised vertically check box and click the
OK button. I will choose 5 and 6
3 The Year Groups are merged and shown as Year5/Year6 and the Reg
Groups previously assigned to each individual year group are now displayed in
one list. Click the Save button to save the new structure.
Task 4
Adding Pre-Admission Groups/applicants
You may have already set this up earlier in the year to keep a list of applicants who have registered an interest in your school. If not please follow the steps below
Select Routines | Admission | Admission Groups | Setup to display the Find Intake Group browser. Carry out a search to ensure that the intake group does not already exist.Click the New button to display the Intake Group Details page. Mandatory fields are
highlighted in red. The page may look slightly different depending on whether you
have set up SIMS to allow multiple admission groups to be added. (Staggered)
In the Intake Group panel, select the Admission Year to which the intake groupRelates e. g, 2015/2016
Select the required Admission Season e. g. Autumn Select the required Year Group from the drop-down list. e. g. Reception6. Enter the number of applicants that you expect to admit to this intake group in the
Planned Admission field.
7 Click in the Name field, then a default name will be supplied for the intake group based on the Admission Year, Admission Season and Year Group
In the admission Group panel click in the Name field and then a default name will be
supplied for the Admission Group. Enter the required Admission date. We
recommend that the date of admission is the day on which the applicants will
actually arrive in school, i. e. not a teacher training day.
If you have the system set to allow multiple admission groups for staggered intake. You would click on New, then enter the name of Intake group and their date of admission. Repeat for the other staggered intakes.
(To allow Multiple admissions groups Tools/Admissions/Defaults and tick allow Multiple admission groups)
Ok and Save You would then add the applicants by Focus/Admissions/Application/NewTask 5
Importing Common Transfer Files (CTF)
Download any outstanding CTF’s for this Academic Year and Import into Sims via Routines/Data In/Import CTF.
Task 6
Checking Dates for Part-Time Pupils
To ensure that pupils who are no longer part-time are showing correctly in Attendance, it is necessary to enter an end date in their part-time details in SIMS and to change their attendance mode to all day.
Select Focus | Pupil | Pupil Details then select Nursery from the Year Group Field and then click Search Open each pupils record and then click on the Registration hyperlink In the Part Time Details table click on Open and enter an end date for any part time pupils who will no longer be part time. Select All day from the Attendance Mode drop-down list. Click the Save button to save any changes.Task 7
Recording Leavers
To bulk record year 6 leavers you need to follow the steps below
Select Routines | Pupil | Leavers If you wish to assign a group of pupils as leavers search on the appropriate Year Group for example year 6 To select all the pupils displayed in the browser, select All from the Select drop-down menu. In the Leaving Information panel, enter the Date of Leaving Select the Reason for leaving from the drop-down list, such as End of Phase Transfer.6. Enter the Destination after leaving if required. Alternatively, apply the Reason for
Leaving to one set of pupils (as described in the next step) then enter the
destination after Leaving for a different, or subset of pupils.
7. Highlight the pupils to which this information applies using the Ctrl and Shift keys
then clicking their names and choosing Assign to selected. If the information applies
to all the pupils in the list, click the Assign to All button.
8. Click the Save button to save the changes
To record individual leavers that are leaving their current school to attend an alternative primary school
1. Select Focus/Pupil/Pupil Details
2. Open up the pupil’s record, that is going to leave
3. Click on the School History hyperlink
4. Enter a date and reason for leaving, optional destination after leaving
Task 8
Exporting Common Transfer Files (CTF)
Year 6 leavers should be sent directly to their respective schools via a CTF
1. Select Routines | Data Out | CTF | Export CTF to display the Export CTF page.
2. General
3. Select
4. In the Data to be Exported panel, ensure that the check boxes relating to the data items you wish to export are selected.
5. Select the status of the pupils you wish to include in the CTF file from the View drop - down list (e. g.If you doing this procedure prior to the pupils actually leaving, change the view to Leavers this Year and then change the Effective date to the date after they are due to leave)
6. Click Refresh
7. Click on the drop down list next to Year Group and select year 6
8. You now need to separate the pupils into different files depending on which High School the pupils will be attending. For example - If a group of pupils are going to one particular High School. Highlight the first pupil going to that school, then hold down the Ctrl key and highlight the other pupils who will be joining that pupil, and then on the last pupil who will be attending that particular High School release the Ctrl key and select the appropriate High School from the Destination School. Repeat the process for the remaining High School
9. Press Export to get a list of the Exported File References
All Other leaver’s such as those leaving to attend an alternative primary school should be exported directly to their respective school as normal
Task 9
Setting up the Promotion Mapping for the New Academic Year
1. Select Routines | School | Promotion
2. Click the Ok button to display the Validate Memberships message dialog
3. The current academic year 2014/2015 should be selected automatically. Do not change unless it’s showing incorrectly
4. Press Load button
5. The Year Group panel does not need to be changed, instead navigate to the
Class Panel
6. The Class panel displays a list of the classes for the current academic year along with the propose promotion path. Review the promotion path for each class, and if incorrect use the drop down list under Promotion to change to the correct registration group. If the class promotion is not straight forward i. e. all the class not being promoted to the same class together but instead moving to various different registration groups, you would leave the promotion path blank, and would manually promote on the next page.
7. You would only use the Registration Tutor column if the class tutor was being promoted with their existing class
8. Select the Override their Membership check box in both the Year Group
and Class panels the first time you carry out the promotion mapping
process.
IMPORTANT NOTE: If you already carried out this process to set up your
mappings and you now wish to edit them, please ensure that the Override
Membership check box is not selected if you wish to retain your previous
settings.
9. Click the Finish button to save the settings.
10 SIMS will now display the Promote Pastoral Groups page. Here you can expand the current year group to view the promotion path you set on the previous page, or alternatively if the class promotion was not straight forward as mentioned earlier you would now manually select the class promotion for each pupil by clicking on the drop down list under Next Registration Group. Don’t worry if its in red and saying unusual, as
It just indicating that the change falls outside the normal mapping.
The promotion path can be set for multiple pupils by holding down the Ctrl key and highlighting the required pupils, then on the last pupil select the required registration group, which will populate all the selected fields.
11. Click the Save button to save the promotion mappings. The promotion occurs
at the beginning of the next academic year. A warning is displayed if any
unusual promotions have been set. Accept the warning by clicking the Yes
button.
Task 10
Changing the Status of Applications to Offered (We do this to keep a history of the application record
You may have already changed the status of the application to offered earlier in the year. If not you need follow the steps below:
Record if the applicant has been offered a place or if their application has been rejected. To do this select Routines | Admission | Finalise Offers to display the Find Intake Group browser. Search for, then double-click the required intake group To change the application status, tick either Offered or Rejected Click the Save button to save the changes.Task 11
Changing the Status of Applications to Accepted
You may have already changed the status of the application to accepted earlier in the year. If not please follow the steps below:
Select Routines | Admission | Accept Applications to display the Find Intake Group browser. Search for then double-click the required intake group Change the filter as required next to Current Application Status, to make sure all applications are picked up. e. g. Filter on Offered or Applied Click the Accepted column for each applicant who has accepted a place at your school, or tick the Withdrawal column if the applicant has rejected the place Once complete, click the Save button to save the changes.Task 12
Allocating Applicants to Registration Groups
Select Focus | School | Pastoral Structure | Next Academic Year Structure to display the Next Academic Year Pastoral Structure page. The Effective Date defaults to the start of the academic year, but if applicants are starting on a different day to this, you will need to amend this and press Go to refresh Expand the Pastoral Structure until the Registration Group folder is visible under the required year. Right-click the applicable Registration Group folder and select Members from thepop-up menu
Select the required class for each applicant in the grid by clicking the appropriate cellto display a tick. (Your applicants may have a class already assigned if you chose to
enter the class when the applicants were originally entered) Once you have selected
classes for each the applicants, click the OK button to save the changes.
IMPORTANT NOTE: Although you can specify which class the applicants will go in, the applicants must be admitted (via Routines | Admission | Admit Applications) before they become a member of this class. Do not admit the applicants now wait until as and when they arrive in September
Task 13
Printing Class (Registration Group) Lists for the New Academic Year
Select Reports | Run Report Expand the Student focus and double-click the required pre-defined report, e. g.
Registration Groups (Dated)
Deselect the Bypass effective date check box. Enter the required date, e. g. Start of the academic year 01/09/2015 Select the required Year Group(s) and Registration Group(s) then click the OKbutton to produce the required report.
Task 14
Printing OMR Registration Sheets for the First Week of Term
Select Routines | Attendance | OMR Entry | Print OMR Registration Sheet to display the Print OMR Registration Sheet page. Set the date range and click on Search. Highlight the required group(s) using Ctrl or Shift to highlight multiple groups. Click
the Print button to produce the required registration sheets.
Task 15
In SIMS Attendance - Entering Reasons for Absence Last Year
If you have not already done so, you need to enter reasons for Absence for Last Year
If you are using OMR Absence sheets, read the sheets via Routines | Attendance | OMR Entry | ReadOMR Absence Sheets.
If you are using Edit Marks (via Focus | Attendance | Edit Marks), put the date back in the Week Beginning field to the required date, then click the Search button.
Additional tasks need to be carried out after the start of the new academic year. This will be emailed and published shortly.
