Партнерка на США и Канаду по недвижимости, выплаты в крипто
- 30% recurring commission
- Выплаты в USDT
- Вывод каждую неделю
- Комиссия до 5 лет за каждого referral
ATS Day 4
 Agarose Gel Electrophoresis of
Restriction Digested Plasmid DNA
I. Objectives
The purpose of todayХs lab is to learn how to set up and run an agarose gel, separate DNA fragments on the gel, and visualize the DNA on a the end of today's lab, you should:
q Know how to pour, load, and run an agarose gel
q Be able to interpret the DNA bands observed on an agarose gel
II. Safety considerations
Gel electrophoresis requires passing electrical current through an aqueous solution so there is always the potential for a shock. Our gel rigs have lids that should prevent this, but do be careful with the rigs and the power supplies. There are no other specific hazards in this lab.
III. Introduction
GEL ELECTROPHORESIS
Gel electrophoresis is one of the most widely used techniques in molecular biology. It enables researchers to separate out large biomolecules (DNA, RNA, proteins) according to their size (number of nucleotides or number of amino acids). Electrophoresis refers to any separation of molecules in an electrical field, and gel electrophoresis refers to the separation of molecules in an electrical field in the presence of a supporting gel matrix. The matrix stabilizes the system and also serves as a molecular sieve, allowing small molecules to pass through the matrix more quickly than large ones.
In molecular biology, gels of agarose and polyacrylamide are usually used because the pore size created by these matrices is in the right range for efficiently separating molecules the size of nucleic acids and proteins. Agarose gels have larger pore sizes and therefore permit large nucleic acids to enter the gel matrix and be separated. On the other hand, these gels have fairly low resolution, and even very concentrated agarose gels (e. g., 2-3%) are limited to a resolution of about 50 base-pairs. Polyacrylamide gels have pores that are too small to permit large nucleic acids from entering the matrix. However, they are an excellent choice for separating molecules of 600 nucleotides or less and their resolution is very high. Polyacrylamide gels are used for DNA sequencing (which requires that DNA molecules differing by a single base-pair be resolved) and are always used for the separation of proteins.
Three factors influence how rapidly a nucleic acid or protein will move through a given gel matrix: (1) its mass (which is directly related to the number of nucleotides or amino acids in the molecule, (2) its overall charge, and (3) its shape or conformation. The following rules apply:
1. All else being equal, less massive nucleic acids and proteins will move more quickly through the gel than more massive ones.
2. All else being equal, highly charged nucleic acids and proteins will move more quickly through the gel than less highly charged ones.
3. All else being equal, nucleic acids and proteins with tighter conformations will move more quickly through the gel than those with looser conformations.
Since there are three factors that influence migration rates, separating out molecules on the basis of size alone can be problematic. In the case of linear double-stranded DNA, itХs relatively easy because all linear DNA molecules are long, thin rods (i. e., have the same conformation) and carry the same charge:mass ratio (one negative charge per nucleotide). Therefore, as long as the gel is oriented such that the DNA molecules run through the gel from the negative to the positive end, they will separate according to mass (length) alone. While linear double-stranded DNA molecules separate based exactly upon their length, circular double-stranded DNA molecules do not migrate according to their size as precisely.
Single-stranded DNA and RNA molecules tend to fold back upon themselves to form complex secondary and tertiary structures (much like proteins). Thus, while all molecules have the same charge:mass ratio, they can have quite different conformations. Therefore, such molecules must be denatured as they are run by gel electrophoresis, ensuring that all the molecules remain in a random coil conformation. This is usually achieved by the use of formamide and/or urea.
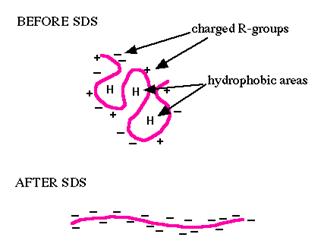
The situation with proteins is even more complex because amino acids do not all carry the same charge. Therefore, some proteins have an overall negative charge, some have an overall positive charge, and some are neutrally charged. Proteins must therefore be treated with SDS (a negatively charged detergent) prior to size separation analysis. SDS destroys the secondary structure of the proteins and swamps them with negative charges. Thus, SDS forces all the proteins into the same random coil conformation and charge:mass ratio.
|
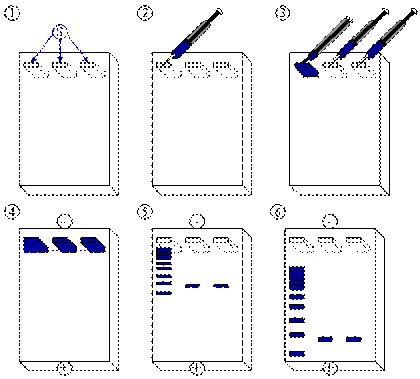
Agarose is a seaweed derivative and acts a lot like jello. If powdered agarose is mixed with buffer and boiled, it enters solution. The gel is then cooled slightly and poured into a mold, where it solidifies as it cools back to room temperature. Wells for loading the DNA samples are created as the gel is poured by placing a well comb near one end. As the matrix cools, the well comb will create holes in the gel, and very small volumes (usually less than 25 µL) of DNA samples are placed in the wells. The gel is then submerged in a buffer, which carries the electric charge and dissipates heat around the gel. When an electric charge is applied, the molecules will begin to migrate, moving towards the positive electrode.
When the gel is removed from the electric field (the electrophoresis chamber), the molecules will be present in a lane extending from the sample well, but they will not be visible. One way to make nucleic acids visible is to treat the gel with an intercalating dye that fluoresces when exposed to ultraviolet (UV) light. In the past we typically used ethidium bromide (EtBr) for this purpose. Upon exposure to UV light the DNA molecules of different sizes show up as orange fluorescent bands. EtBr is a strong mutagen so we have replaced it with SYBR Safe, a far less toxic alternative. SYBR Safe is a bit less sensitive so many labs still use EtBr. Upon exposure to UV light DNA with intercalated SYBR Safe are visible as fluorescent green bands. The size of a piece of DNA of previously unknown size can be deduced by its position in the lane compared to the position of standards of known size (a size ladder) that are also loaded on the gel. The lower limit of detection on ethidium bromide stained agarose gels is about 10 ng (double-stranded DNA).
 |
|
Before the DNA is loaded into the well on the gel, it is mixed with a loading dye. Two or three negatively charged dyes are included in the loading dye, along with a heavy substance like sucrose or glycerol. The dye serves two purposes. First, it moves through the gel in the same direction as the DNA and is visible to the eye, so the progress of the electrophoresis can be visualized and monitored despite the fact that the DNA in the gel cannot be seen until the gel is stained and exposed to UV light. Second, it helps the DNA load into the well because the loading dye is heavier than the gel buffer. Therefore, the DNA sample will "sink" into the well of the gel and stay there until the current is applied.
GEL ANALYSIS: Determining the sizes of DNA fragments separated by gel electrophoresis.
One of the most powerful aspects of gel electrophoresis is our ability to determine the sizes of fragments that we observe in gels. This is frequently used in molecular biology and biochemical analyses. In this lab we will use this tool to determine the sizes of the restriction fragments that we observe in our gels. If our products are those that we expect, then their sizes should match the size we predict based upon the choice of restriction enzymes. To determine fragment sizes we normally include a DNA size standard in one or more of the lanes on the gel. One common standard is a HindIII digest of lambda DNA. This and many other standards can be prepared easily and are available commercially. Fragments migrate through gels in inverse proportion to the log of their size. Therefore, if we plot the log of the sizes of fragments separated on a gel vs. the distance migrated we should see a linear relationship (figure 1 below). Further, if we do this, we should be able to use that line as a standard curve to determine the sizes of unknown fragments. To accomplish this, we can measure the distance the unknown fragment migrated and determine where this size intersects the standard curve (line A in Figure 1). The size corresponding with this point is the predicted size of the unknown fragment (line B in Figure 1).




 Log Size (bp)


Distance Migrated
Figure 1. Determination of DNA fragment sizes. The solid line represents a plot of the log of DNA size standards vs. distance migrated. The dotted line (A) represents the intercept of the distance migrated with the standard curve. Line (B) drawn horizontally from the intercept of A with the standard curve indentifies the size of the unknown fragment.
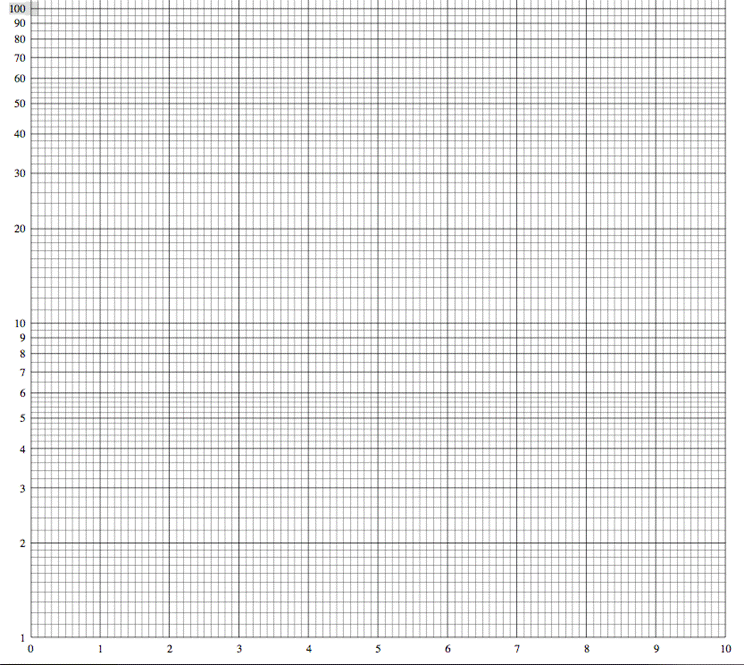
To simplify graphing this, the size of the fragments can be plotted on semi-log graph paper. Appendix 1 provides you with a piece of semi-log paper for this exercise.
IV. Things to Do
Agarose Gel Electrophoresis of Restriction Enzyme Digestions
1. Put on a pair of gloves. The gel rig, casting tray, power supply, gel comb, and TAE running buffer are all at your bench.
Also make sure that you know the location of:
б Melted agarose in water bath
б Graduated cylinders (beside agarose)
2. Retrieve your 4 tubes of 1) digested DNA (you should have 2 EcoRI digests and 2 HindIII digests), 2) your remaining plasmid prep DNA (ТuncutУ), 3) one tube of loading dye, and 4) one tube of lambda HindIII ladder.
3. Set up your casting tray and gel comb according to the demonstration by your instructor. DonХt forget to tape the ends of your tray well so that the agarose doesnХt leak.
4. Once your casting tray is ready, get 40 mLs of melted agarose from the water bath, using one of the graduated cylinders. Carry it back to your bench and pour it into the tray immediately (the agarose begins to solidify quickly). If there are any bubbles on the surface of the gel, pop them gently with a micropipette tip. DonХt forget to place your combs in the gel rig before the agarose begins to solidify.
5. While you are waiting for the gel to cool (solidify), prepare the samples to be run on the gel.
a. Add 4 µL of loading dye to each of your restriction digest reactions. The total volume of each should now be 24 µL.
b. To the tube with your plasmid prep (uncut), add 10 µL of water and 4 µL of loading dye for a total of 24 µL. You can use your P20 micropipette to get an estimate of how much plasmid prep DNA solution is remaining if you believe that you have less than 10mL remaining. Adjust the amount of water you add to have a total volume of at least 20 µL prior to adding the loading dye.
c. You will load your lambda HindIII straight to the gel, so no preparation is needed.
d. Mix each after additions. If necessary, use a brief spin to collect all liquid at the bottom of the tube.
6. When your gel has cooled, carefully remove the comb (pulling straight up with a gentle wiggle) and place the gel in the gel rig.
7. Add enough 1X TAE running buffer to completely cover your gel. Make sure that the wells are filled with buffer and that the gel is well-covered by buffer. (You can confirm this by viewing the gel from the side.)
8. Load the samples onto the gel according to your instructor's directions. Make sure that your pipette tip is below the level of the buffer and right above the well when you load.
9. Load 10 µL of your lambda HindIII ladder in the first lane. You will load 15 µL of each of your samples (uncut plasmid prep, single digest with EcoRI and digest with HindIII for both of your preps Р Tube 1, 1A, 1B and Tube 2, 2A and 2B) using your P20. Make sure to record the lane that each sample is loaded into. It is recommended that you sketch the gel and label the contents of each lane in your notebook.
10. When your samples are loaded, add the gel rig lid and connect the leads to the power supply: black to black and red to red. Turn on the voltage to 110 V. Look for the appearance of bubbles on each end of the rig to confirm that you have a current. (These bubbles arise from the hydrolysis of water to hydrogen and oxygen gasses.)
11. The gel should run for about 1 hour (until the first dye band is approximately ¾ of the way down the gel). When the run is complete, stop the current, disconnect the leads, and remove the lid off the apparatus. Carefully remove the casting tray (and gel) from the apparatus. Hold the gel on either end so that it won't slip off the casting tray.
12. SYBR Safe was added to the gel before class, so your DNA is stained and ready for observation.
13. Transfer the gel onto the UV transilluminator in the digital imager chamber by gently sliding it off the casting tray onto the UV transilluminator.
14. Observe and capture an image of the gel according to the instructions posted there (or described by your instructor).
15. Print copies of the image for each member of your group.
16. When you are done imaging your gel, discard it in the regular trash.
17. Tape your gel image into your notebook, and determine the size of your bands by creating a standard curve of your HindIII ladder and extrapolating to determine the size of the bands in your samples. You will use the graph paper provided.
Questions: Record in your lab notebook
1. List the sizes of all of the major bands in your EcoRI digests. Did your EcoRI restriction digest appear to go to completion? Are your bands the sizes that you expected? Explain why you conclude this.
2. List the sizes of all of the major bands in your HindIII digest. Did this digest appear to go to completion? Are your bands the sizes that you expected? Explain why you conclude this.
3. How did your uncut plasmid run compared to your linearized (single cut) plasmid? Why is this?
4. Why do we run the uncut plasmid on the gel?
5. If you didnХt see DNA on your gel, what could be some reasons for this?
V. Lab Clean-Up
б Make sure your gel tray, comb, and gel apparatus have been rinsed with distilled water and have been placed back on your bench
б Discard all leftover tubes in the trash
Appendix I