

Партнерка на США и Канаду по недвижимости, выплаты в крипто
- 30% recurring commission
- Выплаты в USDT
- Вывод каждую неделю
- Комиссия до 5 лет за каждого referral
3G Plus Wireless Scouting Camera
UM785-HD Instruction Manual
(For UM785-HD Model)
Content
1 General Description....................................................................................................................................... 1
2 Camera button info diagram........................................................................................................................... 2
3 Installing batteries......................................................................................................................................... 3
4 Purchasing SIM card..................................................................................................................................... 4
5 Installing your SIM card and SD card.............................................................................................................. 4
6 Customizing camera settings........................................................................................................................... 5
6.1 Formatting the SD card........................................................................................................................ 5
6.2 Download U set................................................................................................................................... 5
6.3 Setup with computer............................................................................................................................ 6
6.4 Send a test photo................................................................................................................................ 11
6.5 Camera mode settings......................................................................................................................... 11
6.5.1 CAM TAB............................................................................................................................... 11
6.5.2 Camera Scene.......................................................................................................................... 11
6.5.3 Video Mode.......................................................................................................................... 13
6.5.4 PIR TAB.............................................................................................................................. 14
6.5.5 Work Time.................................................................................................................................. 16
6.5.7 SYS TAB.................................................................................................................................... 16
7 Control Camera by APP via SMS................................................................................................................ 18
8 View or Delete photos on the color display.................................................................................................. 20
9 Trouble Shooting......................................................................................................................................... 20
10 Tricks and tips on field setup....................................................................................................................... 21
Appendix ўс: Technical Specifications.......................................................................................... 22
Appendix ўт: Parts List....................................................................................................................... 23
1 General Description
Congratulations on your purchase of UM785-HD scouting camera. UM785-HD is a powerful and reliable performance wireless camera.
Features:
12MP invisible IR 3Gcamera;
1080P H.264 video with audio;
0.6s trigger speed;
3G (WCDMA) network, faster transmission speed;
Video/Full size picture transmission;
Remote control via Android App or SMS;
Support 1-10 burst photos;
Support Wifi-SD card;
No glow black LEDs with 15m range;
Rich camera scene settings, including moving object and so on
Water resistance;
2 Camera button info diagram
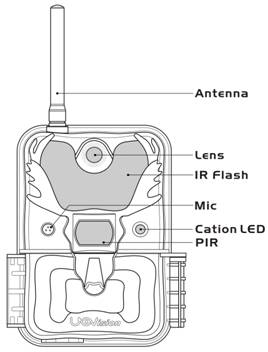
Figure 1 Front View Figure 2 Operation Interface
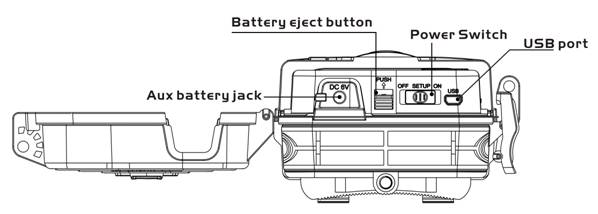
Figure 3 Bottom View
Operation PanelЈє
MENU: To enter the menu, the power switch should be on SETUP.
Ўш▼◄►: Navigation arrows.(Ў°ЎшЎ±is the shortcut to choose Ў°VideoЎ±, while Ў°▼Ў±for the Ў°PhotoЎ±.)
 OK : Save parameter settings. Exchange between playback and preview.
►Shot : To capture a photo or record a video manually. (Click ►again to stop the video.).
Power Switch: OFF: turn off the power; SETUP: change camera settings; ON: enter working mode.
3 Installing batteries
To supply power for the camera, 4, 8 or 12 size AA batteries are needed.
Confirm that the power switch is on the OFF position; load the fully charged batteries into the pack according to the polarities signs shown below. The following batteries with 1.5V output can be used:
1. High-density and high-performance alkaline batteries (Recommended)
2. Rechargeable alkaline batteries
3. Rechargeable NiMH batteries
There are 6 battery slots. Slot 1 and 2 form one group and is marked Ў°1Ў±, slot 3 and 4 form the other group and is marked Ў°2Ў±, while slot 5 and 6 form the other group and is marked Ў°3Ў±. Single Ў°groupЎ± of batteries is needed to supply power to the camera, but both can be used and is recommended.
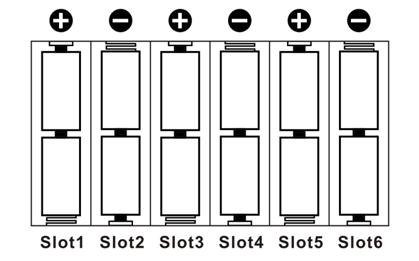
Figure 4 Battery Config
4 Purchasing SIM card
The camera is designed by using 3G/2G cellular network to send photos to any phone number or email address instantly once the photo is taken.
Be sure that the PIN Code of the SIM card is disabled before inserting SIM card to camera. (You can disable the PIN of a SIM card via your mobile phone. Then reinsert the card into your camera)
5 Installing your SIM card and SD card
UM785-HD camera has no storage space to store pictures. You need to insert a SD memory card to let the camera work correctly. SD and SDHC (High Capacity) cards up to a maximum 32GB capacity are supported. Using high speed SD cards (SanDisk Ultra or Extreme series or similar) is recommended if you will use the 1280x720 or 1920x1080 video settings.
Make sure the power switch is at OFF position before you insert SIM card or SD card into camera. You can use any SD card size up to 32G. The camera will not turn on without a SD card inside.
Before you switch camera to ON mode, please double check that the write-protect switch on the side of the card is Ў°offЎ± (NOT in the Ў°LockЎ± position).
NOTE: Every photo taken by this camera will be saved to SD card even those have been sent out wirelessly to the recipients. You will always have access to high resolution photos on the SD card.
SD card can be over written to ensure cycle use;
6 Customizing camera settings
6.1 Formatting the SD card
Press MENU button, then choose SYS tab. Navigate down by pressing the ▼ button until the FORMAT option is highlighted and press OK then choose Yes to format.
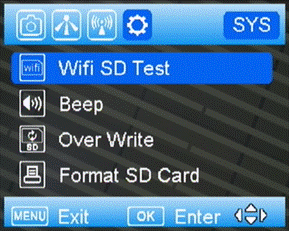
Figure 5
6.2 Download U set
1) Select the NET tab and navigate down to the DOWNLOAD TOOL and press OK. Shown as Figure7 and Figure8;
2) Turn the camera off.
3) Remove the SD card from your camera and insert into your personal PC card reader.
4) Locate the SD card reader in your computer.
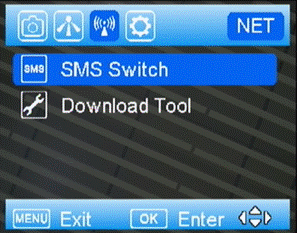
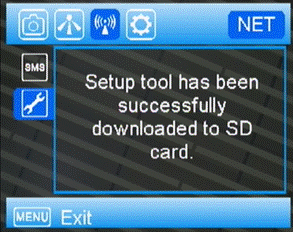
Figure 6 Download Tool Figure 7 Download successful
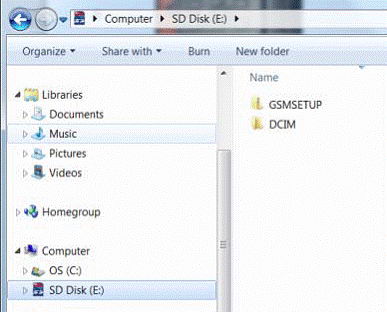
Figure 8 GSMSETUP
5) Unzip the GSMSETUP file to get the U Set application.
6.3 Setup with computer
1) After double click U set, you may see a warning box like below. Choose YES to continue.
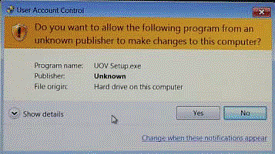
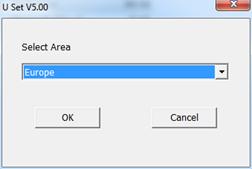
Figure 9 Warnning box Figure 10 Select Area
2) You will see the above screen for selecting area (Fig.10), then setting up window will shows up;
3) Setup starts from choosing operator parameters for your camera. There are three ways to setup your camera.
A. Fill in the "E-mail" setting box before doing other settings, shown below in Fig.11. Then choose Auto in the parameter settings shown in below in Fig.12. Fill in rest of the needed information such as e-mail, phone etc. Note: the advantage of this way is that if any change on SIM card for the camera in the wood, you don´t need to bring camera back to home.
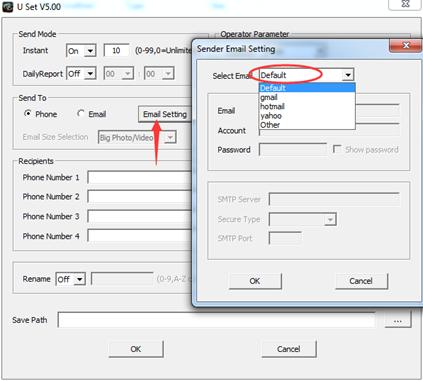
Figure 11 function A to set up camera
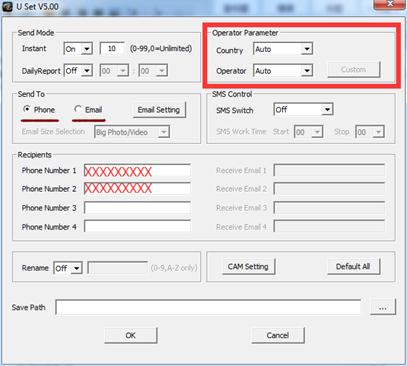
Figure 12 phone number and email address
B. Choose your country and select operator, set sender email, then fill in rest of the needed information like e-mail, phone etc.
C. If your personal cellular provider is not on the list, you can customize all the parameters by choosing Other in operator parameter, you can look all the MMS and GPRS information online or call your operator customer service, and fill in the blanks;
D. If the default set sender email is not working in your country, please select Other in Sender email settings shown as below, and put your personal email account in the sender email.
Note: the sender email should be different from receive email;
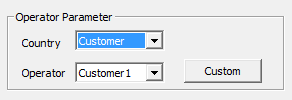
Figure 13 customize operator parameter
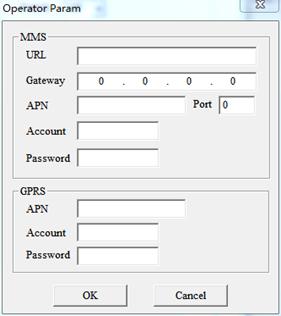
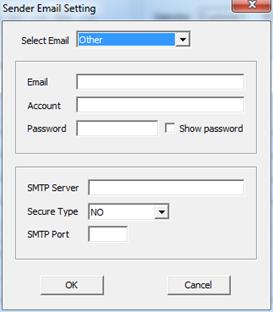
Figure 14 customize operator parameter Figure 15 customize sender email
Then fill in the blanks with your phone number or email addresses.
Note: when entering phone number, make sure you do not enter any spaces or dashes;
4) after finish customizing all the settings, make sure to save your path directly to SD card root, then it will generate a Ў®profile .binЎЇ file in SD card;
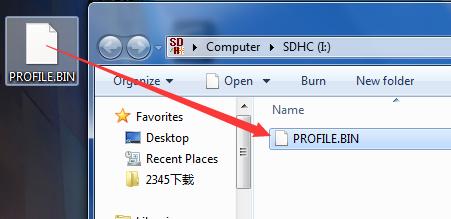
Figure 16 Save to SD card root
5) put the SD card back to camera, switch camera to setup, then you will see Ў®update successЎЇ shown on the screen;
6) Send Mode:
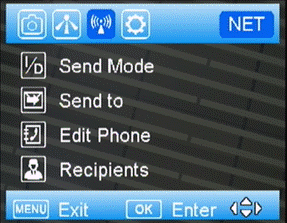
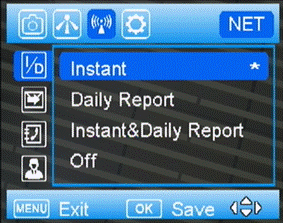
Figure 17 Send mode Figure 18 Instant
a. INSTANT: If you want the camera to send every photo instantly, you need to choose this option. You can control the numbers of photos that are sent to your device or email every day. If you want to limit this, set the maximum number. If you want it to send every photo regardless of the number of photos each day, set this value to 0 (zero)
b. Daily Report: This option only sends you the last photo taken each day with a report of all the other activity during the day at the preset time.
c. Instant & Daily Report: Camera will send every photo choose this option if you do not want the camera to send out the photos taken. This will make the camera perform just like a normal trail cam.
d. Off: choose this option if you do not want any photo be sent out
7) Send to:
a. Phone: Choose this option if you only want the photos sent to phone numbers
b. Email: Choose this option if you only want the photos sent to chosen e‐mail addresses.
NoteЈєFor your information security, please click Email Set button to change the default sending email address to your own sending email address. Thanks.
8) Edit Phone: you can add or delete phone number from here.
9) Recipients: you can double check the receive phone number and emails from here.
10) SMS switch: you can require photo or change settings by sending a SMS command code. Choose the ON option if you want to be able to control the basic functions of your camera by APP from your phone. If you do not want to have wireless control, you can leave the option at OFF. Also you can preset working time, then SMS command only work during that time.
6.4 Send a test photo
1) Switch camera to Setup mode, press ► button to take a picture, then press OK button to check this picture;
2) Press the MENU button, choose send. You will see sending progress shows on the LCD screen.
Once you see send successful, check your email account or phone see if you receive the correct photo.
6.5 Camera mode settings
6.5.1 CAM TAB
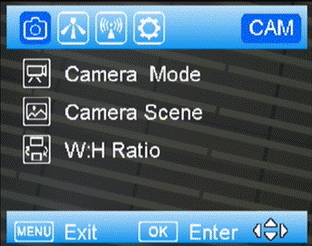
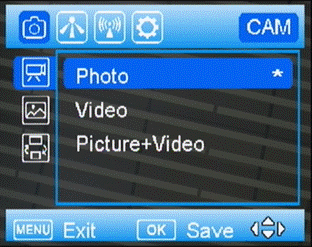
Figure 19 CAM menu Figure 20 Camera mode
Press menu button, then you will see the screen shown in Fig.19, press Ўш▼ button to highlight the option, then press OK to select. There are always a Ў®*ЎЇ shows up beside every selected option.
6.5.2 Camera Scene
UM785-HD camera has rich camera scene settings, including moving object and close object, with the help of camera scenes, you can easily choose different combinations of shutter speed and exposure time according to particular cases.
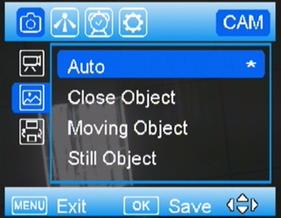
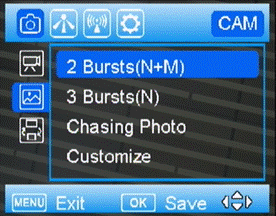
Figure 21 Camera scene(A) Figure 22 Camera Scene(B)
Camera Scene | Description |
Auto | This option is appropriate for most of the use. We recommend this option for quick setup camera. It takes 8MP photos in daytime and 3MP photos at night. |
Close objects | This option is suitable for object which is within the distance between 3m and 5m. The IR flash is dimmed to prevent excessive exposure. Note: Keep in mind that the focal distance of the camera is 3m(10ft) to infinity. |
Moving objects | This option is to reduce motion blur when capturing fast moving objects. |
Still objects | This option give a relatively slow shutter speed to get a brighter picture. |
Chasing Photo | This option allows PIR triggered up to three times within 15s, without constraint of the PIR interval. |
2Bursts(A+M) | Your camera can take a 2 shot burst every time the PIR is triggered to take a photo. One is using Auto scene, the other one using Moving objects scene to take a no blur photo. ItЎЇs useful for home surveillance usage. Ў°AЎ± means Auto, Ў±MЎ± means moving. |
3Bursts(A) | To take 3 continuous photos after one trigger. |
Also, you have access to custom settings just by clicking customize. See Fig.23.
Photo Size: 1.3MP, 3MP, 8MP, 12MP
Flash Power: Low/Medium/High.
Photo Burst: 1-10
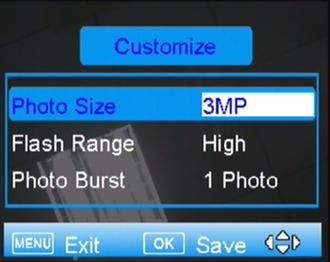
Figure 23 Customize
6.5.3 Video Mode
When you set Camera Mode as Video, then you will see these submenu shows up.
1) Video Size
Select video resolution (in pixels per frame). Higher resolution produces better quality videos, but creates larger files that will take up more SD card space and fills it up faster. It provides 1080P (1920x1080, 30fps), 720P (1280x720, 60fps) and WVGA (848x480, 60fps) videos. Default set is 720P.
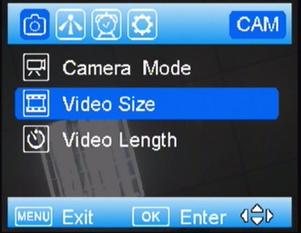
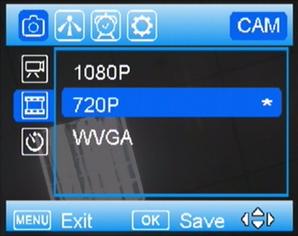
Figure 24 Video Size Figure 25 Video size
2) Video Length
Video length is the length per captured video clip. The video length is from 5s to 60s. The default setting is 10s. For saving power, it is better to set video length within 20s.
Note: For saving flash power, it is suggested to set video length within 20s.
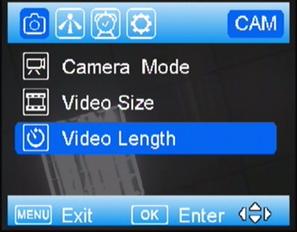
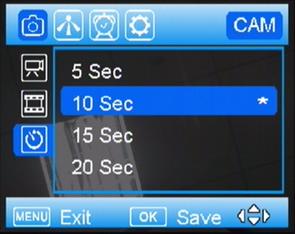
Figure 26 Video Length Figure 27 Video Length
6.5.4 PIR TAB
Trigger Mode
There are 3 trigger modes: PIR triggerЈTime lapse and PIR trigger & Time lapse.
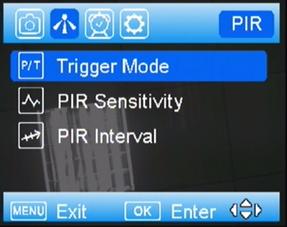
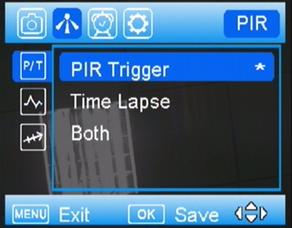
Figure 28 Trigger Mode Figure 29 Trigger options
PIR trigger
When choose PIR trigger, the PIR is active. Any motion (animals or humans) that is detected by PIR will trigger camera to capture a photo or video according to the preset PIR sensitivity and PIR Interval.
1) PIR Sensitivity
The camera monitors temperature of ambient conditions. Auto is camera automatically adjusts the sensitivity of sensor/trigger signal, on cold days it is ok to choose Low, on hot days it is better to choose High to be more sensitive to slight variations in temperature.
2) PIR Interval
Allows you to customize how often the PIR sensor can be allowed to work. This prevents the card from filling up with too many redundant images. Options are 0-60 seconds (5 second increments) and 1-60 minutes.
Time lapse
When choose time lapse, camera takes photos or videos even when it is not triggered by a nearby live animal, useful for constant monitoring of an area that might be far away from the camera. The interval time between each photo/video is set in submenu Time Lapse.
It sets the time lapse interval between each photo/video, when the trigger mode is Time Lapse or both. The time options include 5-55 seconds (in 5 second increments), 1-5 minutes (in 1 minute increments), 5-55 minutes (in 5 minute increments), 1-8 hours (in 1 hour increments) and 24 hours.
Both
It means PIR and Time Lapse are both active.
For exampleЈєSomeone placed this surveillance camera in a country park entrance, selected both, set the PIR interval as 5 second, set the Time Lapse as 4 hours, means that in addition to every 4 hours automatic field scan shooting.
6.5.5 Work Time
The camera can just work at a preset time and preset days. In the rest of the time the camera is under standby mode.
There are four work time can be set, see Figure 30.
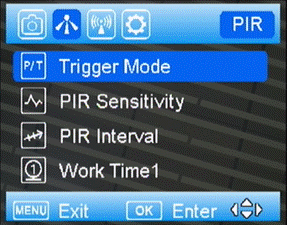
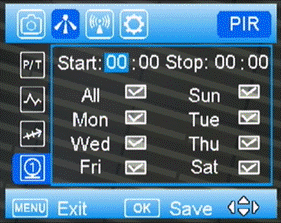
Figure 30 Work Time 1 Figure 31 Work time menu
On: It means enable the work time function. OffЈєIt means the camera will work all the time.
If you want set two different time periods, please set more than one Work Time.
6.5.7 SYS TAB
Set Clock
Enter to set the date and time.
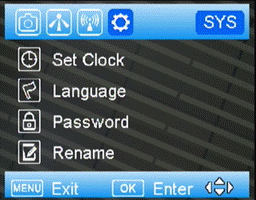
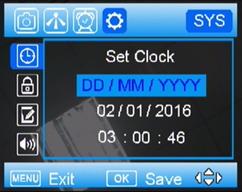
Figure 32 SYS menu Figure 33 Set Clock
Password
Use Ў°ЎшЎ±Ў°▼Ў±Ў°►Ў± to set the password, and press OK to save it. The default password is 0000. In case you forget your password, make sure you write down your password or save it to your mobile phone so you can access your camera if you ever forget your password. This is a very important security feature.
Rename
In order to distinguish one camera from others, you can rename your camera. The character is fromЎ±0Ў±toЎ±9Ў± and Ў±AЎ± to Ў±ZЎ±. The max number of character is 8. Use Ў°ЎшЎ±Ў°▼Ў±to select the character, and press OK to save it. The new camera name will be printed on time stamp.
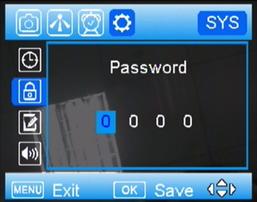
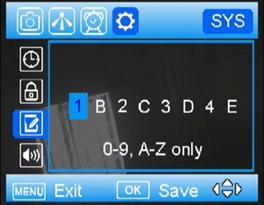
Figure 34 Figure 35
Wifi SD Test
You can enable wifi function by select this option. Before you use Wifi SD card to transfer photos, please make sure you already downloaded a certain app to smart phone. With the certain Wifi transfer app, you can send photos & videos from your SD card to your Android phone or tablet, or share them on your favorite online site. Your Wifi SD card will automatically upload your photos & videos to your Android device — no cables, no hassles! Further information please refer to SD card supplier.
Beep
When the Beep is on, every button you pressed, there will be a sound notifies you that an action just be done. Also you can turn it off to mute this sound.
Overwrite
The Over Write function will save new photos over the old photos on your SD card if it becomes full. Each time a new photo is taken the oldest photo on the card will be overwritten, however the camera may not continue to send pictures once the SD card is full.
Format SD card
Deletes (erases) all files stored on a SD card to prepare it for reuse. Caution! First, make sure you have downloaded and backed up all the photos you want to preserve!
ItЎЇs recommended to format the SD card when first used in this camera, especially when the SD card has been used in other devices
Default
The Default Set resets the camera to factory settings.
Software Version
It shows the firmware version of the camera, for manufacturerЎЇs use only.
7 Control Camera by APP via SMS
You can control many of the basic functions of your camera from your cell phone by android/IOS APP or text message when camera switched to ON mode. You can control the following functions on your camera via android/IOS APP.
(IMPORTANT NOTE: the SMS switch MUST be set to ON in the NET set‐up for the SMS function.)
The number which has control of this function (command phone number) is the one in the first position of the phone number list. This number can delete/add the subordinates of phone numbers 2, 3 and 4.
Please search ЎЇUOVisionЎЇ or ЎЇ CamCtrl_M ЎЇin Google play and install the APK file to your smart phone.
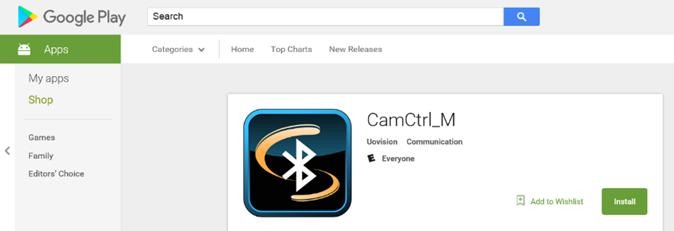
Figure 36 CamCtrl_M
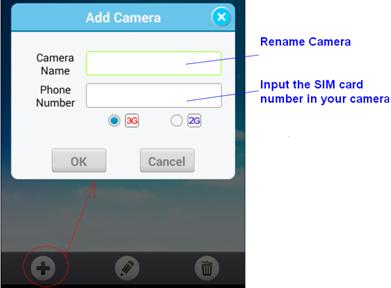
Fig 26
There are 2 main panels as below. Slide the phone screen to change between the panels.
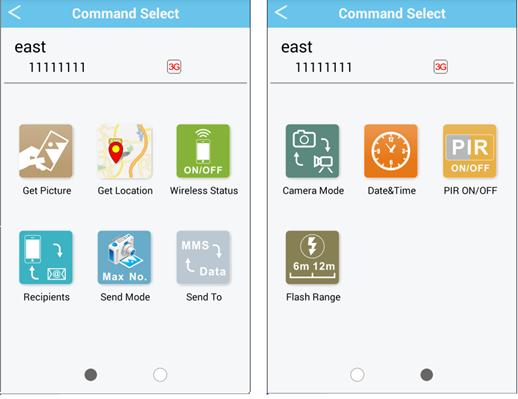
Fig 27
Note: If you set Wireless Status to OFF, you will not receive photos or Daily reports to your phone or e‐mail. You also canЎЇt get any response of other SMS commands. Just Wireless ON command can be responded when the Wireless Status is Off.
8 View or Delete photos on the color display
 You can view your photos on the color display when in the field. If you want to do this, make sure the Power switch is setted to SETUP. Press the Play button . You can use the ◄► buttons to toggle through the photos.
If you see photos you want to delete, press the DEL button. Use the ◄► buttons to toggle through YES or NO. Press OK to delete it
 Press the Play button again, you can back to the main screen.
If you want delete all photos one time, press from main screen, then press MENU. Choose Delete item, and use ► to select delete all. After delete all the photos, press again to back to the main screen.
9 Trouble Shooting
COMMON ERROR MESSAGES:
Ў°SEND FAILЎ±
Ў°NETWORK BUSYЎ±
Reasons for error:
1) The service in your area is not sufficient to run the camera.
2) There is an error when setting up the SIM card or itЎЇs locked.
Suggestions to remedy:
1) Re‐do the UOV Set‐up to make 100% sure there arenЎЇt any mistakes, check to be sure the numbers and e‐mail addresses are correct.
2) Contact your network provider and make sure your SIM card is a Text Feature Package only and is UNLOCKED.
3) If itЎЇs a cellular service issue you may need to purchase a booster antenna to help boost the signal. These can be very effective in boosting the signal to your camera in a poor signal area.
Ў°Network Busy:Ў±
Reasons for error:
1) There is a problem with the phone number or email addresses.
2) There is not enough money on the SIM card plan.
Suggestions to remedy:
1) Re‐do the UOV setup. Make sure there are no mistakes.
2) Sometimes you need to go back to just one phone number or e‐mail address at a time to find where the error is. Test with just one and if it works, then add more and test.
3) Call in and re‐up your text plan with more texts.
Cannot access the SETUP menu:
Reasons for issue:
1) This only happens if you donЎЇt have a SD card in the card slot or if the SD card is corrupt.
2) Batteries are too low
Suggestions to remedy
1) Install a SD card or Install a new SD card
2) Replace the batteries.
10 Tricks and tips on field setup
For best results, mount the camera approximately 1.3m/4ft off the ground facing straight forward as level as possible.
To enhance the flash, we recommend positioning the camera in an area with a backdrop to reflect the maximum amount of light. For instance, place the camera 7m-10m/20ft‐30ft from a field edge facing the woods. For the inside of timber, positioning the camera facing a thicket approximately 7m-10m/20ft‐30ft away.
Try to set the camera up so itЎЇs not facing directly into the sun either in the morning or the evening when game movement is at its peak.
Appendix ўс: Technical Specifications
Picture Resolution | 12MP, 8MP (Interpolated)Ј Real 5MP, 3MP |
Lens | F/NO=3.0 FOV(Field of View)=52Ўг |
Frequency Bands | UMTS/HSPA+: 900/2100MHz GSM/EDGE:850/900/1800/1900MHz |
IR-Flash | 6m, 12m |
Display Screen | 2.4Ў± LCD |
Memory Card | Up to 32GB |
Video Resolution | WVGA,720P,1080P |
PIR Sensor | Multi Zone |
PIR Sensitivity | Adjustable (High/Normal/Low) |
Trigger Time | 0.6s |
Operation/Storage Tem. | -30 - +60ЎгC / -40 - +80ЎгC |
Trigger Interval | 0s – 60 min. |
Time lapse | 5‐55 second (in 5 second increments)Ј» 1‐59 minutes(in 1 minute increments)Ј» 1-8 hours(in 1 hour increments)Ј» 12 hours/16 hours/20 hours/24 hours |
Photo Burst | 1–10 |
Video Length | 5–60s |
Power Supply | 4ЎБAA, 8ЎБAA or 12AA |
Stand-by Current | < 0.25 mA (<6mAh/Day) |
Low Battery Alert | LED Indicator; SMS alert |
Mounting | Rope/Belt/Python lock |
Dimensions | 140 x87 x55 mm |
Operation Humidity | 5% - 90% |
Security authentication | FCC, CE, RoHS |
Appendix ўт: Parts List
Part Name | Quantity |
Digital Camera | One |
Belt | One |
User Manual | One |
Antenna | One |
Declaration of Conformity to Directive 1999/5/EC
CE CautionЈє
Hereby, the manufacturer declares that this camera is in compliance with the essential requirements and other relevant provisions of Directive 1999/5/EC. Pls ask for your distributor for a copy of the Declaration of Conformity to Directive 1999/5/EC.
ЈЁVersion 2.00Ј©
Customer Name: | |
Contact Tel: | |
Date of Purchase: | |
Series No: | |
Fault Description: | |
Retailer: |
The camera manufacturer provides 24 months of warranty service for this product against manufacturing defects or malfunctions. If your camera fails to function under normal use within 2 years, the camera manufacturer will repair or replace the camera at no charge. The purchase receipt must be included from an authorized retailer to validate the warranty. Improper use of the camera resulting in damage is not covered by this warranty.
The camera manufacturer can provide repair service, after the warranty expiration. The customer will be responsible for any charges on parts, labor and shipping costs. Please contact the manufacturer for more details.
Please contact the area dealer for more details.
