

· Unplug the power cord in case you do not use it for a long time.
· Always unplug the power cord before servicing.
If the net input connector doesn’t agree with a plug of the appliance – please do not try to replace the socket by yourself – it must be done by qualified specialist only. Do not use adaptors, T-sockets or extension leads for connection. If it is impossible to connect the appliance without additional electrical devices, please be sure that their technical characteristics meet the technical requirements of the voltage in the ac source.
·  It is forbidden to lay the wiring near the heat sources. When the appliance is working, be sure that the power cord is completely unreeled. Otherwise it may cause its overheating.
· Don’t use the appliance with broken power cord after any damage. Once you suspect any problem, deliver the appliance to the service center.
· It is forbidden to use the appliance without filter.
· To avoid any accidents do not leave the appliance without the supervision while it’s working.
· Please follow all the special safeguards, otherwise the producer declines all responsibility.
Special caution for heating function!
| While using the heating function, please follow the instructions below: · Install the exhaust pipe well, in order to prevent the penetration of the cool air indoors. (Please refer to the instruction manual for the installation method.) · Fix the drain tube for the continuous pouring of condensed fluid. · Working range for heating function is 5 to 27C (for cooling function, it is 18 to 32C accordingly). If the temperature range does not agree with the technical requirements, the unit may not work properly. |
Energy savings.
· Do not exceed the recommended room size (see the technical data).
· Do not use the appliance in places where the furniture or some other objects may prevent the air flow.
· Keep curtains and blinds closed during the sunniest part of the day.
· Keep filter clean.
· Before switching on the appliance for the first time make sure that the thermostat regulator is in “MAX” position and the speed switch for cooling/heating option is in “HIGH” position too. After switching on you can choose the speed and temperature you want.
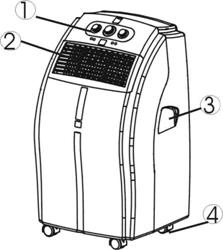
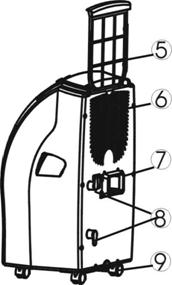
III. Description
Front panel | Back panel |
|
|
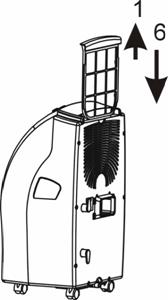
1. Control Panel 2. Air outlet 3. Carrying handle 4. Wheels | 5. Air filter 6. Air inlet 7. Exhaust air outlet 8. Cord storage 9. Water stopper / drainage point |
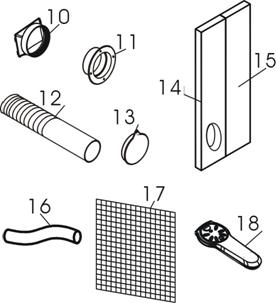
Accessories
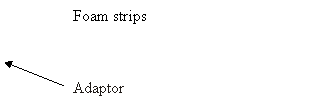
10. Inward adaptor – to put on the exhaust hose and fix to the air outlet at the back side of the appliance. 11. Outward adaptor - to put on the exhaust hose and fix into the hole of the foam strip (or into the hole in the wall/window). 12. Exhaust hose 13. Round cap for closing the hole in wall/window. 14. Foam strip - for filling the open window space, with a hole for the exhaust hose. 15. Foam strip - for filling the open window space. 16. Drain tube 17. Active carbon filter 18. Remote control (for the models with electronic control only). |
|
IV. Installation
You have bought one of the products of our company – portable air conditioner. The unit may be moved from room to room to maintain a desirable temperature. The installation is very easy. Follow the instructions to install the unit near the window.
Using the foam strips
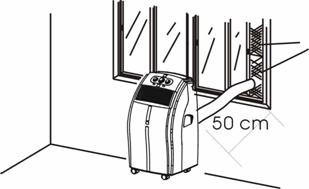
· Fix the foam strips into the window and cut to size if necessary.
· Insert the exhaust hose into the hole of the foam strip.
Using the adaptor
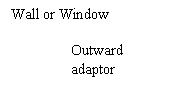
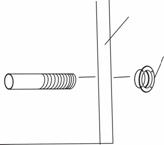
· Cut a 130mm diameter hole in the wall or window.
· Insert the exhaust hose into the hole in the window or wall and attach the outward adaptor from the outside as shown.
· When not in use, close the hole with the cover provided.
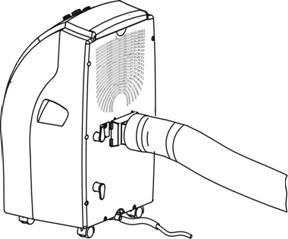
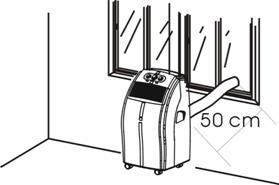
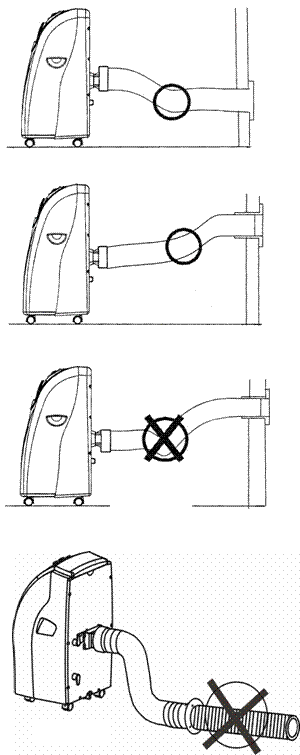 Mounting of the exhaust pipe
· Use only the exhaust hose provided with the appliance. Put the inward adaptor on it and fix it to the air outlet at the back side of the unit.
· The correct position of the hose is shown on the first two pictures.
· The hose supplied with the unit may be extended from 300 mm to 1500 mm but for maximum efficiency use the shortest length possible.
· Before switching the appliance on make sure that there are no kinks and bends on the exhaust hose. Otherwise it may cause overheating of the appliance and its automatic switching off.
WARNING!
· The length of the exhaust pipe is specified according to the technical requirements of this product. Do not replace or lengthen it by yourself as it could cause the incorrect work of the air conditioner.
 |
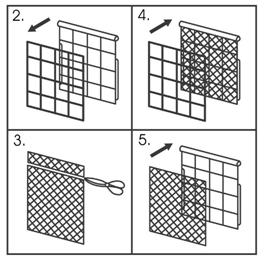
Installation of the carbon filter
· Remove the filter frame from the unit.
· Separate the fixing device from the filter frame.
· Remove the active carbon filter from its plastic bag.
· Insert the active carbon filter into the filter frame.
· Fix the filter with the fixing device into the filter frame.
· 
V. Appliance operating
For PM 0904 M, PMH 0904 M
Model PM 0904 M without heating function
_
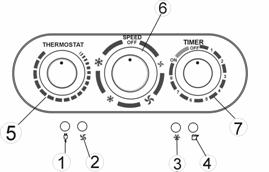
1. Power indicator
2. Fan mode indicator
3. Cooling mode indicator
4. “Water full” indicator
5. Thermostat
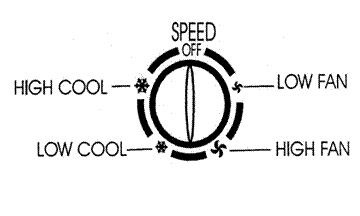
6. Speed switch with options for - LOW FAN, HIGH FAN, LOW COOL, HIGH COOL
7. Timer (1-8 hours) as well as ON/OFF switch
Model PMH 0904 M with a heating function.
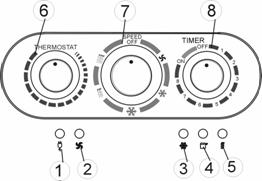 |
1. Power indicator
2. Fan mode indicator
3. Cooling mode indicator
4. “Water full” indicator
5. Heating mode indicator
6. Thermostat
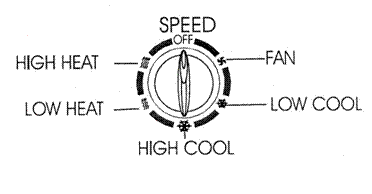
7. Speed switch with options for - FAN,
LOW COOL, HIGH COOL,
LOW HEAT, HIGH HEAT.
8. Timer (1-8 hours) as well as ON/OFF switch
Turning ON/OFF
For the permanent work of the appliance just set TIMER to “ON” position
(the unit will operate till you switch it off).
 Power indicator is alight all the time.
To switch off the unit, turn the TIMER to “OFF” position.
Setting mode/function
Model PM 0904 M
Turn the speed switch to select the mode you need:
LOW FAN, HIGH FAN, LOW COOL, HIGH COOL
 Setting mode/function
Model PMH 0904 M
Turn the speed switch to select the mode you need:
FAN, LOW COOL, HIGH COOL,
LOW HEAT, HIGH HEAT
Setting temperature
Turn the THERMOSTAT to regulate the temperature you desired, from 18C to 32C. The cooling intensity is increasing clockwise.
Set timer
Set the TIMER to the desired operating time (1 to 8 hours). When the time is up, the machine will stop working automatically.
For Models PMH 0904 SE-Р, PMH 1204 SE-Р
Control panel
1. Automatic mode indicator
2. 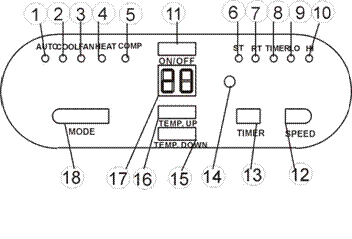 Cooling mode indicator
3. Fan mode indicator
4. Heating mode indicator (For cool & heat models)
5. Compressor operation indicator
6. 'Set temperature' indicator
7. 'Room temperature' indicator
8. Timer operation indicator
9. Low ventilation indicator
10. High ventilation indicator
11. ON/OFF (power) button
12. Speed (air flow) button
13. Timer
14. Receiver for Remote Control
15. 'Temperature down' button

|
Из за большого объема этот материал размещен на нескольких страницах:
1 2 3 4 5 6 |
