

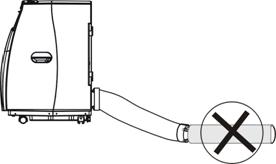
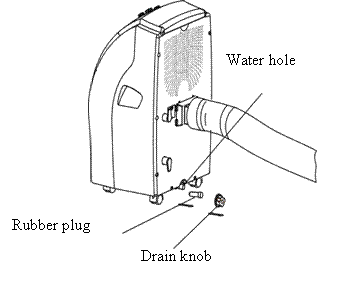
· The correct position of the hose is shown on the first two pictures.
· The hose supplied with the unit may be extended from 300 mm to 1500 mm but for maximum efficiency use the shortest length possible.
· Before switching the appliance on make sure that there are no kinks and bends on the exhaust hose. Otherwise it may cause overheating of the appliance and its automatic switching off.
 WARNING!
· The length of the exhaust pipe is specially designed according to the specification of this product. Do not replace or prolong it with your own private hose as this could cause the unit to mal-function.
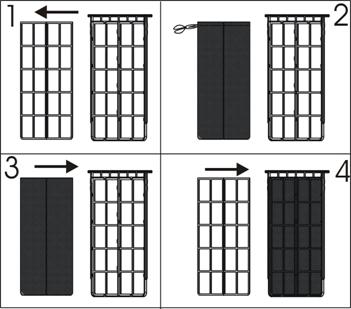
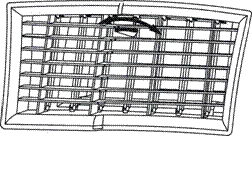
Installation of the carbon filter
· 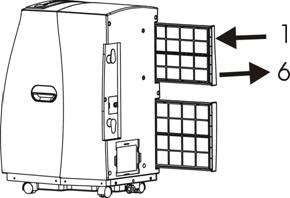 Remove the filter frame from the unit.
· Separate the fixing device from the filter frame.
· Remove the active carbon filter from its plastic bag.
· Insert the active carbon filter into the filter frame.
· Fix the filter with the fixing device into the filter frame.
· Put the filter frame inside the unit.
V. Appliance operating
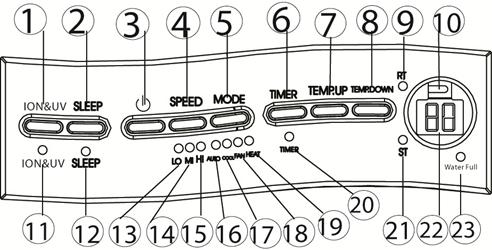 |
Control panel
1. Button for UV and ionizer
2. “SLEEP” function button
3. ON/OFF (power) button
4. Speed (air flow) button
5. Mode (function) option button
6. Timer
7. 'Temperature up' button
8. 'Temperature down' button
9. 'Room temperature' indicator
10. Receiver for remote control
11. Indicator for UV and ionizer
12. “SLEEP” function indicator
13. Low ventilation indicator
14. Medium ventilation indicator
15. High ventilation indicator
16. Automatic mode indicator
17. Cooling mode indicator
18. Fan mode indicator
19. Heating mode indicator
20. Timer operation indicator
21. 'Set temperature' indicator
22. Digital display
23. “Water Full” indicator
Switching ON/OFF
Press ON/OFF button, the unit will start working automatically. If the room temperature is
- higher than 23C, the unit will work in cooling mode.
- higher than 20C but below or equal to 23C, the unit will work in ventilation mode.
- below 20C, the unit will work in heating mode.
Indicators of the modes light up accordingly. *NOTE! The COMPRESSOR indicator lights up only if the compressor is in operation.
The display window shows the room temperature.
To switch the unit off, press ON/OFF button again.
Setting mode/function
· Press MODE button to select required working mode: automatic, cooling, fan or heating,
· The indicator of the selected mode lights up.
Setting temperature
· Press 'Temperature up' or 'Temperature down' button to regulate the temperature you desired.
· The display window shows the temperature you set when you press 'Temperature up' or 'Temperature down' button. Otherwise, it always shows the room temperature.
· The pre-setting temperature of this machine is: 24oC for cooling, 20 oC for heating.
Setting the speed of air flow
· Press SPEED button to choose the air flow speed you need, high or low. The indicator of high or low air flow lights up at the same time.
· If the unit is in AUTO mode, it will choose the air flow speed automatically according to the room temperature (the related indicators lights up), at this time, the speed button doesn’t operate.
Setting timer
· Press TIMER button to set the operating hours you desired (1 to 12 hours - the timer indicator lights up). When the set time is up, the machine will turn off automatically. The display window shows the hour(s) you set when you press TIMER button. If the timer button is not pressed, the unit will work continuously.
· Setting the timer but without pressing the other modes’ buttons, you can PRE-SET the time for the machine to start working. For example, if you press the timer to '2', the unit will start working automatically in 2 hours.
“SLEEP” function
· By pressing SLEEP button, the set temperature will increase at 1oC at the 1st hour, another 1oC at the second hour, then keeps the reached temperature.
· Re-press the SLEEP button, the temperature will return to the pre-selected one.
· The unit will stop working automatically after the SLEEP function running for 12 hours.
All the above functions can also be performed with the supplied remote control. This remote control requires 2 pcs AAA batteries to operate. The remote control is supplied without batteries.
UV light and ionizer function.
· To start the UV and Ionizer function, please press UV/Ionizer button.
· The blue light inside the air vent lights up, the ionizer starts working.
Regulating of air flow direction
Turn the roller of the air vent to the right or to the left to control the air flow direction.
NOTICE!
· To prolong the compressor's life, after switch-off of the unit, please wait for 3 minutes (at least) before re-switch.
· The cooling mode switches off if the room temperature is lower than the set one. The ventilation, however, keeps working on the set level. If the room temperature rises above the selected level, the cooling system switches on accordingly.
· On the contrary, the heating mode switches off if the room temperature is higher than the set one (still, the ventilation keeps working on the set level). As the room temperature drops below the selected level, the heating starts working again.
· This machine has got the ANTI-FROST function. While using the heating mode when the temperature in the room is low, sometimes the heating stops for a while in order to melt the frost. When it happens, wait for the heating starts working.
· While switching on the heating mode the ventilation stops working for 15-20 sec. in order to warm up the appliance.
Drainage system
When the appliance is working for cooling, the moisture
is absorbed from the air and the water fills in the water tank inside of the unit.
If the water tank inside of the unit is full of water then the “Water full” indicator lights up.
Drainage
 |
· Turn off the air conditioner and avoid moving it when the water tank is full.
· Put a container (a water tray for example) underneath the drain hole.
· Remove the drain knob & rubber plug from the drain hole and allow the water to drain out.
· When the container is almost full, place the rubber plug in the drain hole and empty the water tray.
· Repeat until the water tank is empty.
· Insert the rubber plug and tighten the drain knob firmly.
· Switch on the unit - the “Water full” should stop lighting.
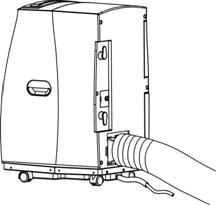
Drain tube usage
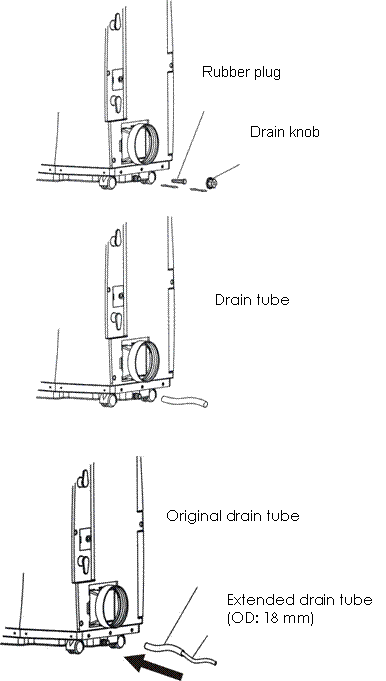 |
· Remove the drain knob and rubber plug from the drain hole. Connect the drain tube supplied with the unit to the water outlet as shown and put the other end into any container. In that case the water drains automatically.
· If you want to extend the water tube, you can do it with the help of another tube (OD: 18mm)
![]()
·
· If you use this method the “Water full” indicator should not light or flashing.
 .
.
VI. Technical maintenance
Always unplug the air conditioner from the mains before cleaning.
To maximize the efficiency of the air conditioner clean it regularly.
Cleaning the housing
· Use a soft, damp cloth to wipe the body clean.
· Never use aggressive chemicals, gasoline, detergents, chemically treated cloths, or other cleansing solutions. These all could hurt the body of the unit.
Cleaning the filter
· Use a vacuum cleaner or tap the filter lightly to remove loose dust and dirt from it and then rinse thoroughly under running water (no hotter than 40C).
· Dry thoroughly before replacing.
· Notice! Never use the unit without filter.
End of season storage
- Unplug the air conditioner from the mains.
 Drain all the water from the water tank inside of the unit. In sunny day switch on the appliance and let it work for some hours choosing the fan mode. It is necessary for drying the inside parts of the unit. Clean or change the filter
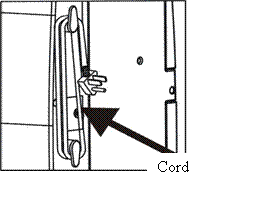
 - Store the power cord as shown on the picture Put the unit in the original carton or cover for storage.
VII. Fault check list

|
Из за большого объема этот материал размещен на нескольких страницах:
1 2 3 4 5 6 |
