
Партнерка на США и Канаду по недвижимости, выплаты в крипто
- 30% recurring commission
- Выплаты в USDT
- Вывод каждую неделю
- Комиссия до 5 лет за каждого referral
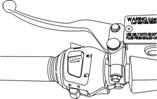
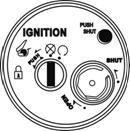
· Ignition switch key can be removed.
· When unlocking, simply turn the key from “LOCK” to “OFF.”
![]() position
position
· How to open : Insert your key into the ignition switch, and turn it to the left.
· How to lock : Push the seat and it locks automatically.
· Never operate the ignition switch key when the scooter is running. To turn the ignition switch to “OFF” and “LOCK,” will shut off the electrical system and that may result in a dangerous accident. Therefore, the ignition switch can only be turned off after the scooter has been completely stopped. · Always remove the key and be sure to take the key away with you after locking the steering handle before leaving your scooter. · If ignition switch remains in the “ON” position for a prolonged period after the engine has been stopped, the battery’s capacity will be reduced and this may affect the engine’s start ability. |
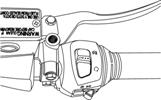
USE OF BUTTONS
 |
![]()
|
|
|

|

|
|
|
Hazard Switch
![]() When the switch is turned to this position, all lights will go off.
When the switch is turned to this position, all lights will go off.
![]() The main switch in the〝 ON 〞 position, cuts according to this switch, four directions lantern festivals dodge extinguish do move, also can simultaneously dodge on the display board direction indicating lamp extinguishes does moves. If stops the vehicle has when the transportation frequent dangerous position or the vehicle the breakdown, may use the dangerous police to show the switch.
The main switch in the〝 ON 〞 position, cuts according to this switch, four directions lantern festivals dodge extinguish do move, also can simultaneously dodge on the display board direction indicating lamp extinguishes does moves. If stops the vehicle has when the transportation frequent dangerous position or the vehicle the breakdown, may use the dangerous police to show the switch.
· Engine Stop Switch
![]() Switch to this position to turn off the engine when a state of emergency.
Switch to this position to turn off the engine when a state of emergency.
![]() Switch to this position and the engine can be started.
Switch to this position and the engine can be started.
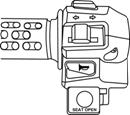
· Seat open Switch
![]() Turn ignition switch “ON” and press this button down. Then, the seat will unlock immediately.
Turn ignition switch “ON” and press this button down. Then, the seat will unlock immediately.
This button will return to original position after releasing.
Make sure to take the key away with you before you lock your seat. |
· Electrical Starter Button
![]() This is a starting motor button (switch) for engine starting.
This is a starting motor button (switch) for engine starting.
With the main switch "ON", press this button while holding the front or rear brake lever will start the engine.
· Release this button immediately after engine has been started, and never press the button again to avoid damaging the engine. · This mechanism is a safety design. The engine can only be started after the front or rear brake lever (pedal) has been applied. · Do not use light system. Turn headlight and turn signal lights to the “OFF” position when the engine is being started. |
· High/Low Beam Switch
This is the high and low beam of headlight switching switch. Press this switch to switch between high and low beams.
![]() This is for high beam.
This is for high beam.
![]() This is for low beam. (Please turn to low beam when riding in city)
This is for low beam. (Please turn to low beam when riding in city)
· Passing Switch
![]() Turn ignition switch “ON” and press this button down. Then, the high beam of headlight will come on immediately to warn the driver of the vehicle ahead that you intend to overtake him/her. (For overtaking, high beam indicator will come on at this time) This button will return to original position after releasing
Turn ignition switch “ON” and press this button down. Then, the high beam of headlight will come on immediately to warn the driver of the vehicle ahead that you intend to overtake him/her. (For overtaking, high beam indicator will come on at this time) This button will return to original position after releasing
· Horn Switch
![]() Press this button down when ignition switch is in the “ON” position, the horn will sound.
Press this button down when ignition switch is in the “ON” position, the horn will sound.
Do not press this button when you are in the area where there’s no honking. |
· Turn Signal Switch
Turn signal lights are used when turning left/right or changing lane.
Turn ignition switch to “ON”, and slide the turn signal switch to left or right.
Then, the turn signal lights will flash.
To release, simply return the turn signal light button to the original position.
![]() Right-side turn signal light flashing means you intend to make a right turn.
Right-side turn signal light flashing means you intend to make a right turn.
![]() Left-side turn signal light flashing means you intend to make a left turn.
Left-side turn signal light flashing means you intend to make a left turn.
· Power supply comp
The accessory socket is inside the inner box. You can use the accessory socket to power a trouble light, PDA, spotlight, radio, or cell phone, etc.
Ÿ Do not plug in any head-generating accessory such as an automobile cigarette lighter because it can damage the socket. Ÿ Do not use the socket in raining day. Ÿ Do not splash water or other liquid on socket when using the socket. |
To use accessory socket, turn the ignition switch ON to start the engine. Then turn the headlights OFF, and open the accessory socket cap.
The accessory socket’s rated capacity is DC 12V, Max 120 Watts (10A).

|
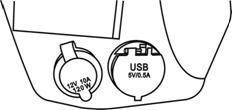
POWER SUPPLY COMP:
1.Rated voltage: DC 12V
2.Control voltage scope:DC9V~16V
USB:
3.Output voltage:DC5V±5%
4.Maximum output current:500mA(Max)
5.Overloading short circuit protection:>1A
ENGINE CONTROL SWITCH
Ÿ This switch is located in the luggage box, under the seat.
Ÿ To set on the ENG. control switch, switch it to〝ON〞or〝![]() 〞.
〞.
Ÿ Switch to〝OFF〞或〝![]() 〞,before start the engine.
〞,before start the engine.
Ÿ Be sure the seat locked preperly after set on the switch.

|

STORAGE BOX
· This box is located under the saddle.
· Maximum load capacity: 10kg.
· Do not store valuables in the box.
· Make sure that the saddle has been locked completely after it was pressed down.
· Take out valuables before washing to avoid wetting these objects.
· Do not place thermal sensitive objects in the box because of engine’s heat and high temperature.
PILLION STEP
·
|
![]()
![]()

FUEL TANK CAP【Fuel refilling】
1. Insert the key into the fuel tank cap, turn it counterclockwise and pull out the fuel tank cap.
2. Put the fuel tank cap into the fuel cap hole, turn the key clockwise and lock the fuel tank cap.
|
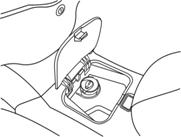
· Main stand should be put down on the ground, engine should be shut off and flames should be strictly prohibited to ensure safety when refueling. · Do not fill above fuel upper limit when refueling. Otherwise, fuel will flow out through a hole on the cap that may damage the body’s painting, in serious cases, it may cause a fire to burn down the scooter. · When refill the fuel, the flow rate should not be too big, in case of preventing the spurting to cause danger. · Make sure the cap has been tighten properly. |
BRAKE
· Avoid unnecessary sudden braking.
· Use front and rear wheel brakes simultaneously when braking.
· Avoid brake continuously for a long period of time because that may overheat the brakes and reduce its braking efficiency.
· Slow down and brake early when riding in rainy days on slippery roads. Never apply the brakes suddenly to prevent skidding and falling.
· Using only the front brake increases the risk of falling because the scooter is tend to pulled to one side.
| |
| |
PARKING BRAKE
|

a. The parking brake lever is above the right front floor panel.
b. Pull up the parking brake lever while parking the vehicle, then the”![]() ” on the meter lights up.
” on the meter lights up.
![]()
![]() c. Pull up the parking brake lever to the end to release the parking brake before riding, then the “
c. Pull up the parking brake lever to the end to release the parking brake before riding, then the “![]() ” on the meter goes out.
” on the meter goes out.
|
《Engine Brake》
Return the throttle valve handle back to its original position, and apply engine brake.
It is necessary to apply both brake and engine brake intermittently when riding on a long or stiff slope.
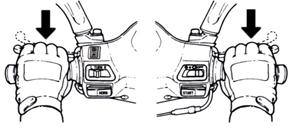
· Please check the engine oil and fuel volume are adequate or not before starting engine. · To start engine the main parking stand must be firmly on the ground and the brake is applied on the rear wheel to prevent the scooter from moving forward suddenly. |
Turn ignition switch key to the “ON” position.
1. Apply rear wheel brake.
2. Do not accelerate, press starter button when the brake is applied.
|
|
[We care for you! Before drive off, keep the hand brake applied on the rear wheel.]
· If engine can not be started after starter motor running for 3~5 seconds, turn the throttle valve handle 1/8~1/4 turns, and then press starter button again for an ease start. · In order to avoid damaging the starter motor, please do not press the starter button continuously over 15 seconds. · If engine still can not be started after pressing starter button over 15 seconds, stop and wait for 10 seconds before start it again. · It is harder to get the engine started after the scooter has been left idle for a long time or after refueling only after the fuel has been depleted. Then, it is necessary to press starting lever or starter button several times, and keep the throttle valve handle at the close position to start the engine. · It may need several minutes to warm up engine if it is a cold start. · Exhaust contains harmful gases (CO), therefore please start the engine at a well ventilated place. |
· Turn on the turn signal light before moving, and make sure no vehicle is coming from behind. Then, drive off.
THE CONTROL OF THROTTLE VALVE HANDLE
|
|

Acceleration : To increase speed. When riding on an inclined road, turn the throttle valve handle slowly to allow the engine to output its power.
Deceleration : To decrease speed.
PARKING METHOD
· When approaching the parking lot:
1. Turn on the turn signal light early, and pay attention to the vehicles in front, from rear, left and right, then take the inner lane and approach slowly.
2. Return the throttle valve handle back to its original position, and apply brakes in advance. (Brake light comes on when braking to warn drivers of vehicles behind.)
· When stop completely:
3. Press the turn signal switch back to its original position, and turn the ignition switch key to “OFF” position to shut off the engine.
4. Get off the scooter from left side after the engine has been stopped, and select a parking place where the scooter will not interfere with traffic and the ground is level, then put down scooter’s main parking stand.
5. Hold the steering handle with your left hand, and hold down the front end of saddle or hold the parking handle on the lower-left side of saddle with your right hand.
6. Press the main parking stand with your right foot, put down the main parking stand firmly on the ground.
7. Pull the parking brake.
To remind you: Lock the steering handle and remove the key after parking to prevent the scooter from being stolen.
· Park your scooter at a safe place where it will not interfere with traffic. · Should so as to ensure the flame-out engine the security of parking first while parking. · Please cut off the engine for safety parking. |
(Please refer to the components location diagram for the following components.)
ROUTINE INSPECTION
Check Items | Check Key Points | |
Engine Oil | Is there enough engine oil? | |
Fuel | Is it enough? Is it Octane 90 or above | |
Brake | Front | Braking condition? (Brake lever free play: 10~20mm) |
Rear | Braking condition? (Brake lever free play: 10~20mm) | |
tires | Front | Is tire pressure normal? (Standard: 2.0kg/cm2) |
Rear | Is tire pressure normal? (Standard: 2.25 kg/cm2 for 1 person, 2.5 kg/cm2 for 2 persons) | |
Steering Handle | Does the handle vibrate abnormally or is difficult to turn? | |
Speedometer, lights, and rearview mirror | Is it operated properly? Do lights come on? Can it be seen clearly from behind? | |
Tightness of Main Components | Are screws, nuts loosen? | |
Abnormal Points | Do the previous troubles still exist? |
· If any problem founded during routine inspection, correct the problem before using the scooter again, have your scooter checked and repaired by the “SYM dealer or authorized service personnel” if necessary. |
ENGINE OIL INSPECTION AND CHANGE
INSPECTION:
1. Use the main parking stand to support the scooter on a level ground, remove the dipstick after engine stopped for 3~5 minutes. Wipe oil off the dipstick and then insert it into the guide tube again (Do not rotate it.)
2. Remove the dipstick and check whether oil level is in between the upper and lower marks.
Add oil to upper limit if oil is under the lower limit. (Check cylinder, crankcase…etc for leakage.)
OIL CHANGE:
· Change engine oil after the first 1,000km, and change the engine oil every 5,000km thereafter. Clean oil filter after the first 1,000km, and clean oil filter every 20,000km.
· In order to maintain the engine’s maximum performance, check whether the engine oil is enough every 1,000km. Add oil to upper limit if the engine oil has been found to be inadequate.
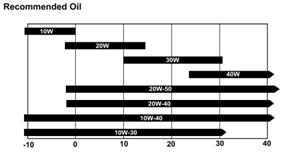
· Engine Oil : Use API SJ, SAE 10w-40 grade or better engine oil. Otherwise, damage will not be covered by warranty.
※Recommended Oil: SYM Genuine EXTRA 4X OIL.
· Oil Capacity :
2.0 Liter (1.8 liters for routine change),
oil filter change: 1.9 liters.
|
|

|
【Oil Filter Cleaning】
Open the filter nut assembly of the element, and remove the element. Remove the foreign materials from the element by using a gasoline or air spraying gun.
· Oil level will not be correct when checking the oil level with the scooter parked on an unleveled ground or immediately after the engine stopped. · Engine and exhaust pipe are hot right after engine stopped. Pay special attention not to get burned when checking or replacing engine oil. |
· If the oil pressure warning light activated for more than 10 seconds after engine started, please shut the engine as soonest as possible. · IT IS NORMAL that this warning light to be activated for 6~8 seconds after engine started. If this light keeps ON more than 10 seconds or even longer, the engine oil pressure may be too low for sufficient lubrication. An immediate lubrication check is HIGHLY ADVICED. · Please kindly check the engine oil level by dipstick to ensure there is sufficient oil inside the engine, if the oil level is correct yet the warning light does not disappear after engine started more than 10 seconds, please contact your SYM dealer. |
FUEL INSPECTION
· Turn main switch key to "ON" position, and check fuel gauge's needle range to make sure there is enough amount of fuel in the fuel tank.
· This scooter’s engine is designed for using the unleaded fuel of Octane 90 or above.
· Firmly secure the main stand on the ground, shut off the engine and keep flames away from the scooter when refueling.
· Do not fill above fuel upper limit level when refueling.
· Make sure the fuel tank cap had been tighten properly.
· Ethanol in gasoline can not be more than 10%.
TRANSMISSION OIL INSPECTION AND CHANGE
INSPECTION:
· Use the main stand to support the scooter on a level ground, after the engine stops, wait for 3~5 minutes. Remove the transmission oil infusion bolt, put a measuring glass under the drain bolt, and remove the drain bolt. Let the oil flows into measuring glass and check for decreased or not.
at disassembly: 350 cc. / at change: 330 cc.
OIL REPLACEMENT:
· Stop the engine and use the main stand to support your scooter on a level ground. Remove the infusion bolt and drain bolt, drain out the oil.
· Install the drain bolt and tighten it. Fill new transmission oil (330 cc.), and install the infusion bolt and tighten it. (make sure that bolts are tightened and check that there’s no leakage.)
※Recommend Oil:
Genuine SYM HYPOID GEAR OIL (SAE 85W-140).
![]()
|
|
|
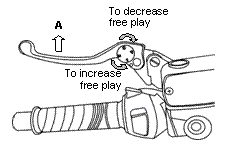
INSPECTION AND ADJUSTMENT OF BRAKE FREE PLAY
|
·
|
When checking the hand-braking lever for front and rear wheels, its free play (the stroke of hand-braking lever from no braking to initial braking) should be 10~20mm. It is abnormal if the feel is spongy when holding the hand-braking lever forcefully.
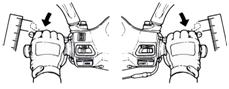
BRAKE LEVER ADJUSTMENT KNOB
 operation:
· Push the brake lever forward to the end (A), and turn the span adjustment knob.
· There are four positions on the span adjustment knob; position 1 is the shortest span between the brake lever and the handgrip with the loosest braking feel, position 4 is the longest span between the brake lever and the handgrip with the tightest braking feel.
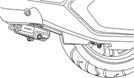
DISK BRAKE INSPECTION (Applicable for model equipped with disc brake.)
(Leak, damaged, looseness of brake line)
· Visual check brake lines for leakage, or damage, check brake lines connections for looseness using a wrench or similar tool, and check whether steering handle vibration in driving, or any parts' interference may have damage the brake lines. If so, bring your scooter to your SANYANG dealer for repairing or service.

|
Из за большого объема этот материал размещен на нескольких страницах:
1 2 3 4 5 |
