
Партнерка на США и Канаду по недвижимости, выплаты в крипто
- 30% recurring commission
- Выплаты в USDT
- Вывод каждую неделю
- Комиссия до 5 лет за каждого referral
|

· Please drive your scooter on a dry road surface slowly and operate front and rear brakes in order to find out if there is any malfunction so as to ensure the scooter is at its optimum condition and safe to ride. |
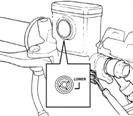
﹙Checking front brake lining﹚ | ﹙Checking oil quantity in brake oil reservoir﹚ |
· Check the brake from behind the brake caliper. The brake pad must be replaced with new lining when the brake pad wear limit reaches the brake disk. | · Park the scooter on a level ground, and check if fluid level is under the “LOWER” mark. Recommended Brake Fluid: WELL RUN BRAKE OIL (DOT 3). |
|

|

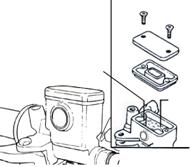
﹙Replenishment of front wheel brake fluid﹚
1. Loosen the screws and remove the master cylinder cover.
2. Wipe clean foreign materials, dirt around the reservoir, being careful not to let foreign materials fall into the reservoir.
3. Remove the diaphragm plate and the diaphragm.
4. Add brake fluid to upper level.
5. Install the diaphragm plate and the diaphragm, and install the master cylinder cover.
6. Please note the diaphragm direction, and do not let foreign materials fall into the reservoir. And tighten the master cylinder cover securely.
|
|

|
|
|
· To prevent chemical reaction, please do not use brake fluids other than those recommended. · Do not fill above the upper limit when adding brake fluid and avoid dropping on painting or plastic components to prevent damage. |
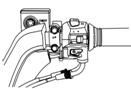
THROTTLE VALVE HANDLE CLEARANCE ADJUSTMENT
· Correct clearance allows throttle vale handle to rotate 2~6mm.
· Loosen the lock nut first, then turn the adjust nut to adjust. Tighten the lock nut securely when finished.
Check Items: 1. Check throttle valve cable to see if it can be moved smoothly from a closed position to a wide open position. 2. Rotate steering handle from side to side to check if the throttle valve cable is interfered. 3. Check to see if the throttle valve cable is obstructed by other cables preventing it from being operated smoothly. |
|
|
|
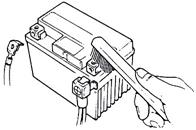
INSPECTION AND MAINTENANCE OF BATTERY
· This scooter is equipped with a maintenance-free type battery, so it is unnecessary to check and add electrolyte. Have your scooter checked by SYM Authorized Dealer or Franchised Dealer should any abnormality is found.
〈Cleaning of battery terminals﹚
Remove the battery terminals and clean if there are dirt and corrosion on them.
Battery removal procedures are as follows:
Turn ignition switch “OFF”, then open the battery cabinet door, and remove negative cable screw firstly and disconnect the negative cable. Then, remove positive cable screw and positive cable.
|
|
· Clean the battery posts with warm water if the posts are eroded and have some white powders on them. · If there is an obvious erosion on the terminals, disconnect the cables, then clean the erosion off with a steel brush or a piece of sandpaper. · Install battery cable after cleaning and apply a thin coat of grease on the terminals. · Install battery in reverse order of removal. |
· This scooter is equipped with a maintenance-free type battery, so it is unnecessary to check and add electrolyte. Have your scooter checked by SYM Authorized Dealer or Franchised Dealer should any abnormality is found.
· This is a closed type battery. Never remove the caps. · In order to prevent electrical leakage and self-discharge when the battery sits idle for periods longer than 15 days, remove the battery from scooter and store it in a well-ventilated and dimly lighted area. Store battery out of reach of children. If the battery is to be kept on the scooter, disconnect the battery’s negative cable. · If the battery needs to be replaced, replace with a same closed-type battery (Maintenance-Free). · Do not disconnect the battery cables from the battery when the engine is running to prevent any electronic parts from being damaged. |
TIRE INSPECTION
· Tires should be checked and inflated with the engine shut off.
· If a tire’s ground contacting curve is abnormal, check it with an air pressure gauge and inflate it to the specified pressure.
· Tires pressure must be checked with an air pressure gauge when cold.
PLEASE REFER TO SPECIFICATIONS FOR STANDARD TIRE PRESSURE |
|
|
|

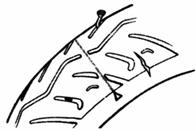
· Visual check tires for frontal and lateral side walls for crack or damage.
· Visual check tires for any nails or small stones wedged in the tread.
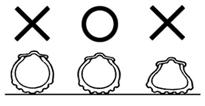
· Check the “tread wear indicator” condition to see if tread groove depth is insufficient.
· A tire with a wear bar showing is worn out and should be replaced immediately.
· Abnormal tire pressure, wear, or crack is the most important cause that results in the loss control of the steering handle and a punctured tire(s). |
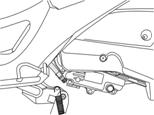
STEERING HANDLE FRONT SHOCK ABSORBERS INSPECTION
· Perform this check with engine shut off and ignition switch key removed.
· Visual check front shock absorbers for damage.
· Operate steering handle up and down, and check front shock absorbers for noises due to bends.
· Check the bolts and nuts of front shock absorbers with wrenches for tightness.
· Shake steering handle up & down, left & right, and front & rear to check if it is loosen, has too much resistance and pulls to one side.
· Check steering handle if it is being pulled too tight by the brake cables.
· Take your scooter to SYM Authorized Dealer or Franchised Dealer for a check or adjustment if any abnormal conditions are found.
![]()
![]()
![]()

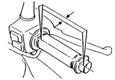
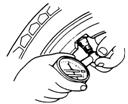
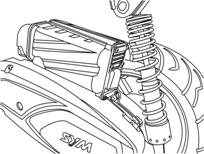
REAR CUSHION HARDNESS SETTING
The rear cushion is 5 stage adjustable type. It’s set at 3th stage when manufactured, and you can adjust it depending on your need. Turn the adjust collar of the cushion to adjust it’s hardness.
· Turn counterclockwise to harden it, and turn clockwise to soften it. · Mark sure adjust both cushion at the same time to be sure the riding stability. |
![]()
|
|

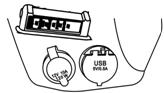
CHECKING AND CHANGING FUSES
Turn off ignition switch, and check fuses if they are intact. Replace the blown fuse with a new one having the same specified amperage rating. Using a fuse of more than 30、20 、15 or 10 amperes, a brass or iron wire to replace a blown fuse is strictly prohibited to avoid damaging the electrical system and the circuit.
· Remove the storage box, and you’ll find the fuse box near light.
· Open the fuse box cover, and pull out the fuse. Check it for damage or broken.
· Fuses must be firmly secured with wire connectors when replacing. Loose connections will result in overhead and damage.
· Use only parts having the specified specification to replace electrical components such as light bulbs. Using parts not having the specified specifications for replacement may cause the fuse to blow and over-discharge the battery.
· Avoid spraying water directly on or around fuse box when washing the scooter.
· Take your scooter to your dealer for an inspection if a fuse is blown by unknown causes.
![]()
|


|
CHECKING THE TURN SIGNAL LIGHTS AND HORN
· Turn the ignition switch key to “ON” position.
· Turn on the turn signal light switch, and make sure that the front & rear and left & right signal lights flashes and also check if the warning buzzer sounds.
· Check turn signal light covers if they are dirty, crack, or loosen.
· Press horn button to check if it works.
· Specified specification bulbs should be used for turn signal lights. Otherwise, the normal operation of turn signal lights will be affected. · Turn on the turn signal light before turning or switching lane to warn driver of vehicles behind. · Turn off the turn signal light immediately by pressing its button down after using. Otherwise, the flashing of twin signal lights may confuse the drivers of vehicles behind. |
CHECKING THE FRONT AND REAR LIGHTS
· Start engine and turn on the head lamp switch. Check if head lamp and rear lamp come on.
· Check the brightness and direction of front light by wall to see if it is correct.
· Check the head lamp cover if it is dirty, crack, or loosen.
CHECKING THE BRAKE LIGHT
· Turn the ignition switch key to “ON” position, hold the hand-braking levers for front and rear wheels. Check if the brake lights come on.
· Check the brake light cover if it is dirty, crack, or loosen.
· Use only specified specification bulbs, do not use bulbs with different specifications to avoid damaging electrical system, burning out bulbs, and discharging the battery. · Do not modify or add other electrical components to prevent over load or short circuit which may result in a fire and burn down the scooter in serious cases. |
CHECKING FOR FUEL LEAKAGE
· Check fuel tank, fuel cup, fuel hoses, carburetor for leakage.
CHECING THE LUBRICATION OF BODY’S VARIOUS MECHANISMS
· Check the body’s pivot points if they have enough lubrication.
(For example, the pivot points on the main stand, the side stand, and the brake lever…etc.)
CHECKING THE SPARK PLUG
· Remove the cap of spark plug cable (remove the spark plug using the spark plug wrench in the tool kit.
· Check the electrode if it is dirty or fouled by carbon deposits.
· Remove the carbon deposits on the electrode with steel wire, and clean the spark plug with gasoline, then, wipe dry with a rag.
· Check the electrode, and adjust its gap to 0.8 mm. (Check it with a feeler gauge)
·
|

The engine is very hot after running. Pay attention not to get burned. ※Use only spark plugs suitable for the engine specifications of this scooter recommended by the manufacturer. (Refer to specifications.) |
COOLING SYSTEM INSPECTION
(Checking coolant lever)
1. Support vehicle with main stand on a level ground.
2. Check reserved tank from viewing window to see if coolant level is between the upper limit and lower limit mark.
3. Add coolant up to upper mark if coolant is close to the lower mark.
(Check the cooling system for leakage)
· Check radiator and piping for leakage.
· Check the ground where the vehicle is parked for water dripped from the vehicle.


REPLENISHMENT OF COOLANT
Always keep radiator cap tightly closed.
1. Support vehicle on a level ground in a straight up position.
2. Open the battery cabinet door.
3. Open surge tank cap, refill coolant until reaches the upper mark.
· If coolant level becomes too low and occurs too often, it may indicate there is something wrong with the coolant system.
· To avoid radiator getting rusty, do not use coolants other than those recommended.
Coolant recommended: SYM Bramax radiator agent Concentration: 50%
Radiator capacity: Main radiator : 650 c. c.
Surge tank : 450 c. c.

· Use soft water when mixing coolant. · Please pay special attention that using poor quality coolant may shorten the service life of the radiator. · Coolant should be changed once a year normally. |
Please refer to a table showing what percentage of anti-freeze should be used under different temperatures if the vehicle is to be operated in the low temperature areas. (below 0℃) |
A reference table for anti-freeze concentration percentages under different temperatures
1. Radiator anti-freeze specification for this scooter is H68. (SYM Bramax radiator agent)
2. Proper anti-freeze percentages for different frozen temperatures are as follows:
Anti-freeze percentage | Frozen temperature | Remark |
20% | -8 | 50% concentration is used for all scooters before delivery to ensure the effectiveness of anti-freeze. |
30% | -15 | |
40% | -24 | |
50% | -36 |
3. If the specified anti-freeze is unavailable, use an equivalent with the same high quality.
4. Increase radiator maintenance intervals when the weather is extremely cold.
CRANKCASE BLOW-BY VENTILATION
Pull out the plug from draining hose to clean deposits
· When always riding in rainy area or full throttle position, maintenance travel must be shorted. The deposits can be seen in the transparent section of draining hose. |
|

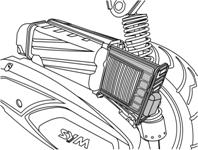
CHECKING THE AIR CLEANER
《DISASSEMBLE PRCEDURE》
1. Remove mounting screws from air cleaner cover.
2. Remove the air cleaner cover, then remove filter element.
3. Take the element out and clean it. (Refer to maintenance schedule.)
《ASSEMBLE PRCEDURE》
· Assemble the air cleaner in reverse order of disassemble.
|

![]()
|
· Dust deposit is one of the major causes of reducing output horsepower and increasing fuel consumption. · Change the air cleaner element more frequently to prolong the engine’s service life if the scooter is driven on dusty roads very often. · If air cleaner is installed improperly, dust will be absorbed into cylinders, which may cause a premature wear and reducing output power and engine life. · Be careful not to soak the air cleaner when washing the scooter. Otherwise, it will cause engine hard to start. |
DIAGNOSIS WHEN ENGINE DOES NOT START
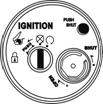
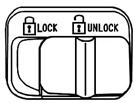
(1). Has the ignition switch key been turned to “ON” position? | (2).Anti-thief switch stir to 〝 |
|
|

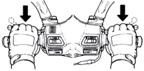
(3). Is there enough fuel in the fuel tank? | (4). Is the rear or front wheel brakes applied when pressing starting button? |
|
|
|
|

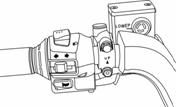
(5). Do you rotate the throttle valve handle while pressing starting the button? | (6). Turn the ignition switch key “ON”, and press horn button down, if the horn does not sound, the fuse may have been blown. |
【Have your scooter checked by SYM authorized dealer or franchised dealer immediately if there are no problems with the above items and engine still can not be started.】
12. SUGGESTIONS ON ENGINE FUEL
· This scooter is designed to use UNLEADED gasoline of Octane No. 90 or higher.
· If the scooter is operated in high attitude (where the atmosphere pressure is lower), it is suggested that the air/fuel ratio should be readjusted to maximize the engine performance.
13. TRANSMISSION OIL
· Recommended Oil: Genuine SYM HYPOID GEAR OIL (SAE 85W-140)
Use SAE85-90 when outside temperature is below 0℃.
14. CAUTIONS FOR RIDING SCOOTER
1. Raise the scooter with the main stand, and sit on the saddle.
Push the scooter forwarding to raise the main parking stand.
· Never rotate the throttle valve handle at will to increase the engine RPM before driving off. |
2. Get on the scooter from the left side, and sit on the saddle properly, keep your feet firmly on the ground to prevent the scooter from falling.
· Apply brake on the rear wheel before driving off. |
3. Rotate the throttle valve handle slowly, and then the scooter will begin to move.
· Rapidly rotate the throttle valve handle may cause the scooter moving forward suddenly and it is very dangerous. · Make sure the side parking stand is spring back completely before driving off. |
【Do not use the brake suddenly and make a sharp turn】

|
Из за большого объема этот материал размещен на нескольких страницах:
1 2 3 4 5 |
