

Партнерка на США и Канаду по недвижимости, выплаты в крипто
- 30% recurring commission
- Выплаты в USDT
- Вывод каждую неделю
- Комиссия до 5 лет за каждого referral
11. PROGRAMMAZIONE
E’ possibile modificare le caratteristiche di ognuno E’ possibile modificare le caratteristiche di ognuno dei dieci programmi inseriti in memoria, procedendo nel modo seguente.
Mentre a display scorre la scritta “SELEZIONARE UN PROGRAMMA”, premere contemporaneamente i tasti “UP” e “DOWN”.
A display appare la scritta “PASSWORD”: premere il tasto “ENTER”. A display appare “0”. Inserire la password di accesso digitando “777” e confermare con “ENTER”. A display appare il primo parametro: “INFORMAZIONI”.
Si precisa che i parametri disponibili possono essere sfogliati con i tasti “UP” e “DOWN” e che è possibile uscire dalla programmazione, mantenendo le modifiche eseguite, premendo il tasto “STOP” più volte, finché a display appare “SELEZIONARE UN PROGRAMMA”.
Si procede ad analizzare i parametri disponibili.
LINGUA
Per visualizzare il valore del parametro premere “ENTER”. A display appare “ITALIANO”. Per modificare la lingua, utilizzare i tasti “UP” e “DOWN”. Quando appare la lingua desiderata, premere “ENTER” per confermare.
INFORMAZIONI
Per visualizzarne il valore premere il tasto ENTER. A display appare “ORE LAVORO”. Premere ancora il tasto “ENTER”: a display vengono visualizzate le ore di lavoro accumulate dal giorno di installazione della macchina. Per uscire dal parametro premere il tasto “ENTER”.
DATA (solo per macchine ICD)
Per visualizzarne il valore premere il tasto “ENTER”. Modificare il valore con l’uso della tastiera alfanumerica e confermare con il tasto “ENTER”.
ORA (solo per macchine ICD)
Per visualizzarne il valore premere il tasto “ENTER”. Modificare il valore con l’uso della tastiera alfanumerica e confermare con il tasto “ENTER”.
PROGRAMMI
Per modificare le caratteristiche di uno o più programmi, premere il tasto “ENTER”. A display appare “50 min 90°C”, che è il nome del primo programma. Con i tasti “UP” e “DOWN” sfogliare i programmi in memoria. Quando viene visualizzato il nome del programma che si desidera modificare, premere il tasto “ENTER”. Si entra così nel menu dei parametri del programma prescelto. Si procede ad analizzare i parametri programmabili per ogni singolo programma. NOME
Premere il tasto “ENTER” per entrare nel parametro: utilizzare la tastiera alfanumerica per compilare il nome desiderato. Utilizzare il tasto “CICLO SINGOLO” per cancellare eventuali errori di compilazione. Premere il tasto “ENTER” per confermare e passare al parametro successivo.
AUTO (solo per macchine dotate di sensore di umidità)
Premere il tasto “ENTER” per visualizzare il parametro. Utilizzare i tasti “UP” e “DOWN” per modificarlo. Quando il parametro AUTO è “NO”, il programma sarà caratterizzato da un tempo e da una temperatura di asciugatura. Il parametro AUTO può essere altresì pari a “VELLUTO”, “LANA”, “COTONE” o “SINTETICO”. Utilizzare i tasti “UP” e “DOWN” per selezionare una delle curve presenti in memoria e che meglio si adegua al materiale da asciugare. Premere il tasto “ENTER” per confermare e passare al parametro successivo.
DURATA CICLO
Premere il tasto “ENTER” per visualizzare il valore del parametro. Usare la tastiera alfanumerica per inserire la durata del ciclo di riscaldamento (valore compreso tra 1 e 99 minuti). Premere il tasto “ENTER”.
TEMPO ROTAZIONE (solo per macchine dotate di inversione)
Premere il tasto “ENTER” per visualizzare il valore del parametro. Usare la tastiera alfanumerica per inserire il tempo di rotazione in senso orario e antiorario (valore compreso tra 10 e 40 secondi). Premere il tasto “ENTER” per confermare.
PAUSA INVERSIONE (solo per macchine dotate di inversione)
Premere il tasto “ENTER” per visualizzare il valore del parametro. Usare la tastiera alfanumerica per inserire il tempo di pausa (valore compreso tra 5 e 15 secondi). Premere il tasto “ENTER” per confermare.
TEMPERATURA CICLO
Premere il tasto “ENTER” per visualizzare il valore del parametro. Usare la tastiera alfanumerica per inserire la temperatura del programma (valore compreso tra 25 e 90°C). Premere il tasto “ENTER” per confermare.
DURATA RAFFREDDAMENTO
Premere il tasto “ENTER” per visualizzare il valore del parametro. Usare la tastiera alfanumerica per inserire la durata del ciclo di raffreddamento (valore compreso tra 0 e 15 minuti). Premere il tasto “ENTER” per confermare.
TEMPERATURA FINE RAFFREDDAMENTO
Premere il tasto “ENTER” per visualizzare il valore del parametro. Usare la tastiera alfanumerica per inserire la temperatura di fine raffreddamento (valore compreso tra 20 e 35°C). Premere il tasto “ENTER” per confermare.
UMIDITA’ FINE CICLO (solo per macchine dotate di sonda di umidità)
Premere il tasto “ENTER” per visualizzare il valore del parametro. Usare la tastiera alfanumerica per inserire il valore di umidità residua (valore compreso tra 50 e 10%). Premere il tasto “ENTER” per confermare.
COSTO PROGRAMMA (solo per macchine coin op)
Premere il tasto “ENTER” per visualizzare il valore del parametro. Usare la tastiera alfanumerica per inserire la somma di denaro che l’Utente Finale dovrà pagare, per acquistare un tempo definito dal parametro “tempo base”. Il costo programma è visualizzato nella valuta corrente, con il punto decimale (se necessario). Il valore è compreso tra 0 e 64000. Premere poi il tasto “ENTER” per confermare.
TEMPO BASE (solo per macchine coin op)
Premere il tasto “ENTER” per visualizzare il valore del parametro. Usare la tastiera alfanumerica per inserire il tempo che si potrà acquistare, pagando la somma stabilita dal parametro precedente “costo programma”.
Il valore è compreso tra 1 e 255. Premere poi il tasto “ENTER” per confermare.
DURATA BUZZER
Premere il tasto “ENTER” per visualizzare il valore del parametro. Usare la tastiera alfanumerica per inserire il tempo di attivazione del buzzer a fine programma (valore compreso tra 1 e 15 secondi). Premere il tasto “ENTER” per confermare.
12. PROGRAMMAZIONE PER MACCHINE COIN OP
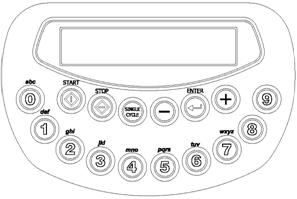
Le macchine dotate di gettoniera possono essere programmate, modificando tempi temperature e prezzi dei singoli programmi. Per eseguire la programmazione è necessario utilizzare una tastiera membrana a 16 tasti.
Togliere alimentazione elettrica alla macchina: aprire poi con l’uso di un cacciavite, lo sportellino anteriore. Scollegare i flat della tastiera a cinque tasti (in figura) dalla scheda elettronica e collegare al suo posto la tastiera a sedici tasti (viene consegnata assieme alla documentazione della macchina).
Riaccendere la macchina.
Mentre il display mostra “SELEZIONARE UN PROGRAMMA”, premere i tasti “UP” e “DOWN” contemporaneamente. A display appare “PASSWORD”. Premere il tasto “ENTER”.
A display appare “0”. Inserire il codice 777 e confermare premendo il tasto “ENTER”.
A display appare “INSTALLAZIONE”: premere il tasto “ENTER”.
A display appare “VALUTA”: premere il tasto “ENTER”.
A display appare il primo parametro: “XXX”.
Si precisa che i parametri disponibili possono essere sfogliati con i tasti “UP” e “DOWN” e che è possibile uscire dalla programmazione, mantenendo le modifiche eseguite, premendo il tasto “STOP” più volte, finché a display appare “SELEZIONARE UN PROGRAMMA”.
XXX
Con questo parametro è possibile selezionare il tipo di valuta che appare a display quando viene richiesto il pagamento. Sfogliare i simboli di valuta disponibili con i tasti “UP” e “DOWN” e di seguito elencati:
XXX gettone
EUR euro
DKR corona danese
L lira sterlina
SKR Corona svedese
SFR franco svizzero
CS dollaro canadese
USD dollaro statunitense
YEN yen giapponese
Visualizzato il simbolo desiderato, premere il tasto “ENTER” per confermare.
ALTRA VALUTA
E’ possibile aggiungere una valuta personalizzata (della lunghezza di tre lettere) a quelle precedentemente elencate. Se lo si desidera, premere il tasto “ENTER” ed inserire le tre lettere che individuano la nuova valuta. Confermare poi con il tasto “ENTER”.
DECIMALI VALUTA
Consente di definire il numero di cifre decimali della valuta personalizzata. Premere il tasto “ENTER” ed inserire il numero di cifre decimali. Confermare poi con il tasto “ENTER”
PREZZO MINIMO
Rappresenta il coefficiente per cui viene moltiplicato il prezzo specifico (parametro “costo programma”) di tutti i programmi, per poter ottenere l’importo minimo di partenza.
Esempio: avendo definito i parametri “costo programma” e “tempo base” (descritti nel par. 11), si sia fissato che il primo programma HIGH (90°C) abbia una durata di 10 minuti (tempo base) e che il suo costo sia di 1€ (costo programma). Se si impone PREZZOMINIMO=3, l’importo minimo per avviare il programma sarà di 3€. L’Utente Finale acquisterà in questo caso un’asciugatura a 90°C della durata di 30 minuti. Avviato il programma, sarà poi possibile incrementare il tempo di asciugatura pagando anche solamente 1€ (costo programma) ed acquistando così ulteriori 10 minuti di asciugatura (tempo base).
Mentre sul display appare “PREZZO MINIMO” premere il tasto “ENTER”. A display appare “1”. Per modificare, inserire il valore desiderato, e confermare poi con il tasto “ENTER”.
GETTONE 1
E’ il valore riconosciuto dalla prima gettoniera. Premere il tasto “ENTER” ed inserire il valore, nell’unità monetaria prescelta, della moneta utilizzata nella prima gettoniera. Confermare con il tasto”ENTER”.
GETTONE 2
E’ il valore riconosciuto dalla seconda gettoniera (per le macchine che ne sono dotate). Premere il tasto “ENTER” ed inserire il valore, nell’unità monetaria prescelta, della moneta utilizzata nella seconda gettoniera. Confermare con il tasto”ENTER”.
A display appare “UNITA’ TEMPERATURA”. Premere stop due volte ed uscire dalla programmazione (i parametri successivi sono ad uso dei Rivenditori).
Per la programmazione dei costi programma e dei tempi base dei singoli programmi, fare riferimento ai corrispondenti parametri, descritti nel par. 11 “PROGRAMMAZIONE”.
13. ALLARMI
Si dà di seguito un elenco dei possibili allarmi che possono bloccare la macchina. Si ricorda che in caso di guasto, può intervenire solo personale specializzato e autorizzato.
DEPRESSIONE
All’avviamento della batteria di riscaldamento, non si è creata sufficiente depressione all’interno dell’essiccatoio; suona il buzzer e la macchina si arresta. Premendo il tasto “STOP” si elimina l’allarme e sul display appare la scritta “PREMI START”: la macchina è pronta per ripartire con un nuovo programma. Verificare la pulizia del filtro filacce: se il segnale persiste spegnere la macchina, togliere tutte le alimentazioni e rivolgersi al servizio di Assistenza Tecnica.
SENSORE DEPRESSIONE
L’allarme appare quando si tenta di avviare un programma mentre la ventola è ancora in funzione. Attendere trenta secondi e ritentare l’avviamento. Se il segnale persiste spegnere la macchina, togliere tutte le alimentazioni e rivolgersi al servizio di Assistenza Tecnica
OBLO’ APERTO
E’ stato aperto l’oblò. Richiudere l’oblò e premere “START” per riavviare il programma o “STOP” per interromperlo. Se il segnale persiste, anche quando la porta è invece chiusa, spegnere la macchina, togliere tutte le alimentazioni e chiamare il servizio di Assistenza Tecnica
FILTRO APERTO
La cassa filtro non è chiusa correttamente. Richiudere la cassa filtro e premere “START” per riavviare il programma o “STOP” per interromperlo. Se il segnale persiste, anche quando la cassa filtro è invece chiusa, spegnere la macchina, togliere tutte le alimentazioni e chiamare il servizio di Assistenza Tecnica.
GUASTO SONDA
La sonda di temperatura risulta guasta: la macchina si blocca. Suona il buzzer. Premendo “STOP” si elimina l’allarme e sul display appare la scritta “SELEZIONARE UN PROGRAMMA”. La macchina è pronta a ripartire con un nuovo programma. Se il segnale persiste spegnere la macchina, togliere tutte le alimentazioni e rivolgersi al servizio di Assistenza Tecnica
BLOCCO TERMICO MOTORE
Uno dei motori si è surriscaldato: la macchina si blocca. Suona il buzzer. Premendo “STOP” si elimina l’allarme e a display appare la scritta “SELEZIONARE UN PROGRAMMA”. Attendere qualche minuto affinché si raffreddino i motori. Riarmare i relè termici ed avviare la macchina. Se il segnale persiste spegnere la macchina, togliere tutte le alimentazioni e rivolgersi il servizio di Assistenza Tecnica
FIAMMA SPENTA
E’ un segnale che può apparire solo nelle macchine alimentate a gas. Sono falliti tre tentativi consecutivi di accensione del bruciatore; suona il buzzer e la macchina si blocca. Premendo “STOP” si elimina l’allarme e sul display appare la scritta “SELEZIONARE UN PROGRAMMA”: la macchina è pronta per ripartire con un nuovo programma. Se il segnale persiste spegnere la macchina, togliere tutte le alimentazioni e rivolgersi al servizio di Assistenza Tecnica.
PRESSIONE GAS
E’ un segnale che può apparire solo nelle macchine alimentate a gas; si è avuta una caduta di pressione nell’alimentazione del gas. Suona il buzzer e la macchina si blocca. Premendo “STOP” si elimina l’allarme e sul display appare la scritta “SELEZIONARE UN PROGRAMMA”; la macchina è pronta per ripartire con un nuovo programma. Se il segnale persiste spegnere la macchina, togliere tutte le alimentazioni e rivolgersi al servizio di Assistenza Tecnica.
![]() ATTENZIONE: qualunque caso di guasto deve in ogni caso essere verificato e risolto dal servizio di assistenza tecnica specializzato.
ATTENZIONE: qualunque caso di guasto deve in ogni caso essere verificato e risolto dal servizio di assistenza tecnica specializzato.
14. MANUTENZIONE
La manutenzione della macchina deve essere eseguita esclusivamente da personale qualificato: qualunque tipo di operazione sulla macchina deve essere eseguita esclusivamente dopo aver staccato l’alimentazione elettrica, e, se esistente, del gas o del vapore.
Si dovranno eseguire con regolarità le seguenti operazioni di manutenzione ordinaria.
GIORNALIERA
Pulire il filtro almeno ogni tre/quattro asciugature.
Controllare il filtro e sostituirlo se è rotto o consumato. Togliere alimentazione elettrica e, se esistente, del gas o del vapore alla conclusione di ogni giornata lavorativa.
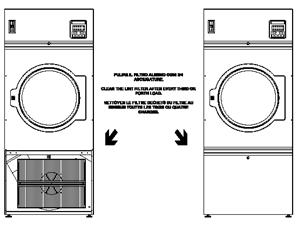
SETTIMANALE
Pulire gli accumuli di filacce dalla camera del filtro e dalla sonda di temperatura (come mostrato in figura).
1. INTRODUCTION
This manual includes all the specifications necessary for a safe and correct use of the dryers. Installation and maintenance of machines must be performed by authorised and qualified technicians; they have to know our products and be acquainted with European standards for installation of industrial laundry equipment. This manual is for installer’s and technician’s use; they have to read and understand it carefully before installing, using or servicing the machine.
This manual should be kept with the machine and consulted before operation; in case of loss or damage please ask the builder for a new copy.
The builder is not responsible for any consequences arising from the neglecting of all instructions reported in this manual.
The manufacturer has the right to modify the data contained in this manual or the technical features of each single machine. The drawings of this manual may represent details which partially differ from the components installed on machines.
Drawings and technical data are subjected to variations without previous notification to the client.
2. SAFETY PRECAUTIONS
Ignoring the following safety precautions can cause damage either to people, linen, animals and to the machine.
Installation and maintenance of machines of this manual must be performed by authorised and qualified technicians; they have to know our products and be acquainted with European standards for installation of industrial laundry equipment.
These tumble dryers must be used only to dry garments and linen exclusively with water. Any other use is forbidden unless builder authorises it in writing.
It is forbidden to put anything in the machine other than the items to be dried. Do not load the machine with fabrics contaminated by dangerous substances such as explosives, inflammables, etc. Make sure they are rinsed or aired before washing.
It is forbidden to dry garments soaked in substances known to be harmful to persons such as lead, poison or cancer-producing products
To prevent fire hazard or explosions do not stand near the machine with explosive or inflammable products.
Please stick accurately to instructions and dosages recommended by manufacturers; Make sure to check and comply with washing instructions of each item to be washed.
Use of the machine is forbidden to children under 14 years of age.
The builder is not responsible for external connections not duly performed.
![]() These precautions do not include all possible risks. Therefore the user must proceed with caution in the
These precautions do not include all possible risks. Therefore the user must proceed with caution in the
observance of all safety specifications.
3. MANUFACTURER’S LIABILITY
This manual instructions are not intended to substitute, but only to combine obligations of current legislation on safety standards.
With reference to information included in this manual, the manufacturer is not responsible in case of:
ü neglect of European safety standards during machine utilisation;
ü incorrect installation of the machine;
ü neglect or incorrect observance of instructions included in this manual;
ü faults of voltage or of the feeding systems;
ü unauthorised changes on the machine;
ü utilisation of the machine by unauthorised operators.
4. MACHINE STARTING
Connect the power feeding by turning on the main switch the installer has to mount on top of the machine: the microprocessor performs the self-testing of the diagnostics system. For gas and steam machine be sure to open the main gate valve to be installed on top of the machine.
5. OPERATING INSTRUCTIONS
When the machine starts, the display shows the software version.
The machine is ready to be loaded; linen weight have not to exceed the 10% of the declared capacity.
In case of humidity control linen loading has to be equal to the 50% of the normal loading.
Open the door and load the machine (for tilting machines see the following paragraphs); close the door.
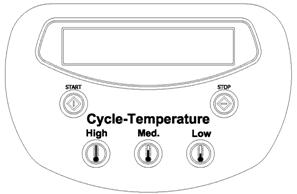
Select one of the ten programs just included into the microprocessor memory pressing one of the buttons, from 0 to 9 (see the relative paragraph). In the display appears the name of the program, for example, “50 min 90°C”.
Press the button START: the machine starts the selected program.
![]() When the program starts, on the display appears the temperature on centigrade degree, and the remaining time to complete the cycle of heating. If the tumble dryer has the humidity probe, in the display appears the temperature and the value of the rate of the residual humidity.
When the program starts, on the display appears the temperature on centigrade degree, and the remaining time to complete the cycle of heating. If the tumble dryer has the humidity probe, in the display appears the temperature and the value of the rate of the residual humidity.
Finished the heating cycle, the machine starts a phase of cooling, during this phase in the display appears the writing “COOLING”. This phase has two programmable parameters: time and temperature. The machine stops the program when time finishes or when temperature has reached.
If in the program you have included also the phase of anti-wrinkle, in the display will appear the writing “ANTIWRINKLE”.
When the writing “END” and an acoustic sound appear, it means that the machine finishes. Open the door and discharge the machine.
“SELECT A PROGRAM” appears and it is possible to select another program.
6. OPERATING INTRUCTIONS ICD
In the previous paragraph, we have to add the following information, in case the machine has the system of survey of residual humidity.
The linen loading has to be equal to the 50% of the nominal load.
![]() Before introducing linen into the machine, control eventual zip is completely opened, and eventual metallic buttons are totally removed or isolated.
Before introducing linen into the machine, control eventual zip is completely opened, and eventual metallic buttons are totally removed or isolated.
7. TILTING OPERATIONS INSTRUCTIONS
In case the machine has the pneumatic tilting to reverse the drum, add the following information.
![]() ATENTION: when the machine is in tilting or during the pneumatic opening door, the user must keep himself out of the machine, using the telecontrol.
ATENTION: when the machine is in tilting or during the pneumatic opening door, the user must keep himself out of the machine, using the telecontrol.
Before using tilting, wait for the conclusion of a program. Telecontrol use can be on or off using the key switch low in the right side. When the telecontrol is on, the microprocessor of the machine is off. When the green light up in the left side, is on means the push-button panel is on.
OPERATIONS OF LOADING (for the machines which foreseen)
Operate the key switch to activate the push-button panel. Open the door pressing at the same time the facilitation button (low in the left side) and the button “DOOR OPEN”. While the door opening is concluded, invert the machine pressing at the same time the facilitation button and “LOAD UP”. When the charging operation is completed the machine has to be put in horizontal position pressing in the same time the facilitation button and “LOAD DOWN”. Close the door pressing the facilitation button and “CLOSE DOOR”.
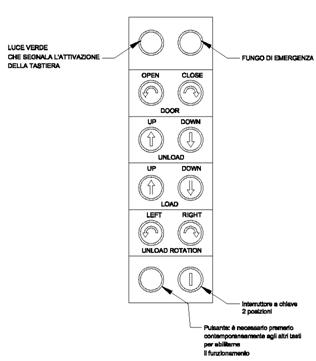
OPERATION OF UNLOADING
Operate the key switch to activate the push-button panel. Open the door pressing at the same time the facilitation button (low in the left side) and the button “DOOR OPEN”. When the door opening is concluded, reverse the machine pressing in the same time the facilitation button (below on the left side) and the button “UNLOAD DOWN”. When the machine is in the unloading position you can take out the linen reversing the drum slowly (right and/or left) pressing at the same time the facilitation button and the “UNLOAD ROTATION” (RIGHT and/or LEFT). When the unload is ended the machine has to be positioned horizontally pressing at the same time the facilitation button and the “UNLOAD UP”. Close the door pressing the facilitation button and the “CLOSE DOOR”.
8. PAUSE AND STOP
During the machine functioning it is not possible to change the characteristics of the program. Opening the door the machine stops and appears the writing “DOOR OPEN”
When the door is closed, the instruction “PRESS START” will be displayed, press START in order to begin again the program.
If you press the button STOP one time the machine will be put in stand by: “PAUSE” will be displayed. Pressing START the program restarts from interruption: pressing STOP for a second time, the program will be interrupted.
9. SINGLE CYCLE
A single program may be implemented for single operation with automatic erase at the end of the program itself.
Pressing the button SINGLE CYCLE: you are in the programming of the single cycle. “DURATION CYCLE” is displayed: Press ENTER. On display appears “0”: put into the wished time (1 and 99 minutes) and confirm pressing ENTER.
On display appears “TEMPERATURE CYCLE”. Pressing ENTER: On display appears “0”: put into the wished time (29 and 90°C) and confirm pressing ENTER.
“PRESS START” is displayed. Pressing START, the cycle just programmed will start.
10. PROGRAMS ALREADY SET.
Below the characteristics of the builder implemented programs. The cooling time is equal to 10 minutes and the cooling temperature is equal to 30°C for all the programs.
Nr. | Name | Duration [minutes] | Temperature [°C] |
0 | 50 min 90°C | 50 | 90 |
1 | 40 min 75°C | 40 | 75 |
2 | 30 min 60°C | 30 | 60 |
3 | 30 min 45°C | 30 | 45 |
4 | 40 min 60°C | 40 | 60 |
5 | 25 min 50°C | 25 | 50 |
6 | 20 min 45°C | 20 | 45 |
7 | 30 min 40°C | 30 | 40 |
8 | 20 min 40°C | 20 | 40 |
9 | 25 min 40°C | 25 | 40 |
Standard
Nr. | Name | Residual humidity [%] | Temperature [°C] |
0 | COTTON | 10 | 90 |
1 | VELVET | 10 | 75 |
2 | WOOL | 10 | 60 |
3 | SYNTHETIC | 10 | 45 |
4 | Pr. 04 | 10 | 60 |
5 | Pr. 05 | 10 | 50 |
6 | Pr. 06 | 10 | 45 |
7 | Pr. 07 | 10 | 40 |
8 | Pr. 08 | 10 | 40 |
9 | Pr. 09 | 10 | 40 |
Machine with humidity version

|
Из за большого объема этот материал размещен на нескольких страницах:
1 2 3 4 5 6 7 |
