

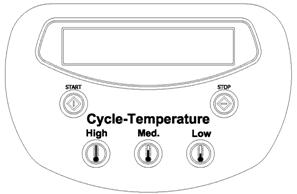
Nr. | Name | Duration [minutes] | Temperature [°C] |
0 | HIGH | Minimum Time | 90 |
1 | MED | Minimum Time | 75 |
2 | LOW | Minimum Time | 60 |
Coin op version
11. PROGRAMMING
The characteristics of the ten programs in the memory can be modified proceeding as follow
Press the buttons “UP” and “DOWN” at the same time while the display shows “SELECT A PROGRAM”. Appears “PASSWORD”. Press “ENTER”.
Appears “0”. Insert the code” 777” and confirm pressing “ENTER”. Appears “INSTALATION”:
With the buttons “UP” and “DOWN” is possible to defoliate the parameters and to go out from the programming system, keeping the modification done, with the button “STOP” many times up to the display shows “SELECT A PROGRAM”
The parameters modifiable are:
LANGUAGE
Press “ENTER” in order to modify the parameter. Appears “ENGLISH”. Press the buttons “UP” and “DOWN” to modify the language seeing the possibilities. Chosen the language press “ENTER” to confirm.
INFORMATION
Press “ENTER” in order to modify the parameter. Appears “WORKING HOURS”. Press again the buttons “ENTER”: in the display appears the hours accumulated since the date of installation of the machine. To go out from the parameter press “ENTER”. and “DOWN” to change the language seeing the possibilities. Chose the language and press “ENTER”.
DATE (only for ICD model)
Press “ENTER” in order to modify the parameter. Change the value using the alphabetical keyboard and press “ENTER” to confirm.
HOURS (only for ICD model)
Press “ENTER” in order to modify the parameter. Change the value using the alphabetical keyboard and press “ENTER” to confirm
PROGRAMME
Press “ENTER” to change the characteristic of one or more program. Appears “50 min 90°C” which is the first program. Pressing the buttons “UP” and “DOWN” is possible to defoliate the parameters, when appears the program you would like to modify press “ENTER” in order to enter in a menu of parameters of the chosen program.
NAME
Press “ENTER” in order to enter in the parameter. Insert the name chosen using the alphabetical keyboard. Use the bottom “SINGLE CYCLE” to delete any mistakes and press “ENTER” to confirm and go on to the next step.
AUTO (only for machine equipped with the humidity sensor)
Press “ENTER” in order to visualize the parameter. When the parameter AUTO is “NO”, the drying temperature and time need to be set up by the user. The end user can also choose between the programs “VELVET”, “WOOL”, “COTTON” and “SINTHETIC”. Please use the buttons “UP” and “DOWN” to select the more suitable program. .
Press “ENTER” to confirm and go on to the next step.
CYCLE DURATION
Press “ENTER” in order to visualize the parameter value. Use the alphabetical keyboard to insert the duration of the heating cycle (value between 1 and 99 minutes), and press “ENTER”.
ROTATION TIME (only for machine equipped with inverter)
Press “ENTER” in order to visualize the parameter value. Use the alphabetical keyboard to insert the duration of the rotation clockwise and anticlockwise (value between 10 and 40 seconds), and press “ENTER for confirmation.
REVERSING PAUSE (only for machine equipped with the reversing drum)
Press “ENTER” in order to visualize the parameter value. Use the alphabetical keyboard to insert the duration of the pause (value between 5 and 15 seconds), and press “ENTER for confirmation.
TEMPERATURE CYCLES
Press “ENTER” in order to visualize the parameter value. Use the alphabetical keyboard to insert the temperature (value between 25 and 90° C), and press “ENTER for confirmation.
COOLING DURATION
Press “ENTER” in order to visualize the parameter value. Use the alphabetical keyboard to insert the duration of the cooling cycle (value between 0 and 15 minutes), and press “ENTER for confirmation.
END COOLING TEMPERATURE
Press “ENTER” in order to visualize the parameter value. Use the alphabetical keyboard to insert the end cooling temperature (value between 20 and 35° C), and press “ENTER for confirmation.
END CYCLE HUMIDITY (only for machine equipped with the humidity feeler)
Press “ENTER” in order to visualize the parameter value. Use the alphabetical keyboard to insert the value of humidity (value between 50 and 10%), and press “ENTER for confirmation.
COST OF THE PROGRAM (only for coin op machines)
Press “ENTER” to visualize the parameter value. Use the alphabetical keyboard to insert the amount of money to be paid for the chosen time defined by the parameter “minimum time”. The cost of the program is displayed in the actual currency, with a decimal figure (if necessary). The value is between 0 and 64000. Press “ENTER” to confirm.
MINIMUM TIME (only for coin op machines)
Press “ENTER” to visualize the value of the parameter. Use the alphabetic keyboard to select the time you want to buy, by paying the amount selected from the previous parameter “cost of the program”.
The value is between 1 and 255. Press “ENTER” to confirm.
BUZZER DURATION
Press “ENTER” to visualize the value of parameter. Use the alphabetic keyboard to insert the time of activation of the buffer at the end the program (value between 1 and 15 seconds), and press “ENTER” for confirmation.
12. PROGRAMMING FOR COIN BOX MACHINES
Coin box machines can be programmed, modifying times, temperature and prices of the singles programs. It is necessary to have a keyboard of 16 buttons.
Remove electric feeding on the machine: open the anterior door with a screwdriver. Disconnect the flats of 5 buttons keyboard (as in the picture) from the electronic plate and connect the 16 buttons ones (it is included with the documents of the machine)
Restart the machine.
Press the buttons “UP” and “DOWN” at the same time while the display shows “SELECT A PROGRAM”. Appears “PASSWORD”. Press “ENTER”.
Appears “0”. Insert the code 777 and confirm pressing “ENTER”.
Appears “INSTALLATION”: press “ENTER”.
Appears “CURRENCY”: press “ENTER”.
Appears the first parameter : “XXX”.
With the buttons “UP” and “DOWN” is possible to defoliate the parameters and to go out from the programming system with the button “STOP” different times up tot eh display shows “SELECT A PROGRAM”
XXX
With this parameter is possible to select the type of currency, seeing the possibilities with the buttons “UP” and “DOWN” XXX token
EUR Euro
DKR Danmark Krona
L English Pound
SKR Swedish Krona
SFR Swiss Franc
CS Canadian Dollar
USD American Dollar
YEN Japanese Yen
Chosen the symbol press “ENTER” to confirm.
ANOTHER CURENCY
You can add another personalized currency (three letters), by pressing “ENTER” insert the three letters and confirm pressing “ENTER”.
DECIMAL CURRENCY
Permits to define the number of decimal cipher of the personalized currency. Press “ENTER” and include the number. Press “ENTER” again to confirm
MINIMUM PRICE
The coefficient for which the specific price of all the programs is multiplied, to obtain the starting minimum amount.
For example: having defined the parameters “Cost of the program” and “minimum time” (par. 11), it has been programmed that the first program HIGH (90°) has a 10 minutes duration (minimum time) and that its cost is 1€ (cost of the program). If it is programmed for a MINIMUM PRICE=3€, the minimum amount to start the program will be of 3€. The final customer will buy a 30 minutes drying at 90°C. Started the program it will be possible to increase the drying time by adding just 1€ (cost of the program) which it will add a further 10 minutes drying (minimum time).
While appears “MINIMUM PRICE” on the display press “ENTER”. The display will show “1”. To modify it, insert the amount as for the desired program and press “ENTER”.
TOKEN 1
Recognized by the first coin box. Press “ENTER” and insert the value of the coin in the first coin box. “ENTER” to confirm.
TOKEN 2
Recognized by the second coin box (if provided). Press “ENTER” and insert the value of the coin in the second coin box. ENTER to confirm
“UNITY TEMPERATURE” appears on display. Press stop twice and go out from programming.
To program the costs and the minimum times of each program, please refer to the correspondent parameter described in the paragraph 11: “PROGRAMMING”.
13. ALARMS
Please find hereafter a list of the alarms which stops the machine:
DEPRESSION
At the starting - up of the heating phase there is not enough depression inside the dryer; the buzzer will ring and the machine will be blocked. Press the STOP key to stop the alarm; the display will show “PRESS STORT”: the machine is ready for operation. If the alarm rings again, turn off power connection and call technical assistance
SENSOR DEPRESSION
This alarm is displayed when you try to start a program while the fun is still functioning. Please wait 30 seconds and try again the operation.
If the warning still appear, switch off the machine, disconnected the alimentation and call our technical assistance
OPEN DOOR
The door is open. Close the door and press START to activate the program or STOP to interrupt it. If the alarm rings again, turn off the machine, take off all connections and call for assistance.
OPEN FILTER
The filter box is not closed correctly. Close again the filter box and press “START” to restart the program or “STOP” to interrupt it. If the alarm rings again, also when the filter box is closed, turn off the machine, take off all the alimentations and call for assistance.
TEMPERATURE PROBE
The temperature probe is broken: the machine stops and the buzzer rings. Press STOP to stop the sound signal; the display will show “SELECT”. The machine is ready for operation, If the alarm rings again, take off all connections and call technical assistance
BLOCK THERMIC MOTOR
One of the motor is overheated: the machine stop and the buzzer rings. Pressing STOP the alarm disappears and on the display appears “SELECT A PROGRAM”. Wait for few seconds until the motors cool down. Rearm thermal cutout and start the machine. If the signal persists switch off the machine, take off all the feedings and call technical assistance
FLAME OFF
It appears only in machines with gas heating. Three consecutive attempts of lighting of burner have failed. The buzzer rings and the machine stops. Pressing STOP the alarm disappears and on the display appears “SELECT A PROGRAM”; the machine can restart with a new program. If the signal persists switch off the machine, take off all the feedings and call technical assistance
GAS PRESSION
It appears only in machines with gas heating; a fall of alimentation has occured. The buzzer rings and the machine stops. Pressing STOP the alarm disappears and on the display appears “SELECT A PROGRAM”; the machine can restart with a new program. If the signal goes on switch off the machine, take off all the alimentations and call technical assistance.
![]() ATTENTION: We recommend calling for authorised technical assistance each time a failure occurs.
ATTENTION: We recommend calling for authorised technical assistance each time a failure occurs.
14. GENERAL MAINTENANCE
Servicing and maintenance of the machine must be performed only by experienced technicians: before servicing be sure to take off power supply and either gas or steam connection according to the type of heating.
The following operations must be performed regularly
DAILY
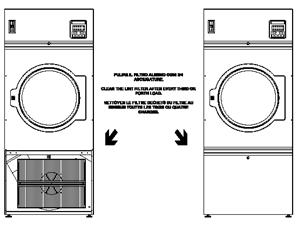
Clean the lint filter after every third or forth load.
Control the filter and replace it if torn.
Turn off power supply and either gas or steam connection according to the type of heating after
working.
WEEKLY
Clean lint accumulation from lint chamber, and temperature probe (as from the example)
1. INTRODUCTION
Ce manuel concerne l’usage de séchoirs industriels en conformité à la Directive Communautaire en vigueur.
Ces renseignements s’adressent aux utilisateurs qui doivent en prendre connaissance avant de mettre en marche ou de réaliser l’entretien du séchoir. Ce manuel doit toujours être à disposition pour consultation. En cas de perte ou d’endommagement, nous vous prions de demander un nouveau manuel à votre fournisseur. Le fabricant ne peut pas être tenu responsable des conséquences d’une mauvaise utilisation suite au non respect des consignes d’usages décrites dans le manuel. Le fabricant se réserve le droit de modifier les caractéristiques des machines, sans préavis. Ainsi, les dessins et données techniques du séchoir peuvent différer de ce manuel. Le schéma électrique correspondant à le séchoir est livré avec chaque appareil.
2. NORMES DE SURETE
Le non respect des règles de sécurité suivantes peut causer des dommages aux personnes, aux machines, aux tissus et aux animaux.
L’installation et l’entretien des séchoirs doivent être réalisés par des techniciens autorisés, ayant la connaissance des produits et des normes européennes de la mise en service de machines industrielles.
L’usage du séchoir est le séchage des vêtements et du linge lavés à l’eau. Tout autre usage est interdit et annule purement et simplement la responsabilité du fabricant si non autorisé par écrit.
Il est interdit d’y introduire des objets différents de ceux-ci. Les vêtements et le linge ne doivent pas avoir été en contact avec des matières dangereuses (explosifs, produits chimiques ou inflammables). De même il est interdit de déposer des produits inflammables à proximité du séchoir pouvant entraîner des incendies et/ou des explosions.
Il est impératif de lire attentivement et de tenir compte des instructions de lavage annotées sur le linge.
L’utilisation du séchoir est interdite aux personnes de moins de 14 ans, de même qu’il ne faut pas laisser les enfants jouer à proximité de la laveuse et des lessives.
Les connexions supplémentaires à l’extérieur du séchoir doivent être réalisées par une personne habilitée.
![]() Ces renseignements ne couvrent pas tous les risques possibles, l’utilisateur doit procéder avec la plus grande précaution dans le respect des normes.
Ces renseignements ne couvrent pas tous les risques possibles, l’utilisateur doit procéder avec la plus grande précaution dans le respect des normes.
3. RESPONSABILITE DU CONSTRUCTEUR
Les instructions de ce manuel ne remplacent pas, mais complètent les obligations de respect des règles de sécurité et de prévention des accidents. Selon les instructions données dans ce manuel, le constructeur décline toute responsabilité dans les suivants cas :
ü Emploi du séchoir contraire aux lois communautaires sur la sécurité.
ü Installation incorrecte du séchoir.
ü Non respect des instructions du manuel.
ü Alimentation électrique ou d’énergie incorrecte.
ü Modifications non autorisées sur le séchoir.
ü Utilisation par des opérateurs non autorisés.
4. MISE EN MARCHE
Mettre le séchoir sous tension à l’aide du disjoncteur ou sectionneur mis en place par l’installateur : le microprocesseur effectue alors un test de ses systèmes de sécurité (diagnostic). Si le séchoir est à chauffage gaz ou vapeur, ouvrir lentement la vanne d’alimentation mise en place par l’installateur en amont du séchoir.
5. USAGE DU SÉCHOIR
A l’allumage du séchoir, le display affiche la version du software du microprocesseur. Le séchoir est prêt à être chargé avec le linge bien essoré : le poids du linge à sécher ne doit pas dépasser de 10% la capacité prévue. Dans le cas de fonctionnement avec contrôle de l’humidité (modèle spécial ICD), la charge de linge doit être réduite de moitié (50% de la charge nominale).
Ouvrir le hublot et charger le séchoir (pour les séchoirs tilting, voir les paragraphes suivants); fermer le hublot.
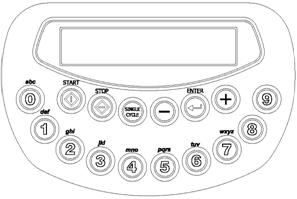
Sélectionner un des 10 programmes déjà présents dans la mémoire du microprocesseur à l’aide des touches de 0 à 9. Le display affiche le nom du programme, par exemple “50 min 90°C ”.
Appuyer sur START: le séchoir démarre le programme désiré.
![]() Après avoir démarré le programme, le display affiche, alternativement, la température en degrés et le temps restant jusqu’à la fin du cycle de séchage. Si le séchoir est équipé avec d’une sonde d’humidité, le display affiche la température et la valeur de la pourcentage de humidité résiduelle.
Après avoir démarré le programme, le display affiche, alternativement, la température en degrés et le temps restant jusqu’à la fin du cycle de séchage. Si le séchoir est équipé avec d’une sonde d’humidité, le display affiche la température et la valeur de la pourcentage de humidité résiduelle.
Quand le cycle de séchage est terminé, le séchoir enchaîne avec une phase de refroidissement. Durant cette phase, le display affiche “REFROIDISSEMENT”. Cette phase est caractérisée par 2 paramètres programmables : une durée et une température. Le séchoir termine le programme quand le temps est écoulé ou quand la température est atteinte.
Une phase anti-froissage peut également être programmée pour s’exécuter en fin de programme, avec le message “ANTIPLIS” dans le display.
Lorsque le programme est terminé, le séchoir s’arrête, le display affiche “FIN”, et il y a un signal acoustique. Ouvrir le hublot et décharger le séchoir.
Le display affiche de nouveau “SELECTIONNER UN PROGRAMME” et le séchoir est prêt pour un nouveau séchage
6. USAGE DU SÉCHOIR ICD
Il faut ajouter, à la description du paragraphe précèdent, les spécifications suivantes, dans le cas où le séchoir est équipé du système de contrôle de l’humidité résiduelle.
Le charge de linge doit être égale à 50% de la charge nominale.
![]() Avant d’introduire le linge, vérifier que les éventuelles fermetures « zip » soient complètement ouvertes, et que les boutons métalliques soient enlevés ou protégés.
Avant d’introduire le linge, vérifier que les éventuelles fermetures « zip » soient complètement ouvertes, et que les boutons métalliques soient enlevés ou protégés.
7. USAGE DU SÉCHOIR TILTING
Il faut ajouter, à la description du paragraphe précèdent, les spécifications suivantes, dans le cas où le séchoir est équipé du système pneumatique tilting pour le basculement du tambour en avant et/ou à l’arrière. Dans ce cas les commandes sont positionnées sur un tableau à poussoirs.
![]() ATTENTION: quand le séchoir est en phase de tilting, ou de ouverture pneumatique du hublot, l’utilisateur doit se maintenir à distance du séchoir et du hublot, en utilisant la télécommande spécifique.
ATTENTION: quand le séchoir est en phase de tilting, ou de ouverture pneumatique du hublot, l’utilisateur doit se maintenir à distance du séchoir et du hublot, en utilisant la télécommande spécifique.
Attendre la conclusion d’un programme avant d’actionner le tilting. La télécommande est activée ou pas selon la position de l’interrupteur à clé situé en bas à droite. Quand la télécommande est activé, le microprocesseur du séchoir est désactivé. L’activation du tableau à poussoir est signalé par l’allumage de la lumière vert en haut à gauche.
OPERATIONS DE CHARGEMENT (pour les
séchoirs avec cette fonction)
Actionner l’interrupteur à clé pour activer le tableau à poussoirs. Ouvrir le hublot en appuyant en même temps sur la touche d’habilitation (en bas à gauche) et la touche d’ouverture hublot “DOOR OPEN”. Quand l’ouverture du hublot est terminée, basculer le séchoir en arrière en appuyant en même temps sur la touche d’habilitation (en bas à gauche) et la touche “LOAD UP”. Quand l’opération de chargement est terminée, basculer le séchoir dans la position horizontale en appuyant en même temps sur la touche d’habilitation (en bas à gauche) et la touche “LOAD DOWN”. Fermer le hublot en appuyant en même temps sur la touche d’habilitation (en bas à gauche) et la touche “CLOSE DOOR”. Désactiver le tableau à poussoirs avec l’interrupteur à clé en bas à droite.
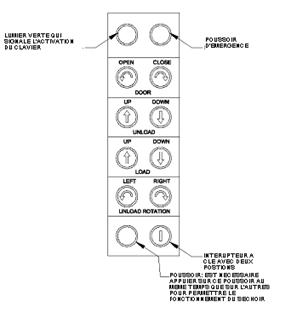
OPERATIONS DE DECHARGEMENT
Actionner l’interrupteur à clé pour activer le tableau à poussoirs. Ouvrir le hublot en appuyant en même temps sur la touche d’habilitation (en bas à gauche) et la touche d’ouverture hublot “DOOR OPEN”. Quand l’ouverture du hublot est terminée, basculer le séchoir en avant en appuyant en même temps sur la touche d’habilitation (en bas à gauche) et la touche “UNLOAD DOWN”. Quand le séchoir est en position de déchargement, il est possible de permettre la sortie du linge en faisant tourner le tambour lentement (à droite et/ou à gauche) en appuyant en même temps sur la touche d’habilitation (en bas à gauche) et la touche “UNLOAD ROTATION” (RIGHT et/ou LEFT). Quand l’opération de déchargement est terminée replacer le séchoir en position horizontale en appuyant en même temps sur la touche d’habilitation (en bas à gauche) et la touche “UNLOAD UP”. Fermer le hublot en appuyant en même temps sur la touche d’habilitation (en bas à gauche) et la touche “CLOSE DOOR”. Désactiver le tableau à poussoirs en actionnant l’interrupteur à clé en bas à droite.
8. PAUSE ET STOP
Quand le séchoir est en fonctionnement, il n’est pas possible de modifier les caractéristiques du programme en cours. Quand le hublot est ouvert le séchoir s’arrête et le display affiche “HUBLOT OUVERT”.
Quand le hublot est fermé de nouveau, le display affiche “APPUYER SUR START”, ce qui permet de relancer le programme là où il s’était interrompu.
Si pendant le fonctionnement la touche STOP est enfoncée une fois, le séchoir se met en pause : le display affiche “PAUSE”. Le programme est relancé en appuyant sur START ou annulé complètement en appuyant sur STOP une deuxième fois.
9. CYCLE MANUEL SIMPLE
En complément des programmes préréglés, le séchoir peut être utilisé en manuel à l’aide de la touche SINGLE CYCLE. Les paramètres ne sont pas mémorisés et doivent être entrés à chaque utilisation.
En appuyant sur la touche SINGLE CYCLE, le display affiche “DUREE CYCLE” : appuyer sur ENTER. Le display affiche “0” : sélectionner le temps désiré (compris entre 1 et 99 minutes) et confirmer avec ENTER.
Le display affiche “TEMPERATURE CYCLE” : appuyer sur ENTER. Le display affiche “0” : sélectionner la température désirée (compris entre 30 et 90°C) et confirmer avec ENTER.
Le display affiche “APPUYER SUR START” : appuyer sur START pour lancer le programme. Celui-ci sera automatiquement suivi d’une phase de refroidissement.
10. PROGRAMMES EN MEMOIRE
Les 10 programmes pré-établis en usine sont numérotés de 0 à 9. Le tableau ci-dessous en donne les caractéristiques. A noter : le temps de refroidissement est égal à 10 minutes et la température de refroidissement est égale à 30°C pour tous les programmes.
Nr. | Nom | Durée [minutes] | Température [°C] |
0 | 50 min 90°C | 50 | 90 |
1 | 40 min 75°C | 40 | 75 |
2 | 30 min 60°C | 30 | 60 |
3 | 30 min 45°C | 30 | 45 |
4 | 40 min 60°C | 40 | 60 |
5 | 25 min 50°C | 25 | 50 |
6 | 20 min 45°C | 20 | 45 |
7 | 30 min 40°C | 30 | 40 |
8 | 20 min 40°C | 20 | 40 |
9 | 25 min 40°C | 25 | 40 |
Version standard

|
Из за большого объема этот материал размещен на нескольких страницах:
1 2 3 4 5 6 7 |
