

Партнерка на США и Канаду по недвижимости, выплаты в крипто
- 30% recurring commission
- Выплаты в USDT
- Вывод каждую неделю
- Комиссия до 5 лет за каждого referral
The Accents sub-menu includes three invisible control characters which may be needed for complex text. Their use is described in ‘Hebrew typing order’ below.
Keypad. (decimal point) inserts a thin space, which can be useful when a narrow letter carries so many marks that they spill on to the next or previous letter. The Vusillus font does its best to avoid this by adjusting the letter spacing itself. But for high-quality printing you may sometimes need to insert more
space between letters. The thin space should always be inserted directly before a consonant, never between a consonant and its marks or among the marks.
Laptop users, who do not have a separate keypad, should use the ‘Preferences -- Keyboard’ dialog to assign marks to the numeral row of the keypad. They will get the layout shown below. Laptop users should choose not to have NumLock switched on automatically when the Hebrew keyboard is loaded.
This arrangement, with a single keystroke for vowels, is faster to use than the arrangement where marks are on the keypad, though it takes longer to learn. Some users with large desktop keyboards may prefer it, and it is suitable for such keyboards.
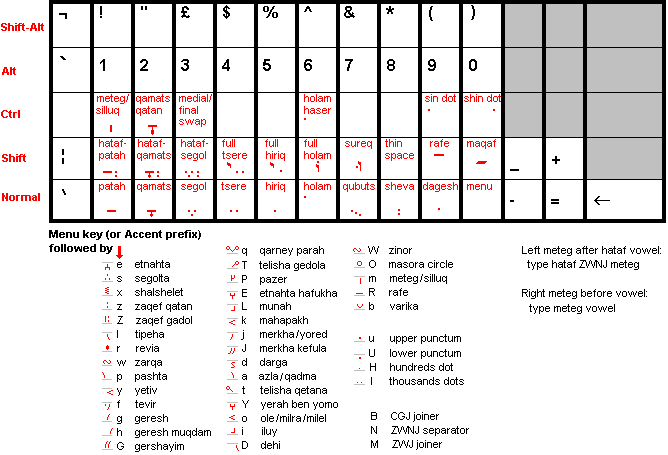
Menu and accent prefix
As well as the Menu function, Antioch offers an ‘accent prefix’ function which will give you accents and other common marks without bringing up a menu, but using the same key for each mark. This function is not assigned to a key in the standard layout, but you can easily map it to one with Hebrew -- Preferences -- Keyboard as described in ‘Mapping the Hebrew keyboard by hand’, below.
Unicode 5 changes to Hebrew
The latest Unicode 5 system, to which this version of Antioch conforms, has the following changes from the previous standard.
There is one new cantillation mark, etnahta hafukha. This has exactly the same shape as yerah ben yomo. Until now the same mark had been used for both. Etnahta hafukha now appears on the ‘Accents’ menu.
There is now a proper character for inverted nun (which was previously obtained by typing nun and the ‘zero width joiner’). This is available from Antioch’s ‘Letters & symbols’ menu. If you want to add a dot above the letter, please -- for the time being -- use the upper punctum from the ‘Accents’ menu. Strictly speaking, the smaller ‘hundreds dot’ is correct; but unfortunately there is a fault in Microsoft’s Uniscribe* controller that makes it impossible to place this dot on this character. It will be rectified in a future version of Uniscribe, which should be issued with a normal update to Word, and nothing in Antioch will need changing.
There are two new vowel points. To deal with the simpler case first, a separate character has been added for qamats qatan (or qamats hatuf), representing a short ‘o’ . It has a longer downstroke than the ordinary qamats. Previously the same character was used for both vowels.
The other addition is holam haser. This is a special form of holam that is to be used only on vav, and only when the vav is consonantal (‘wo’) rather than part of a vowel (‘ф’).
In the old system, consonantal vav with holam was typed as vav, holam [followed by any cantillation marks]. It is now typed vav, holam haser [followed by any cantillation marks].
This change also affects the typing order for holam male, the vowel form of vav with holam. Previously it was typed holam, vav. Now it should be typed vav, holam. (Antioch’s standard keypad layout, when made to produce the vowel in one go, now uses the new order.)
Previously, where a consonant was followed by this vowel, if the consonant had a cantillation mark or marks, the typing order was consonant, holam, cantillation mark(s), vav. The new order is consonant, cantillation mark(s), vav, holam. You will notice that this order now parallels the existing one for sureq (‘ы’), typed vav, dagesh.
Hebrew typing order
Hebrew text with vowel points and cantillation marks should be typed in the order:
consonant
[shin/sin dot]
[dagesh/rafe]
vowel (including holam)
[low cant(s) exc. yetiv/dehi]
[yetiv/dehi]
[second vowel (hiriq, sheva, patah)
[high cant(s) exc. pashta/masora circle]
[pashta]
[masora circle]
If you depart from this order, the vowels and marks may not appear correctly. More importantly, this typing order is an agreed norm among Hebrew users and makers of web pages -- it is known as ‘canonical order’ -- and in order to make text machine-searchable, it is necessary to comply with it.
Antioch will edit your text into canonical order as you type, though you will still have to type vowels before cantillation marks to get a correct visual effect.
Please note that in systems with Vista and Word 2007, automatic canonical reordering may cause a lag between typing a character and its appearance on screen. (This is seldom a problem in XP.) If you are typing a document in unpointed Hebrew, or in Hebrew with vowel points but no cantillation marks, you can turn Antioch’s automatic canonical reordering off. Go to ‘Hebrew -- Preferences -- Text’ and uncheck the checkbox. If you are used to typing in the correct order by hand, you can disable automatic reordering too -- but note that this makes it much harder to edit marks after they have been typed, because it is hard to know where the cursor is.
If there is more than one mark in any of the categories shown above, they should be typed in the order in which they fall from right to left. The only exceptions are yetiv and dehi, which fall on the far right but are typed last of the low marks; and masora circle (ketiv) which always falls over the centre of the letter, although it is typed after the cantillation marks proper.
The automatic keypad command for full holam types vav, holam. This is the correct Unicode* 5 order (see ‘Unicode 5 changes to Hebrew’, above), although the old Unicode 4 order also works in the font. When a consonant carrying a cantillation mark has full holam as its vowel, you should type consonant, mark, then the full holam. The same order applies to sureq (vav with dagesh). For full hiriq and tsere with a mark on the consonant, type consonant, hiriq/tsere, mark, yod.
When adding holam to consonantal vav, you should now use the new holam haser character. Note that this special form of holam is for use only on vav; on all other letters the ordinary holam should be used. The keypad command for holam haser is Kpd 4 followed by capital O. In the ‘Fast Hebrew’ layout the key is Ctrl -6.
Note that the masora circle and puncta extraordinaria are treated in the same way as cantillation marks. Punctum superior should be used as the dot on inverted nun for the time being (see ‘Unicode 5 changes to Hebrew’, above).
The same character is used for paseq and for the ‘lineola’ used as a modifier of the foregoing accent. This character is therefore quite narrow, to fit into a word. When using it as paseq, usually a space should be typed either side of it.
The alternative long version of ayin available from Shift-i is not classified as a right-to-left symbol, and no vowels or cantillation marks may be placed on it.
The CGJ joiner is used when text has to be typed in a nonstandard order, to prevent the order from being automatically changed. Apart from this, it should have no visible effect on the text. Type CGJ before the first mark that is out of order. Some experiment may be needed to get a correct result.
The ZWNJ separator is used to isolate a mark from previous marks. At present it has only one use. If you are typing a hataf vowel followed by meteg, and you want to prevent the meteg from moving into the middle of the vowel as normal, type the vowel, then ZWNJ, then meteg. This will cause meteg to fall on the left side of the vowel.
The ZWJ joiner is used to make ligatures.
For the aleflamed character, type: alef ZWJ lamed
For the Yiddish character pasekh tsvey yudn, type: yod ZWJ yod patah
ZWJ is no longer needed to produce inverted nun. There is now a command for this symbol on the ‘Letters & Symbols’ menu.
Setting up the keyboard
The keyboard can be changed in almost any way you like. To start you off, we have preset it to the most widely used setting: the WinGreek Hebrew layout with vowel points available from the keypad.
The ‘Preferences -- Keyboard’ dialog has four rows of buttons. Each row relates to a section of the keyboard.
‘Letters’ can be set to the WinGreek or Israeli national layout by clicking a button. If you don’t want either, you can select the one most like your preferred layout and modify it later. Or you can click on ‘Clear All’ to remove all assignments for letter keys, and make your own layout from scratch. Take care -- this is quite laborious.
‘Symbols’ deals with the keys which are neither letters nor numbers. Click on ‘Symbols’ to give the standard US meanings to these keys. You may want to modify this later, especially if you have a non-US keyboard. ‘Clear All’ removes all assignments for these keys.
‘1st row num keys’ is normally set to give numerals, assuming that you have a big keyboard with a separate keypad, and want to put the vowel keys on that. But the numeral row can also be set to give vowel points and accents: click on the ‘Diacritics’ button. This arrangement will suit laptop users. The standard arrangement, which you can modify, is shown above, under ‘Hebrew vowels and accents’.
Mapping the numeral row to ‘Diacritics’ prevents the number keys from producing numerals. However, you can get these in two ways. Either hold down Alt when typing the numeral, or press the ‘Pause’ (or ‘Break’) key, which will cause the numeral row to work normally until you press ‘Pause’ again, when it will revert to Hebrew.
‘Keypad’ affects the keypad keys only when NumLock is on. You can choose to have these keys produce vowel points and accents, or numerals as usual. Either of these assignments can be modified later, and there is also a ‘Clear All’ button.
Please note that the standard layout includes a key that gives a menu for inserting accents and other things. When vowels and accents are set to be on the keypad, this key is Keypad 8. When vowels and accents are on the numeral row, the key is 0. When you are more used to typing Hebrew, you may wish to get the same marks more quickly by typing the same keystrokes without the menu appearing, for which you should use the ‘accent prefix’ function. You can use the keyboard mapping procedure (see next section) to assign this function to any key: the \ key is usually a good choice.
When you have the keyboard laid out to your satisfaction, click on ‘OK’. To cancel all the changes you have just made, click on ‘Cancel’. Remember that if you make a mess of things the first time you use this procedure, you can restore any part of the keyboard to a standard layout with the appropriate button in the top half of the dialog box.
Changes usually take effect immediately. If for some reason they do not, shut down Word and reboot the computer.
Mapping the keyboard by hand
The lower half of the ‘Preferences -- Keyboard’ dialog box allows you to assign any key to any character that might reasonably be used with Hebrew. In this way you can modify any of the standard layouts, or create your own.
To assign a character to a key, first scroll down to the name of the key in the left column of the left window and click on the name to select that key. Note that the list includes keys used with Alt and with Alt-Shift.
The character at present assigned to that key appears on the right of the key name in the same window. If only the key name appears, that key is unassigned and will not work.
Then select a character from the list in the right window. Click on ‘Map’ to assign this character to the key.
To delete a key assignment, select the key name in the left window and click on ‘Clear’. That key will become unassigned. Normally you will want to assign another symbol to it at once. You can also click on ‘Clear all’ to delete all key assignments -- but take care, this will involve you in remaking the entire keyboard layout.
If you are in the process of remapping the keyboard and you think you have made a mistake in the new settings, clicking on the ‘Load’ button will reload your original settings from the computer’s registry. Note, though, that the old settings will be permanently overwritten when you click on the ‘OK’ key.
Users of non-US/UK keyboards may need to make several changes to the standard layout to get everything working perfectly. Note, however, that Antioch cannot assign a character to a key which, in the national layout you are using, is already a prefix key for producing accents on various letters.
Finding Hebrew words
Click on ‘Hebrew -- Search’.
Word does not allow the typing of all the Hebrew marks in its built-in ‘find’ or ‘find and replace’ dialog boxes. To allow you to perform search and replace operations as easily as possible, Antioch provides an additional dialog box. This will transfer the search text -- a word or short phrase -- to Word’s own built-in dialog boxes. Using these dialog boxes allows you to make full use of Word’s advanced searching parameters.
When searching text that contains vowels only, with no cantillation marks, you can type only the consonants of the word and it will be found.
There is also a checkbox that allows you to type only the consonants when searching for words with vowel points and cantillation marks. To do this, Antioch adds wildcards after each consonant to match any consonant followed by at least one diacritic, apart from the last consonant of a word. You do not have to type final forms of letters either (though you can), since the procedure adds a wildcard that will find the final form as well as the medial one.
Language setting and spelling checking
No classical Hebrew dictionary file for Word exists at present, which means that no spelling checking can be done on classical Hebrew text.
In Word, it is necessary for text in classical Hebrew to be formatted as being in modern Hebrew. There is no other language setting that works. If you have a modern Hebrew spellchecker installed, this will flag words as wrongly spelt. Therefore Antioch by default turns spelling checking off while typing Hebrew.
If you are using Antioch to type modern Hebrew, and you have a modern Hebrew spellchecker, this setting can be changed with ‘Hebrew -- Preferences -- Text’ by unchecking the ‘Disable proofing tools’ checkbox. Remember to recheck the checkbox before typing any classical Hebrew.
Normally both the ‘When activating’ and ‘When typing’ boxes should be checked. This will cause Antioch to change the spellchecker status both when you select the Hebrew keyboard and when you type a Hebrew letter.
Quotation marks
When you are using the Hebrew keyboard, quotation marks will always be straight: Word’s ‘smart quote’ system doesn’t operate.
Choice of font
By default, Antioch automatically changes to the Vusillus font when you switch on any of its keyboards. You can choose a different font: the setting is under ‘Hebrew -- Preferences -- Text’. The only other Hebrew fonts that are fully compatible with Antioch at the time of the launch of this version are Ezra SIL* and Ezra SIL SR, downloadable free from http://www. sil. org/computing/fonts/silhebrew/ , and the SBL Hebrew font made by John Hudson of Tiro Typeworks, also free, from
http://www. /sblhebrew. html .
However, you can use any ordinary, non-OpeType Unicode font that has Hebrew to type text with vowel points but no cantillation marks. That includes Arial, Times New Roman, Courier, Tahoma and David. The vowel points will not be very well placed on several letters. If you have Windows Vista and Word 2007, and are experiencing delays in characters appearing on screen, choosing a non-OpenType font will speed up imaging of the text.
Registration
Registration costs $50 or its equivalent in any hard currency. When you register, we will send you a file that removes the annoying reminder message, and of course you will also get the roman version of the font. Registered users get free technical support for Antioch. Your registration will remain valid for future versions of Antioch, for the foreseeable future.
You can pay for Antioch by credit card online via a secure site run by the reputable British card handling company SWReg.. There is a link to this site from the Antioch web page, http://www. users. dircon. co. uk/~hancock/antioch. htm.
Otherwise, you can mail a cheque in US dollars on a US bank, or in sterling on a UK bank, made out to R. P. Hancock. The cost of processing any other cheque is very high (even for cheques in euros), so if you can’t manage dollars or sterling, please send banknotes to the approximate value of $50 to:
R. P. Hancock
17 Queen’s Gate Place
London SW7 5NY
England
Or you can make a direct bank-to-bank cash transfer -- here are the details. Please notify us, preferably by email to *****@***co. uk, when you have made the transfer.
Currency | Payment to | For credit to | For further credit to |
UK sterling | Citibank NA London 336 The Strand London WC2R 1HB United Kingdom | Citibank International plc account no. 5524040
| Citibank International plc Mr R. P. Hancock account no. |
US dollars | Citibank NA New York 399 Park Avenue New York, NY 10043 USA : CITIUS33 Routing number:
| Citibank NA London account no.
| Citibank International plc account no. 5524032 Mr R. P. Hancock account no. 0674783 |
Euros | Citibank NA London 336 The Strand London WC2R 1HB United Kingdom | Citibank NA London
| Citibank International plc account no. 5524148 Mr R. P. Hancock account no. |
Swiss francs | Citibank NA Zьrich SeestraЯe 25 CH--8002 Zьrich Switzerland | Citibank NA London
| Citibank International plc account no. 5524159 Mr R. P. Hancock account no. |
Japanese yen | Citibank NA Tokyo 2--1 Ohtemachi 2-chome Chiyoda-Ku Tokyo Japan | Citibank NA London
| Citibank International plc account no. 5524156 Mr R. P. Hancock account no. |
UK sorting code of the bank . IBAN of sterling account GB53 CITI 1, and of US dollar account GB31 CITI 185BIC for both accounts CITIGB2L.
You will be sent registration details and the Vusillus roman font as soon as payment is received. Don’t forget to include your email address, or postal address if you have no email or you have an account that can’t receive email attachments.
Sending Greek and Hebrew email with Outlook Express
If you want to send a piece of classical or katharevousa Greek, or Hebrew, as part of an email message, both you and the recipient must have Outlook Express, Windows Mail or some other e-mail program that can handle the Unicode* Transformation Format (UTF). Recent versions of any leading program should be able to do this. Anyone with Windows Vista or Mac OS 10 will be able to receive both classical Greek and Hebrew with vowel points (but not with cantillation marks) without any adjustment to their settings. This is true of ‘plain text’ emails: there is no need to send HTML emails specifying a particular font.
In Windows XP things are a little more complicated. You need to select a suitable display font. The procedure for Outlook Express varies slightly from one version to another: this is for OE 6. Choose ‘Tools -- Options -- Read -- Fonts’. Select ‘Unicode’ from the list at the top of the window. Under ‘Proportional font’ select any suitable font with a classical Greek set, such as Arial Unicode MS, and under ‘Encoding’ select ‘UTF-8’. If you want to send Hebrew with cantillation marks as well as vowel points, you need to select a fully equipped font such as Vusillus; for vowel points only, Arial or Arial Unicode MS are both suitable. You may need to close and restart OE before the changes take effect. This will not affect messages in the standard Western character set, which will remain as you set it.
Windows Mail, supplied with Vista, uses the Vista version of Arial as its default font. Unlike previous versions of Arial, this font has a basic classical Greek set, so you don’t need to set another font for Greek email. For Hebrew, the conditions are the same as with Outlook Express. The setting procedure is also exactly the same.
Write your message with Word, then paste it into Outlook Express and send it in the usual way. Make sure that the outgoing message is formatted as ‘Unicode (UTF-8)’; the setting is under ‘Format -- Encoding’ in the window that contains the message. A recipient whose computer has the same settings may see the message in Arial in the preview pane at the bottom of the OE window (so it may be partly illegible in Windows XP), but it will appear correctly in the designated font when the message is opened by double-clicking on its title in the upper pane -- as long as the recipient has chosen a suitable font, of course.
Uninstalling Antioch
Antioch can be removed like any other Windows program: select ‘Start -- Settings -- Control Panel -- Add/Remove Programs’. This will work even if you have installed Antioch 2 directly on top of an old copy of Antioch 1.

|
Из за большого объема этот материал размещен на нескольких страницах:
1 2 3 4 |
